EasyManua.ls Logo

kd frames KD Lounger Twin User Manual

kd frames KD Lounger Twin
4 pages
To Next Page IconTo Next Page
Page #1 background imageLoading...
Page #1 background image
PARTS
Instructions for
KD Lounger
Twin
(2) K-37-S SEAT SLAT - 37”
(2) K-37-L LOUNGER SLAT - 37”
(2) K-37-S SEAT RAIL - 37”
(8) K-33-M MIDDLE SLAT - 33”
(1) K-10-BL BACK LEG (Left) -10”
(1) K-10-BR BACK LEG (Right) -10”
K-29-P
K-15
H-19
2
(2) K-20-S SEAT SLAT CAP - 20”
(2) K-9-SL SEAT LEG - 9”
(2) K-37-B BACK SLAT - 37”
(1) K-29-P PROP CONNECTOR - 29”
(2) K-24-L LOUNGER RAIL - 24”
(2) K-11-L LOUNGER SLAT CAP - 11”
(2) K-9-LL LOUNGER LEG - 9”
(2) K-15 PROP - 15”
(2) K-31-B BACK RAIL - 31”
Press the Prop Connector (K-29-P)
onto the wood dowels on the
Props (K-15) and attach with
(2) Wood Screws (H-19).
(2) K-22-B BACK SLAT CAP - 22”
Manufactured by:
4
4
8
32
H-11
WOOD DOWEL
20
H-19
1 - 3/4” WOOD SCREW
H-8 2-1/4” CLEVIS PIN
H-5 HAIR PIN
H-12 3-1/4” CLEVIS PIN
400-B Dairy Pak Rd. • Athens, GA 30607
kdframes.com • alan@kdframes.com
(1) K-23-LC LEG CONNECTOR - 23”
Push Wood Dowels (H-11)
all the way into holes as
shown.
1
K-37-S SEAT RAIL (2)
K-24-L LOUNGER RAIL (2)
K-15 PROP (2)
K-31-B BACK RAIL (2)
K-9-LL LOUNGER LEG (2)
sku# 4833-KD-T
HARDWARE
Question and Answer IconNeed help?

Do you have a question about the kd frames KD Lounger Twin and is the answer not in the manual?

kd frames KD Lounger Twin Specifications

General IconGeneral
Brandkd frames
ModelKD Lounger Twin
CategoryIndoor Furnishing
LanguageEnglish

Summary

KD Lounger Twin Assembly Guide

Hardware Identification

Lists and quantities of all hardware components required for assembly, including clevis pins, hair pins, dowels, and screws.

Parts Identification

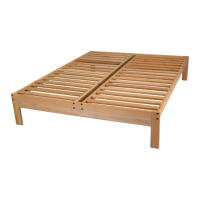
Lists and quantities of all furniture parts required for assembly, such as legs, rails, and slats.

Step 1: Push Wood Dowels

Instruction to push wood dowels fully into designated holes on lounger legs and props.

Step 2: Attach Prop Connector

Instruction to press prop connector onto wood dowels of props and secure with wood screws.

Step 3: Attach Back Rails

Attaching the back rails to the prop assembly using clevis pins and hair pins.

Step 4: Double-Check Assembly

A critical reminder to double-check the assembly at this stage for proper alignment.

Step 5: Attach Back Legs

Attaching back legs to the outside of the back rails using clevis pins and wood screws.

Step 6: Attach Seat Rails

Sliding seat rails onto clevis pins and securing them with hair pins.

Step 7: Attach Seat Legs and Rails

Attaching seat legs and lounger rails to the seat rails using clevis pins and hair pins.

Step 8: Attach Lounger Legs

Attaching lounger legs to lounger rails, pushing leg connector onto dowels, and securing.

Step 9: Attach Back Slats

Attaching back slats to back slat caps using middle slats and wood dowels.

Step 10: Attach Seat Slats

Attaching seat slats to seat slat caps using middle slats and wood dowels.

Step 11: Attach Lounger Slats

Attaching lounger slats to lounger slat caps using a middle slat and wood dowels.

Step 12: Attach Slat Decks

Pushing the seat and back slat decks down onto wood dowels and securing with wood screws.

Product Operation

Adjusting Lounger Positions

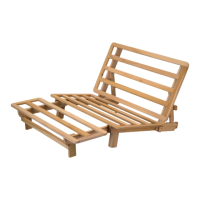
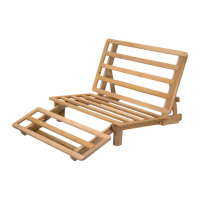
Guidance on adjusting the lounger to bed, flat footrest, and down footrest positions.

Sofa Position Adjustment

Instructions for adjusting the back to a comfortable position for sofa use.

Finishing and Care

Wood Properties and Finishing

Information on Tulip Poplar wood properties and recommendations for finishing, painting, and staining.

Finishing Recommendations

Advice on applying finishes like wax, oil, or polyurethane for wood protection.

Warranty Information

Product Warranty Details

Details the five-year warranty against defects, exclusions, and how to make a claim.

Related product manuals