Do you have a question about the Kenwood AR-404 and is the answer not in the manual?
Describes how to set the AC voltage selector switch on the rear panel for proper operation.
Outlines critical safety warnings and cautions to prevent hazards like fire and electric shock.
Instructions for carefully unpacking the unit and checking for accessories.
Lists the accessories that come with the receiver unit.
Describes the TAPE2/MONITOR jacks for monitoring recorded sound.
Explains the function for storing and recalling received stations in memory.
Details controlling other KENWOOD components via system control connection.
Highlights the use of a new transistor for improved sound quality.
Explains exclusive output circuitry for consistent sound quality.
Guides on connecting audio components to the receiver for system setup.
Explains how to operate the various functions available from the receiver.
Covers additional information like troubleshooting and specifications.
Provides steps to reset the microcomputer in case of operational issues.
Details ventilation requirements to prevent damage or fire hazards.
Outlines ventilation requirements to prevent damage or fire hazards.
Explains how to connect AM antennas using the push/insert/return lever method.
Guides on positioning and adjusting the AM loop antenna for best reception.
Details connecting indoor and outdoor FM antennas via coaxial cable.
Explains matching speaker impedance to prevent damage or malfunctions.
Details operations like Remote Control, Automatic Operation, and Synchronized Recording.
Provides important notes and cautions regarding system control connections.
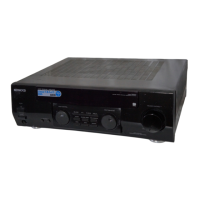
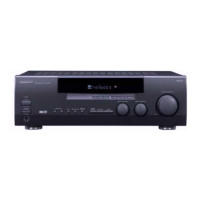
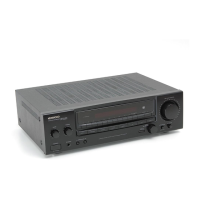
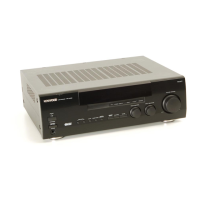
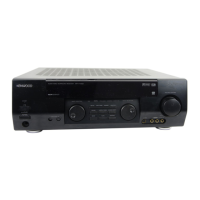
Identifies and explains the functions of buttons and knobs on the main unit.
Explains the unit's standby mode and its implications for operation.
Details the functions of various buttons on the remote control unit.
Provides notes on specific button functions and their context.
Step-by-step guide on inserting batteries into the remote control.
Explains how to operate the remote control, including range and key presses.
Explains how to select speaker systems A, B, or both for sound output.
Outlines preparatory steps before starting playback, including turning on the receiver.
Guides on selecting a source component and starting playback.
Explains how to adjust bass and treble levels using the SOUND and MULTI CONTROL.
Describes how to use the BASS BOOST key for enhanced bass.
Explains muting sound and SOURCE DIRECT playback function.
Guides on connecting headphones and adjusting speaker balance.
Guides on selecting a source and starting recording on a cassette deck.
Explains how to copy tapes from TAPE 1 to TAPE 2.
Describes how to adjust the receiver's display brightness.
Guides on adjusting input level when using the monitor function.
Guides on selecting the tuner, band, and tuning method.
Explains how to store stations into memory presets.
Guides on selecting stored stations using numeric keys.
Explains how to recall preset stations sequentially.
Provides steps to reset the microcomputer for troubleshooting.
Lists common amplifier issues like no sound and their solutions.
Lists common tuner issues like no reception and their solutions.
Lists common problems with remote control operation and solutions.
Explains items deleted from memory when power is disconnected.
Explains items deleted from memory when power is disconnected.
Warns about modifications and details FCC compliance testing.
Provides guidelines for CATV system installer regarding cable grounding.
Lists technical specifications for the audio section for USA/Canada.
Lists technical specifications for the audio section for other countries.
Lists technical specifications for the FM tuner section.
Lists technical specifications for the AM tuner section.
Lists general specs like power, dimensions, and important notes.
Section for recording model and serial numbers for service.
Covers safe connection to power supply and routing of power cords.
Covers plug polarization, unit ventilation, and operating temperature range.
Advises on placement away from heat, avoiding electric shock, enclosure, and magnetic fields.
Advises on cleaning methods, accessory use, and water precautions.
Details protection against lightning, actions for smells, and when to service.
Covers safety regarding power lines, outlets, overloading, and attachments.
Advises on using correct parts and antenna grounding.
This document describes the Kenwood AR-404/KRF-A4030 Audio Receiver, an instruction manual detailing its functions, usage, and maintenance.
The Kenwood AR-404/KRF-A4030 is an audio receiver designed to be the central hub for an audio system. It features a MONITOR function, allowing connection of a cassette deck, graphic equalizer, or surround processor to the TAPE2/MONITOR jacks. When a 3-head cassette deck is connected, it enables monitoring of the sound being recorded. The unit also includes a Station Preset function, which allows users to store and easily recall preferred radio stations.
A key feature is its Remote Controllable Audio Functions. By connecting other Kenwood source components like cassette decks and CD players via system control connections, the receiver's remote control unit can manage the basic operations of the entire audio system. This simplifies control, allowing a single remote to operate multiple components.
The receiver incorporates a "TRAIT" transistor (except for U.S.A. and Canada models), which boasts superior temperature characteristics. This technology minimizes distortion caused by temperature changes, resulting in a "pure" sound reproduction. For U.S.A. and Canada models, the unit features a K-STAT Discrete Audio Amplifier. This exclusive Kenwood-developed output circuitry includes a thermal compensation sensor within the power transistor housing. This eliminates amplifier warm-up periods and allows the amplifier to instantaneously adjust to temperature changes, significantly improving sound quality and consistency across all volume levels. K-STAT is noted as the world's first transistor specifically designed for audio amplification.
The system control operations include Remote Control, enabling operation of the unit with the supplied remote. Automatic Operation allows the input selector to switch automatically to a source component when playback starts. Synchronized Recording facilitates recording from CD, MD, or analog discs in sync with playback.
Power and Setup: The unit is designed for specific AC voltages depending on the region (U.S.A. and Canada: AC 120V only; Australia: AC 240V only; China: AC 220V only; Other countries: AC 110-120/220-240V switchable). Users must ensure the AC voltage selector switch on the rear panel matches their line voltage before connecting the power cord. The manual warns that warranty does not cover damage from improper voltage settings.
Unpacking involves carefully removing all accessories and inspecting the unit for shipping damage. It is recommended to retain the original carton and packing materials for future transport.
Connections: The receiver provides terminals for connecting AM and FM antennas. The supplied AM loop antenna is for indoor use and should be placed away from the receiver, TV, speaker cords, and power cords, with its direction adjusted for best reception. The supplied FM indoor antenna is for temporary use; for stable reception, an outdoor antenna is recommended. An FM outdoor antenna connects via a 75Ω coaxial cable to the FM 75Ω terminal.
Speaker connections involve stripping coating from speaker cords and inserting them into the push-lever terminals. The unit supports Front Speakers A and B. Users can connect a second front speaker system to the FRONT SPEAKERS B terminals. For a powered subwoofer, the SPEAKER B A key must be turned on. It is crucial not to short-circuit speaker cords and to connect left and right speakers with correct polarity to avoid unnatural sound. Speaker impedance ratings on the rear panel must be matched to connected speakers to prevent malfunctions or damage.
System control cords connect Kenwood audio components (like CD players and cassette decks) to enable integrated system control. The unit is compatible with the [SL-16] mode. It's important to connect components to the correct jacks (e.g., CD players to CD jacks, cassette decks/MD recorders to MD/TAPE jacks). The manual advises against connecting system control cords to components other than specified Kenwood models to prevent malfunction.
Basic Operation: The main unit features various controls including ON/STANDBY (1/0) key, POWER key, MULTI CONTROL knob, BALANCE key, DIMMER key, P.CALL ∧/∨ keys, VOLUME CONTROL knob, PHONES jack, SPEAKERS A/B keys, SOUND key, BAND key, AUTO key, SOURCE DIRECT key, MEMORY key, TAPE 2/MONITOR key, and INPUT SELECTOR knob. The remote control unit (RC-R0709) mirrors many of these functions with additional numeric keys, component operation keys, TUNING keys, P.CALL keys, DISC SKIP, A/B, +100 key, BASS BOOST key, and Input selector keys.
The remote control requires two AA-size batteries, inserted according to polarity markings. The operating range is approximately 6 meters, with a 30-degree angle from the sensor. It's recommended to press keys securely with a 1-second interval.
Normal Playback: To turn on the receiver, press the POWER key (U.S.A. and Canada) or ON/STANDBY (1/0) key (other regions). The speaker system is selected using the SPEAKERS A or B keys. The input source is chosen via the INPUT SELECTOR knob or remote control keys (TUNER, CD, TAPE 1/MD, PHONO, AUX). Volume is adjusted with the VOLUME CONTROL.
Sound Adjustment: Tone (bass and treble) can be adjusted using the SOUND key and MULTI CONTROL knob, with levels adjustable from -10 to +10 in 2-step increments. A one-touch low frequency emphasis (BASS BOOST) function is available via the remote control. The SOURCE DIRECT function bypasses audio processing for a direct signal path. Headphones can be used by connecting them to the PHONES jack and turning off speakers. Balance between left and right channels is adjusted using the BALANCE key and MULTI CONTROL knob.
Recording: To record, select the desired music source (other than "TAPE 1") using the INPUT SELECTOR, set the cassette deck to record, and start playback. Input level can be adjusted via the TAPE2/MONITOR key, SOUND key, and MULTI CONTROL knob when using the monitor function. Tape copying from TAPE 1 to TAPE 2 is possible.
Radio Broadcasts: Radio stations are tuned by selecting the tuner input, then using the BAND key to choose the broadcast band (FM or AM). The AUTO key selects the tuning method (auto or manual). Stations can be preset manually by tuning to a station, pressing MEMORY, selecting a preset number with MULTI CONTROL, and pressing MEMORY again. Preset stations can be recalled using numeric keys on the remote or sequentially with the P.CALL key.
Display Dimmer: The DIMMER key adjusts the display brightness through three available settings.
Troubleshooting: The manual provides guidance for resolving issues such as microcomputer malfunction (resetting by unplugging/plugging power cord while holding POWER key), no sound from speakers (checking connections, volume, MUTE, SPEAKERS switches), humming noise (checking PHONO connections, grounding), and radio reception problems (antenna, tuning, interference).
General Maintenance: The front panel or case should be wiped with a soft, dry cloth. Avoid using thinners, benzine, alcohol, or similar agents, as they may cause discoloration. Contact cleaners are not recommended as they can cause malfunctions and deform plastic components.
Safety Precautions: The manual emphasizes important safeguards:
Memory Backup: For U.S.A. and Canada models, power mode, input selector settings, volume level, broadcast band, frequency setting, and preset stations will be deleted from memory if the power cord is disconnected for approximately 3 days. For other regions, these items are deleted if the main power switch is turned off for approximately 3 days.
FCC Warning (U.S.A. only): The equipment may generate or use radio frequency energy. Unauthorized changes or modifications may cause harmful interference. Users are advised to reorient/relocate the antenna, increase separation from the receiver, connect to a different circuit, or consult a dealer/technician if interference occurs.
CATV System Installer Note: Reminds installers of NEC Article 820-40 guidelines for proper cable ground connection to the building's grounding system.
| Input sensitivity (MM) | 2.5 mV |
|---|---|
| Input sensitivity (line) | 150 mV |
| Signal to noise ratio (line) | 90 dB |
| Tuning range | FM |
| Signal to noise ratio (MM) | 75 dB |
| Speaker load impedance | 4 - 16 ohms |