Other External Components
55English
4
Set each item as follows.
■ [Camera Assignment Settings]
Set up the camera assignment. See To set up
the camera assignment settings (P.55).
■ [Rear Camera Interruption]
[ON]: Displays the picture from the rear view
camera when you shift the gear to the
reverse (R) position.
[OFF ](Default): Select this when no camera is
connected.
■ [Rear Camera for Car interface]
[ON]: Select when you connected an external
system unit. Neither buttons nor titles are
displayed.
[OFF] (Default): Select when you connected a
rear camera.
■ [Rear Camera Settings *
1]
Adjusts the CMOS-3xx series with ID 1 ("Rear
Camera") set. For details, see the instruction
manual of your camera.
■ [Parking Guidelines]
You can display parking guidelines to enable
easier parking when you shift the gear to the
reverse (R) position.
Default is “ON”.
■ [Guidelines SETUP]
If you select [ON] for [Parking Guidelines],
you can adjust the parking guidelines. See To
adjust the parking guidelines (P.56).
■ [Front Camera Settings *
2]
Adjusts the CMOS-3xx series with ID 2 ("Front
Camera") set. For details, see the instruction
manual of your camera.
■ [Front Camera Interruption *
3]
[10 sec]/[15 sec] (Default)/[20 sec]: The front
camera screen is displayed when return
the gear from the reverse (R) position.
[OFF]: Cancel.
*1 When CMOS-3xx series is connected with
this unit.
*2 To use the function, it is necessary to connect
CMOS-3xx series and to set [Camera
Assignment Settings] to [Front]. (P.55)
*3 To use the function, it is necessary to set [Rear
Camera Interruption] to [ON], to set [Rear
Camera for Car interface] to [OFF], and
to set [Camera Assignment Settings] to
[Front]. (P.55)
Ñ To set up the camera
assignment settings
1
Touch [Camera Assignment Settings] on
the Camera screen. (P.54)
2
Set each item as follows.
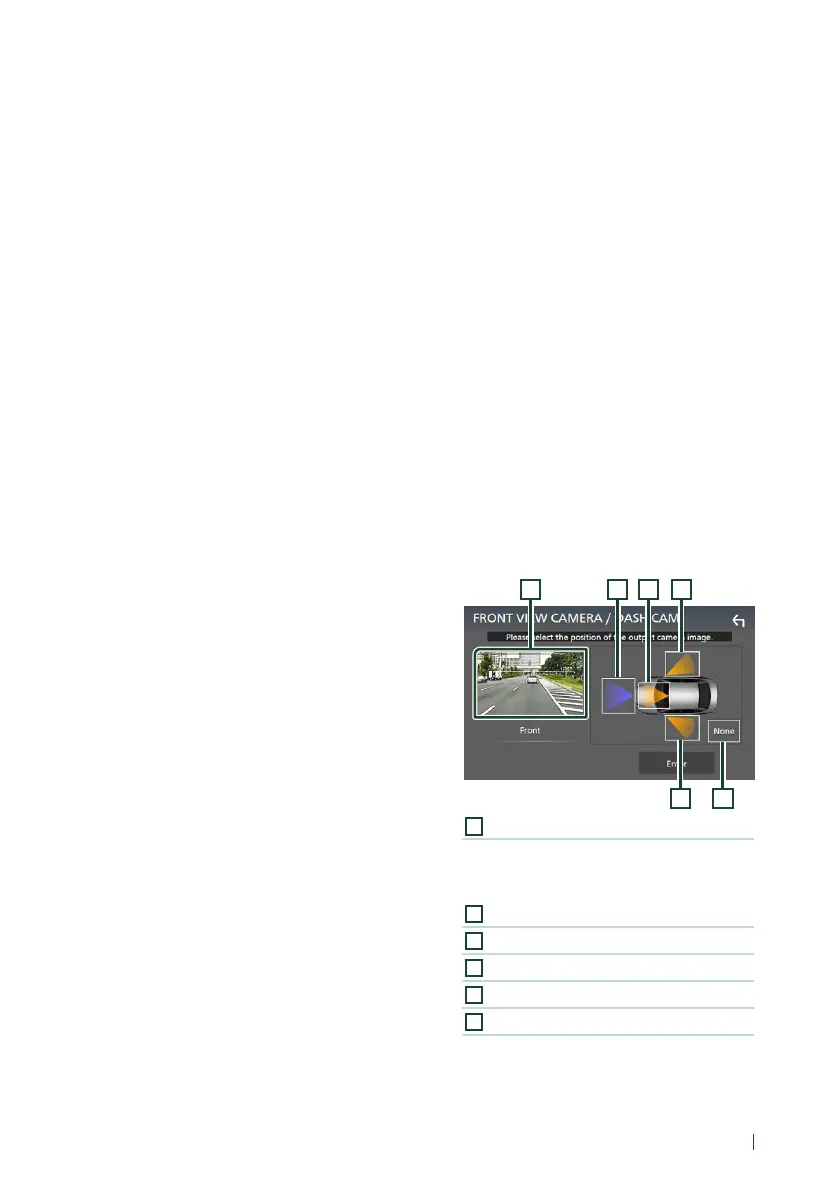
■ [FRONT VIEW CAMERA / DASH CAM]
Set the camera assignment from view
camera connected to Front view camera/
Dashboard camera input terminal.
■ [AV-IN]
Set the camera assignment from view
camera connected to AV-IN input terminal.
For Front view camera/Dashboard
camera input terminal:
1
Touch [FRONT VIEW CAMERA / DASH
CAM].
Displays the picture from view camera
connected to Front view camera/
Dashboard camera input terminal.
2
Select the view camera to set up.
2 3
5 6
41
1
Picture from view camera
Displays the picture from view camera
connected to Front view camera/Dashboard
camera input terminal. (P.85)
2
[Front]
3
[Dashboard Camera]
4
[Right]
5
[Left]
6
[None]
3
Touch [Enter].
 Loading...