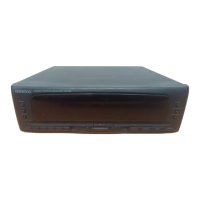
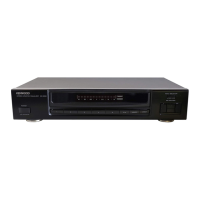
The Kenwood GE-9X is a graphic equalizer designed to enhance your audio listening experience by allowing precise control over frequency response. This instruction manual aims to familiarize you with its operating features, ensuring you can set up and adjust the GE-9X to meet your specific audio requirements.
Function Description
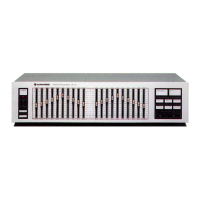
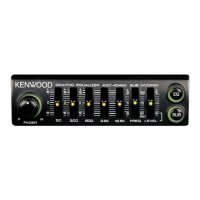
The primary function of the GE-9X is to provide graphic equalization, enabling users to adjust the frequency response of audio signals. This is achieved through a series of slide controls, each corresponding to a specific frequency band. The unit features individual channel adjustment, allowing independent control over the right and left audio channels.
The GE-9X can be integrated into your audio system's tape monitoring path, making it suitable for use with amplifiers or receivers that have tape input/output jacks. It supports connections for two tape decks (A and B), facilitating recording with two decks simultaneously or dubbing between them.
Key controls include:
- POWER switch and indicator: To turn the unit on/off and show power status.
- REC indicator: Lights up when the REC switch is active, indicating equalization is in progress during recording.
- REVERSE indicator: Shows when the NOR./REV. switch is set to "REV.", reversing the frequency response.
- NOR./REV. switch: Reverses the set frequency response, useful for specific audio effects or noise reduction.
- ATT -6 dB switch: Attenuates the input signal by 6 dB, convenient for temporary volume reduction.
- Slide controls: These are the core of the equalizer, allowing adjustment of frequency response for each channel across multiple bands.
- LOW FREQUENCY SPLITTER switch: Selects low cut frequencies (16 Hz or 32 Hz) for each channel.
- HIGH FREQUENCY SPLITTER switch: Sets high cut frequencies (12 kHz, 16 kHz, or 20 kHz) for each channel.
- REC SELECTOR switch: Selects the source signal for the TAPE A and B jacks, including options for dubbing between tape decks (REC A→B, REC B→A) and recording from the main source (SOURCE).
- INPUT SELECTOR switches: Selects the desired audio source (LINE, TAPE A, TAPE B).
- REC switch: Activates the recording function, allowing the selected signal to be sent to the REC jacks of TAPE A and TAPE B.
- EQUALIZER (ON/DEFEAT) switch: Toggles the equalization effect on or off. When ON, LED indicators on the slide controls light up.
Usage Features
The GE-9X offers versatile usage scenarios:
- Recording with equalization: You can record a signal selected via the LINE switch, with the equalization effect applied. This involves setting the INPUT SELECTOR to LINE, activating the EQUALIZER, ensuring the REC indicator is off, setting REC SELECTOR to SOURCE, and then operating your tape deck to record.
- Monitoring and recording processed signals: The unit allows you to listen to a source signal after equalization and record the processed signal on a tape deck. This is achieved by activating the REC switch (so the REC indicator lights), and following similar steps as above.
- Dubbing with equalization: The GE-9X facilitates dubbing from one tape deck to another (e.g., Tape A to Tape B, or Tape B to Tape A) while applying equalization. This involves selecting the appropriate REC SELECTOR dubbing option (REC A→B or REC B→A), playing back the source tape, and recording on the destination tape.
- Listening to tape playback with equalization: You can play back a tape from either Tape A or Tape B, apply equalization, and then record the processed signal onto the other tape deck.
Effective Use of the GE-9X
The GE-9X can be used to address various acoustic and audio issues:
- Compensating for room acoustics: In rooms with "live" acoustic characteristics and emphasized low frequencies (e.g., solid concrete walls), you can reduce the slider controls between 32 Hz and 250 Hz to achieve a flatter low-frequency response.
- Noise reduction: For hissing or residual noise (often high-frequency, above 2 kHz) from recorded tapes or amplifiers, you can boost the slide controls in the noise-prone ranges during recording (pre-emphasis) and then depress the NOR./REV. switch during playback to reverse this pre-emphasis, effectively reducing noise.
- Speaker system compensation: For compact loudspeaker systems with limited low- and high-end response, you can use the 32 Hz and 64 Hz slider controls for low-end compensation, and 8 kHz, 12 kHz, 16 kHz, or 20 kHz controls for high-end compensation.
- Eliminating tape hiss/record scratch noise: During playback, the 8 kHz, 12 kHz, 16 kHz, or 20 kHz slider controls can be adjusted to reduce annoying tape hiss or record scratch noise.
- Suppressing low frequency noise: Hum, rumble, and other low-frequency vibrations can be suppressed by adjusting the 16 Hz, 32 Hz, and 64 Hz slider controls.
- Adding "punch" to music: Emphasize low and mid-frequency bands (125 Hz, 250 Hz, 500 Hz, 1 kHz, 2 kHz) to add impact to your music.
- Spotlighting vocals: Increase the 250 Hz, 500 Hz, 1 kHz, or 2 kHz slider controls to bring out vocals from an orchestral background.
Maintenance Features
The manual provides important notes on installation and safety precautions to ensure the longevity and safe operation of the GE-9X:
-
Installation:
- Avoid direct sunlight or proximity to heating appliances.
- Do not place vases, makeup, or other liquid-containing items on the unit, and avoid humid environments.
- Ensure proper ventilation by keeping the unit at least 10 cm away from walls and avoiding covering it with records or tablecloths.
- Do not connect other high-power electrical appliances (like irons or toasters) to the AC outlet on the rear panel.
- Avoid touching the power plug with wet hands to prevent electric shock.
- Handle the power cord carefully; do not pull, bend, or extend it excessively to prevent damage. Always grasp the plug when disconnecting.
- Place the unit in a location free from vibration or excessive dust.
-
Safety Precautions:
- Never remove the case, as touching internal parts can result in serious electric shock.
- Keep metal objects (hairpins, needles) away from the power socket to prevent electric shock, especially if children are present.
-
Cleaning:
- Do not use volatile solvents such as alcohol, paint thinner, gasoline, or benzine to clean the cabinet.
- Use a silicone cloth or a clean dry cloth for cleaning.
-
Troubleshooting:
- In case of abnormal smell or smoke, immediately turn off the power, unplug the unit, and contact your dealer or Kenwood Service Station.
- A troubleshooting table is provided to help diagnose common issues like "Power not turned on," "No input signal output," "No equalization effect," or "Equalization reversed," offering potential causes and remedies. For example, if power is off, check the AC plug connection and ensure the amplifier/receiver power switch is on. If equalization is not obtained, ensure the EQUALIZER switch is set to ON and the LEDs are lit.
The GE-9X is designed for reliable performance, and Kenwood continuously advances its development, so specifications may be subject to change without notice.