26
EN
1. Select the type of installation and the relative type of motor to be installed:
WARNING! Selecting a motor dierent from the one connected may damage the system.
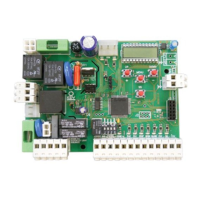
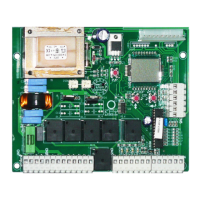
2. CHECKING CONNECTION OF THE SAFETY DEVICES (PHOTO 1 - PHOTO 2 - SENSITIVE EDGE - STOP BUTTON).
During programming, you will be asked whether there are any safety devices connected to the system. If additional safety devices are
connected later, they are simply activated in the relative menu (see advanced parameter table).
3. SAFETY DEVICES ACTIVE/DEACTIVATED DURING AUTO-LEARNING OF TRAVEL STROKE.
If there are safety devices connected, during travel stroke programming, the safety devices can be deactivated to prevent accidental
interruption of this operation. At the end of the auto-learning procedure, the safety devices selected earlier will be reactivated.
4. QUICK AUTO-LEARNING OF TRAVEL STROKE AND DECELERATIONS.
Release the motors and lock them in place again halfway through the travel stroke. If the rst motor operation is not opening, press ▲ or ▼ to
reverse the travel direction. M1 must always open before M2. If the motors are inverted, stop the procedure in the control unit by pressing button
X on the display, swap the power supply terminals of the two motors and start again from the beginning. Follow the instructions on the display.
FULL PROGRAMMING
If this programming mode is used, both the opening and the closing decelerations can be customised.
If no customised settings are made during programming, the control unit will set the default values automatically. Follow the chart below
with the programmer display.
1. Select the type of installation and the relative type of motor to be installed:
WARNING! Selecting a motor dierent from the one connected may damage the system.
2. CHECKING CONNECTION OF THE SAFETY DEVICES (PHOTO 1 - PHOTO 2 - SENSITIVE EDGE - STOP BUTTON).
During programming, you will be asked whether there are any safety devices connected to the system. If additional safety devices are
connected later, they are simply activated in the relative menu (see advanced parameter table).
3. SAFETY DEVICES ACTIVE/DEACTIVATED DURING AUTO-LEARNING OF TRAVEL STROKE.
If there are safety devices connected, during travel stroke programming, the safety devices can be deactivated to prevent accidental
interruption of this operation. At the end of the auto-learning procedure, the safety devices selected earlier will be reactivated.
4. COMPLETE AUTO-LEARNING OF THE TRAVEL STROKE AND DECELERATIONS.
Release the motors and lock them in place again halfway through the travel stroke. If the rst motor operation is not opening, press ▲
or ▼ to reverse the travel direction. M1 must always open before M2.
If the motors are inverted, stop the procedure in the control unit by pressing button X on the display, swap the power supply terminals
of the two motors and start again from the beginning.
When prompted, press the V key to set the motor’s deceleration point, following the instructions on the display.
It is important to allow for the gate’s moment of inertia and to check that the decelerations set allow the motors to brake the leaves of
the gate before they reach the limit position.
To operate the gate in manual mode and check the automation after programming of the travel stroke, proceed as follows:
N.B. COMPLETE PROGRAMMING is no longer possible in the 14A FAST control unit
Channel 1: step-by-step
Channel 2: parcial
Channel 3: open
Channel 4: lights ON/OFF (note 1)
4.4 - Operating the automation using the display programmer
4.5 - Operating the automation using the receiver
Use ▲ for step-by-step operation. Use ▼ to switch the night lights on and o. Use V for partial opening and closing to exit the property.
Note 1: The ON/OFF command switches the lights on or o in
manual mode.
If the Night Light System is active, normal operation of the system
will restart at the next cycle.
If the Night Light System is not active, pressing the switch once
forces switch-on of the lights, while pressing it again resets the
courtesy light operating logic.

 Loading...