18 Keysight M9036A Embedded Controller Startup Guide
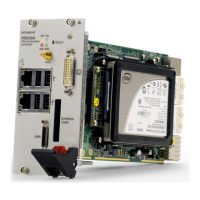
Step 3: Install the M9036A Embedded Controller
Power Down Modes
Keysight’s M9036A defaults to the Windows High Performance Power Plan. This
plan does not allow the controller display to shut off or the controller to enter a
sleep mode.
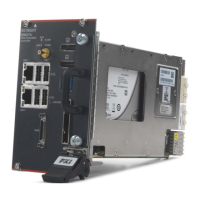
Removing the M9036A from the chassis
To remove the M9036A controller, reverse the previous procedure. Execute the
Windows shut down process on the controller first. Then power down the
chassis. Loosen the four captive screws, press down on the ejector/injector
handle and pull outwards to release the module from the backplane. Pull the
module towards you until it is free of the chassis.
M9018A PCIe Link Configuration
PCIe link configuration refers to how the PXIe chassis (such as the M9018A) PCIe
Switch Fabric is configured to connect PCI Express signals between slot 1, the
system controller slot, and the other chassis slots. For a review of the supported
PCIe link configurations, please refer to the M9018A User Guide (available from
the Windows Start button, select All Programs > Keysight > M9018A).
Keysight’s M9036A can operate with all of the PCIe fabric configurations found
on the M9018A chassis. Although the default M9018A PCIe chassis fabric is
“2-Link Configuration: 1x8” (this configuration, referred to as 1x8, provides one
x8 PCIe link from the system controller slot to the PCIe Switch Fabric) you should
reconfigure it to either 2x8 or 4x4 fabric.
The other supported PCIe link configurations are:
You should not enable the Microsoft Windows sleep mode. It is
possible that the M9036A controller could go into sleep mode
while it is running a user test program. The controller may not
have proper chassis enumeration when it wakes up.
If you have a USB keyboard with a Sleep button (sometimes this is
a key with a moon logo), do not use it.
Do not use the Sleep or Hibernate modes from the Startup Button
as shown in the following graphic.