Do you have a question about the Kiloview RE-3 and is the answer not in the manual?
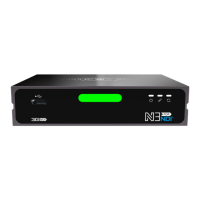
The document describes the Kiloview RE-3 Dual-Channel Video Encoding Card, a professional broadcasting, video conferencing, or other fields device designed for high-performance video encoding. It is part of the Cradle series chassis and aims to meet the demands of users seeking professional installations. The RE-3 provides a more convenient and flexible installation solution and offers outstanding video quality and stability through performance optimization.
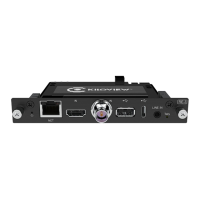
The Kiloview RE-3 is a dual-channel video encoding card that supports 3G-SDI and 4K HDMI H.265 video encoding. It is designed to be installed into a Cradle series chassis, which provides a flexible deployment and management system for the equipment. The RE-3 can be used for various applications, including professional broadcasting, video conferencing, and other video-related fields. It supports simultaneous SDI and HDMI encoding, as well as mix encoding.
1. Installation: The RE-3 card is designed for easy installation into a cardboard component with left and right card slots. The installation process involves aligning and pushing the encoding card into the slot, then tightening two hand-tightened screws on the left and right sides. When disassembling, the screws are loosened, and the card is pulled out.
2. Application Setup: The RE-3 connects to an HDMI source (e.g., a camera) and a network switch. The network switch then connects to a PC, which can be used to manage the device and stream video. The device requires an AC100-240V power supply. It is important to note that the device's included power adapter should be used to prevent damage. The device supports simultaneous HDMI and SDI inputs for separate or mixed encoding.
3. Device Discovery: Kiloview provides NDI Tools for device discovery. If the network supports DHCP, the device will automatically obtain an IP address. Otherwise, the default IP address (192.168.1.168) can be used. The Studio Monitor software can be used to monitor video sources connected to the device. The NDI streams can be discovered in the network according to different devices and channel names.
4. Live Streaming: The RE-3 allows for live streaming of video sources. The video preview window can be set to "Picture" mode by default, refreshing every 3 seconds. For better performance, the "Video" mode can be selected. The device supports various streaming protocols, including RTSP. To add a stream service, users can click "Add" on the web UI and configure the streaming type, name, service port, and session ID. The default RTSP port is 554.
5. Mix Encoding: The RE-3 supports mix encoding, allowing users to combine HDMI and SDI input video into a picture-in-picture UI. This feature enables the output to achieve the effect of multi-view display. Users can click "Video Sources Switching" to switch images between inputs and adjust the layout of the mixed encoding through "Layout settings."
6. Stream Service Configuration: The RE-3 supports multiple stream services. Users can add RTSP streams by configuring the type, name, service port, and session ID. The default RTSP port is 554. The session ID can be a combination of numbers, letters, and symbols, and it's mandatory to fill in. After saving configurations, the stream service will be displayed, and users can obtain the RTSP stream address.
7. Video Playback: The encoded video stream can be played back using VLC media player. Users can download VLC from the official website and open a network stream using the RTSP URL provided by the RE-3 device.
1. Recording: The RE-3 supports local recording by USB and NAS recording. To record, users need to insert a USB memory into the RE-3. Recording settings can be configured in the "Settings" tab of the web UI under "Record Management." This includes options for automatic recording, audio channels, format (TS), limitation, and disk policy (overwrite old records). The power supply should not be cut down during the recording process to prevent data damage.
2. Firmware Update: Firmware updates can be performed through the web UI. Users need to navigate to "Settings" > "System settings" > "Firmware Upgrade" to check for and download the latest firmware. After downloading, the firmware file can be uploaded to the device. The device will automatically restart after the update.
3. Restore to Factory Settings: If the device cannot work normally after changing parameters or forgetting the IP configuration, factory settings can be restored. This can be done via the web page by navigating to "Settings" > "System settings" > "Restore factory settings." Users will be prompted to press the RESET button for 10 seconds. Restoring factory settings will reset the login username and password to "admin," the device's IP address to the default DHCP-assigned IP or failover address (192.168.1.168), and all encoding parameters of video and audio will be restored to default values.
4. Power Management: To prolong the device's life, it is recommended to unplug the power and keep it properly when not in use for a long time.
5. Default IP Address Management: If the network does not support DHCP, the default IP address can be obtained by toggling the dip switch on the cardboard. There is a dip switch located on the upper left part of the cardboard under a yellow protective film. Peeling off the film reveals a white dip switch. Moving the switch to the ON position obtains the card board's default IP address, which is 192.168.1.168.
| Brand | Kiloview |
|---|---|
| Model | RE-3 |
| Category | Media Converter |
| Language | English |