19
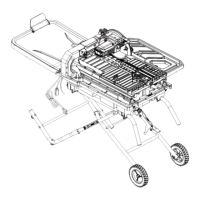
RAISING, LOWERING AND FOLDING THE
CUTTING HEAD (FIG. 6, 7)
NOTE: Always turn the saw OFF when raising or
lowering
the cutting head.
To raise the cutting head (Fig. 6):
● Loosen the cutting head lock knob (DD) and
then pull out the hold-down latch (FF) as shown
in Fig. 6-1.
● Lift the motor handle (Q) upwards, push the
cutting head assembly backwards completely
and then pull the motor handle (Q) forward
to allow the cutting head locking in position
automatically. Tighten the cutting head lock
knob (DD).
● Loosen the arm folding lock knob (AA) and
lift the cutting head up slightly to pull the arm
folding lock knob (AA) as shown in Fig. 6-2.
● Then, hold the motor handle (Q) to raise the
cutting head assembly up. Tighten the arm
folding lock knob (AA).
To lower the cutting head (Fig. 7):
● Loosen the arm folding lock knob (AA) and pull
it out, move the motor handle (Q) clockwise to
lower the cutting head. Tighten the arm folding
lock knob.
● Loosen the cutting head lock knob (DD), and
pull out the hold-down latch (FF); then, hold the
motor handle (Q) and press down to lock the
cutting head assembly.
● Tighten the cutting head lock knob (DD).
To fold the cutting head (Fig. 6-2, 7)
● Loosen the arm folding lock knob (AA) and pull
it out; then, hold the motor handle (Q) to push
the cutting head backwards to a vertical position
as shown in Fig. 6-2.
● Loosen the cutting head lock knob (DD), pull
out the hold-down latch (FF) and then push
the motor handle (Q) downwards to lower the
cutting head until hear a "click" sound to lock in
position. (Fig. 6-2, 7)
● Tighten the cutting head lock knob (DD) and the
arm folding lock knob (AA).
NOTICE: Always fold the cutting head while
transportation. Make sure that all parts of the tile
saw are locked in position without moving.
6
7
Fig. 6-1
FF
DD
Q
AA
Fig. 6-2
Fig. 6-3
AA
Q
Q
DD
FF
 Loading...