1. カメラの電源をオンにします。言語メニューが表示されます。機能ボタン
上/下、左/右を押して、言語を選択し、 ボタンを押して設定を確定しま
す。
2. 機能ボタン上/下、左/右を押して、日時を設定し、 ボタンを押して設定
を確定します。
1
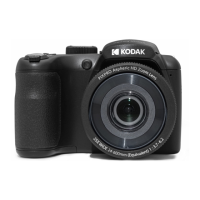
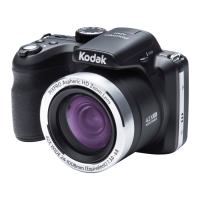
カメラの外観
2
電池の挿入
1. バッテリーカバーを開けます。
2. 電池のプラスとマイナスを確認しながら、電池を挿入します。
3. バッテリーカバーを閉めます。
3
日時/言語の設定
4
撮影の仕方
1. カメラを構えます。液晶モニターで被写体の構図を決めます。
2. ズームレバーを操作して、被写体を拡大するときはT側に回します。広い範
囲を撮影するときはW側に回します。
3. シャッターボタンを半分ほど押して、被写体に焦点を合わせます。フォーカ
スボックスが緑に変わったら、シャッターボタンを完全に下まで押して写真
を撮影します。
5
モードダイヤルの使用
カメラでは撮影シーンに応じて簡単に切り換えることができるモードダイヤルが
付いています。使用可能なモードについて、下記の一覧で説明します:
自動モード 美肌
プログラムAE パノラマモード
シャッター優先 シーンモード
絞り優先
動画モード
手動モード カスタム設定
7
メニューボタンを使います
クイックスタートガイド 日本語
6
優れた機能
1. パノラマでパニング撮影:パノラマモードでは、パノラマ写真を作成しま
す。カメラは撮影した個々の画像で、パノラマ写真を自動的に構成します。
2. 動画撮影ショートカット:撮影モードで、動画撮影ボタン
を押すと、動
画モードに切り替わって録画を開始します。動画撮影を終了するには、動画
撮影ボタン
或いはシャッターボタンを押すと、動画を保存して、撮影
画面に戻ります。
各モードとも、
ボタンを押すと設定メニューが使用可能になります。
ボタンで内容を切り替え、 設定メニューを選択し、 ボタンでメニューに
入ります。
撮影セットアップ 一般的なセットアップ
転送 ファイル・ソフトウェア
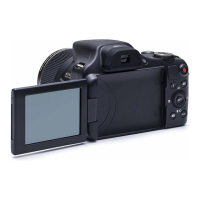
1
AFアシストビーム/
タイマーインジケーター
16 SETボタン
2 フラッシュ 17 ストラップ取り付け部
3 マイク 18 USB端子
4 レンズ 19 HDMI端子
5 液晶モニター 20 ズームレバー
6 露出補正ボタン 21 シャッターボタン
7 電源ランプ 22 連写ボタン
8 iボタン 23 動画ボタン
9 Menuボタン 24 電源スイッチ
10 DISP.ボタン 25 モードダイヤル
11 再生ボタン 26 フラッシュボタン
12 AFモード/機能ボタン上 27 スピーカー
13
フラッシュモード/機能ボタ
ン右
28 三脚ねじ穴
14
消去/セルフタイマー/機能ボ
タン下
29 電池カバー
15 マクロモード/機能ボタン左
6
5
7
クイックスタートガイド
Panduan ringkas
คู่มือการเริ่มต้นอย่างเร็ว
快速指南
快速入门指南
Quick Start Guide
1
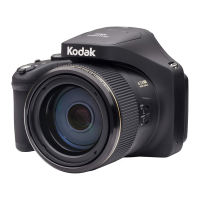
Camera Views
2
Inserting the Battery
1. Open the battery cover.
2. Insert the battery into the battery slot in the correct position as shown in the
following diagram.
3. Close the battery cover.
1.
Push ON/OFF to turn the camera on and the language menu will appear. Use
the Up/Down/Left/Right button to select a language, then press to conrm
the language.
2. Use the Up/Down/Left/Right Button again to set the date and time, and press
to conrm.
3
Setting the Date/Time/Language
4
Taking a Picture
1. Hold the camera securely.
2. Use the
Zoom Lever to select Tele or Wide positions to zoom in or out on your
subject.
3. Press the Shutter Button half way to focus on the subject. When the focus box
turns green, press the Shutter Button completely down to take the picture.
5
Using the mode dial
This camera provides a convenient mode dial that allows you to manually switch
between. Different camera settings with ease. Available modes are listed below:
Auto Mode Face Beautier
Program AE Panorama Mode
Shutter priority Scene Mode
Aperture priority Movie Mode
Manual Mode Custom Settings
7
Using the menu button
6
Additional Features
1. Panorama mode: Panorama Mode allows you to create a panoramic picture.
The camera will create a panoramic photo by stitching individual images taken
in panorama mode.
2. Using quick recording:
In shooting mode, press Recording button to begin
recording video. When you are nished, press the Recording button again or
the Shutter key to stop recording. The camera will store the video and return
to shooting mode.
To change the settings in each mode, press button, press to move
between options, select setting menu, then press button to select and
save menu option.
Photo Setup General Setup
Transmission File/Software
Quick Start Guide English
1 AF Assist Beam/Timer Indicator 16 SET Button
2 Flash Lamp 17 Strap Buckles
3 Microphone 18 USB Port
4 Lens 19 HDMI Port
5 LCD Screen 20 Zoom Lever
6 Exposure Compensation Button 21 Shutter Button
7 Status Indicator 22 Continuous Capture Button
8 i Button 23 Fast Video Recording Button
9 Menu Button 24 Power Switch
10 Display Button 25 Mode Dial
11 Playback Button 26 Flash Button
12 AF Button/Arrow Button (Up) 27 Speaker
13 Flash Button/Arrow Button (Right) 28 Tripod Receptacle
14
Delete Button/Self-Timer But-
ton/Arrow Button (Down)
29 Battery Cover
15 Macro Button/Arrow Button (Left)
8
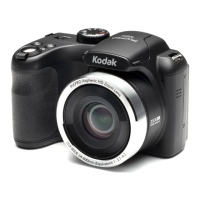
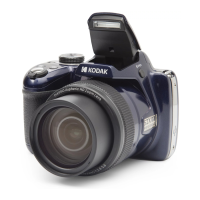
Flash Mode
Press the ash button to open the ash as needed.
8
フラッシュモード
フラッシュポップアップボタン を押して、フラッシュをポップアップさ
せます。
Printed in China
The Kodak trademark and trade dress are used under license
from Kodak.
コダックの商標およびトレードドレスは、コダックのラ
イセンスに基づき使用されます。
Merek dagang dan karakteristik visual dagang Kodak
digunakan berdasarkan lisensi dari Kodak.
Kodak และสัญลักษณ์การค้า ถูกใช้ภายใต้การได้รับอนุญาตจาก
Kodak
柯達商標及商品外觀皆獲得柯達授權使用。
柯达商标及商品外观都获得柯达授权使用。
© 2013 by JK Imaging Ltd. All rights reserved.
1411 W. 190th Street, Suite 550, Gardena, CA 90248, USA
www.kodakcamera.jkiltd.com
Licensed Product
ライセンス
商
品
Produk Berlisensi
ผลิตภัณฑ์ที่ได้รับอนุญาต
許可商品
许可商品

 Loading...