44
Reassembly
KohlerEngines.com 18 690 01 Rev. B
5. Apply a light coating of lithium grease to seal lips
after installing.
Install Governor Assembly
1. Install governor shaft through gear and add thrust
washer to shaft.
2. Install governor gear assembly into crankcase using
a press, or a drift with light taps, until tip of shaft is
78.862 mm (3.105 in.) below machined gasket
surface of crankcase.
3. Install thrust washer and cup on governor gear shaft.
4. Install thrust washer onto governor cross shaft and
slide shaft up through inside of crankcase.
5. Install second fl at washer onto shaft. Position shaft
so fl at index end of shaft faces left (9 o'clock
position). Insert hitch pin so end of pin comes in
contact with raised boss on housing, limiting inward
movement of shaft.
Install Oil Sentry
™
System
1. Mount Oil Sentry
™
fl oat into crankcase using screws.
2. Route wire lead grommet assembly through
crankcase housing.
3. Install nut onto grommet assembly external stud and
tighten securely.
Install Crankshaft
Carefully slide fl ywheel end of crankshaft through main
bearing and seal.
Install Connecting Rod with Piston and Rings
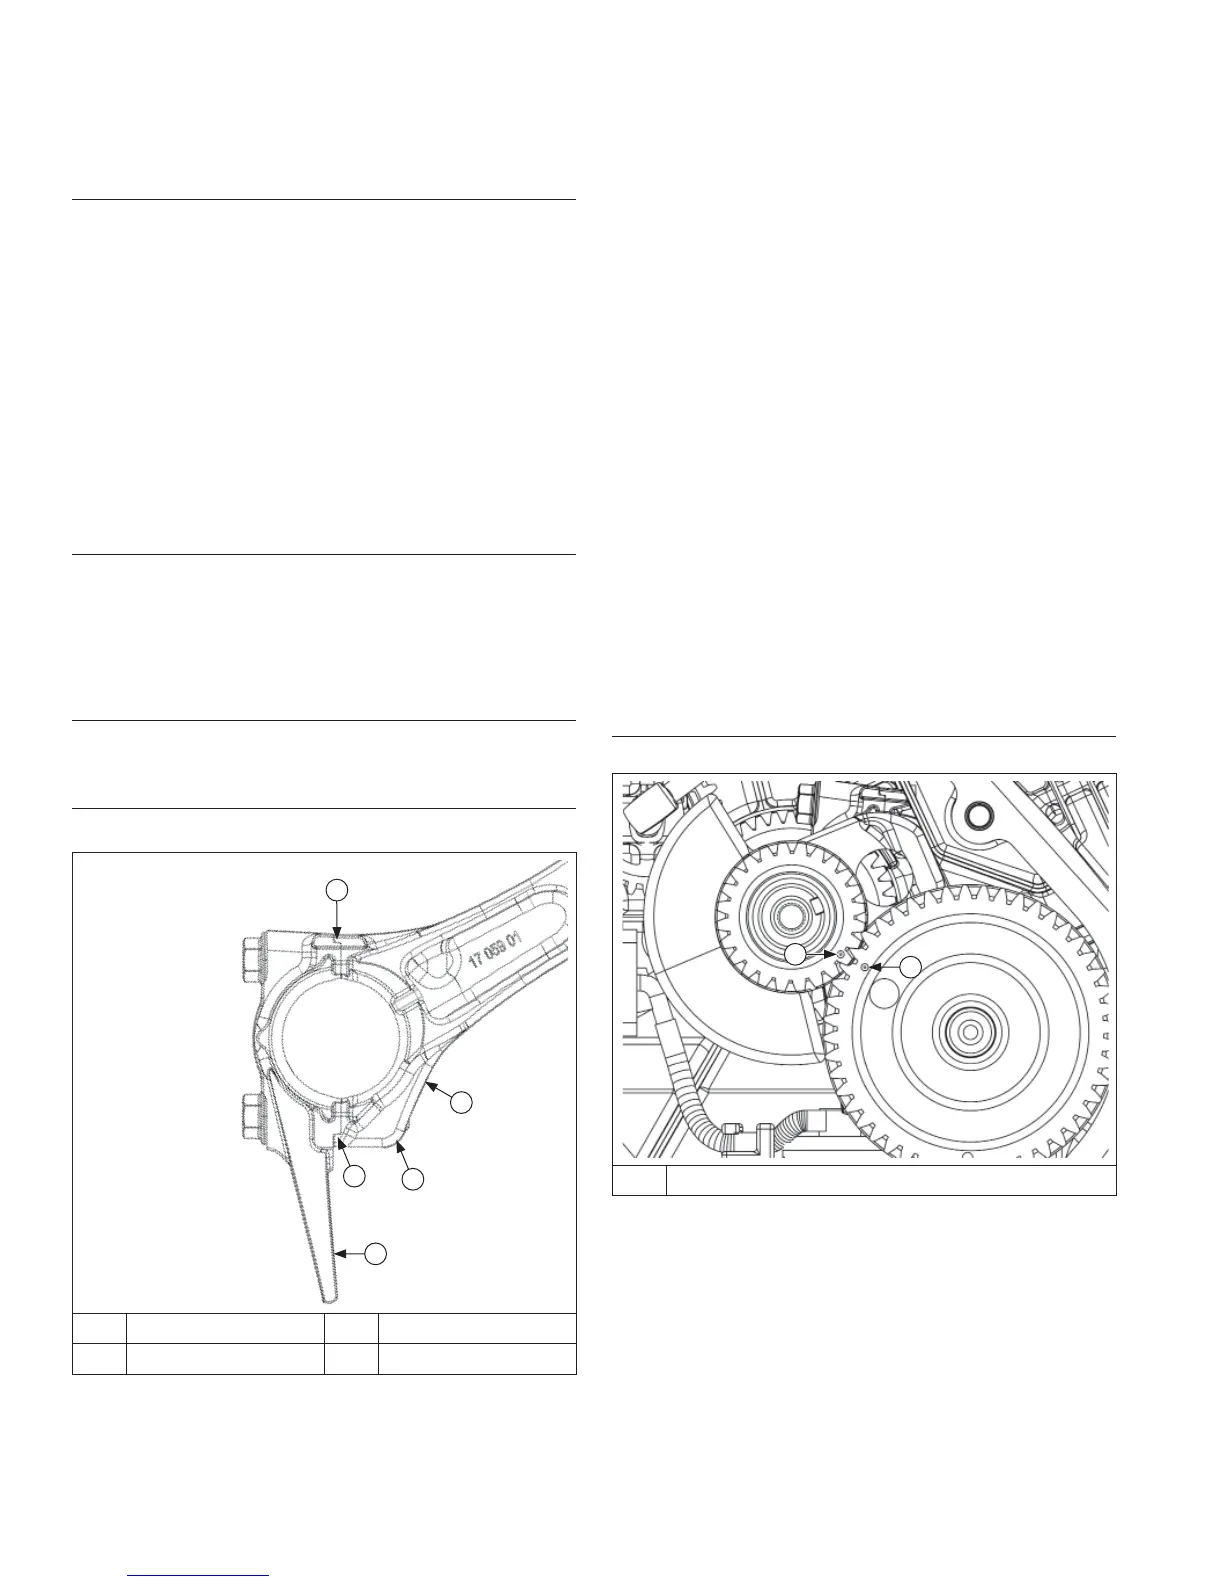
Connecting Rod Details
A
C
D
A
B
A Match Marks B Offset
C Dipper D Oil Hole
NOTE: If piston and/or connecting rod has been
changed or removed, be sure piston index mark
and end cap dipper orientation are correct
before installation.
NOTE: Install oil control ring assembly fi rst, middle
compression ring second, and top compression
ring last. Oil control ring assembly is a three-
piece design, and consists of a top rail,
expander ring, and bottom rail.
1. Install piston with index mark on piston to connecting
rod with dipper of end cap down.
2. Install connecting rod with offset down and oil hole in
4 o’clock position shown. Match marks should align
as shown.
3. Install and stagger piston rings in grooves.
4. Lubricate cylinder bore, piston, piston pin, and piston
rings with engine oil. Compress rings using a piston
ring compressor.
5. Lubricate crankshaft journal and connecting rod
bearing surfaces with engine oil.
6. Be sure index mark on piston is facing down toward
base of engine. Use a hammer handle or rounded
wood dowel and gently tap piston into cylinder. Be
careful oil ring rails do not spring free between
bottom of ring compressor and top of cylinder.
7. Install connecting rod end cap to connecting rod so
dipper is down and match marks are aligned.
8. Torque connecting rod screws in increments to
12 N·m (106 in. lb.).
Install Valve Tappets and Camshaft
Crankshaft and Camshaft Timing Marks
A
A
A Timing Marks
1. Identify valve tappets as to their proper locations.
Lubricate face and stem of each tappet with engine
oil. Install each into its respective bore.
2. Lubricate camshaft bearing surfaces and cam lobes
as well as camshaft bore in crankcase with engine
oil.
3. Rotate crankshaft to TDC so timing mark (dimple) on
crankgear (smaller gear) is in 4 o’clock position.
Install camshaft into crankcase, aligning timing
marks on gears.
 Loading...