9
Upgrade
Guide
Event Automation
Both the D32XD and D16XD support Scene Automation. Pre-
viously, only the D32XD supported dynamic Event Automa-
tion.
The D16XD’s FADER/PAN/AUTOMATION page mode has
been changed to include the same dynamic Event Automa-
tion found on the D32XD (→Manual: p.103). The D16XD is
not equipped with motorized faders, so in order to see the
dynamic automation taking place, use the Mixer View
(→Manual: p.107) or Meter Trk View (→Manual: p.97)
This change adds Automation and Event List pages
(→Manual: p.104).
Please also refer to the Operation section (→Manual: p.54).
3c. FADER/PAN/AUTOMATION
3c-1. Fader Pan
Refer to 3c-1. Fader Pan (→Manual: p.107).
3c-2. Automation
You can turn automation on and record the realtime changes
you make to the mixer settings while the song is playing back
or recording.
The recorded automation can then automatically change the
mixer settings during playback or recording.
1
4
5
2
6
7
8
3
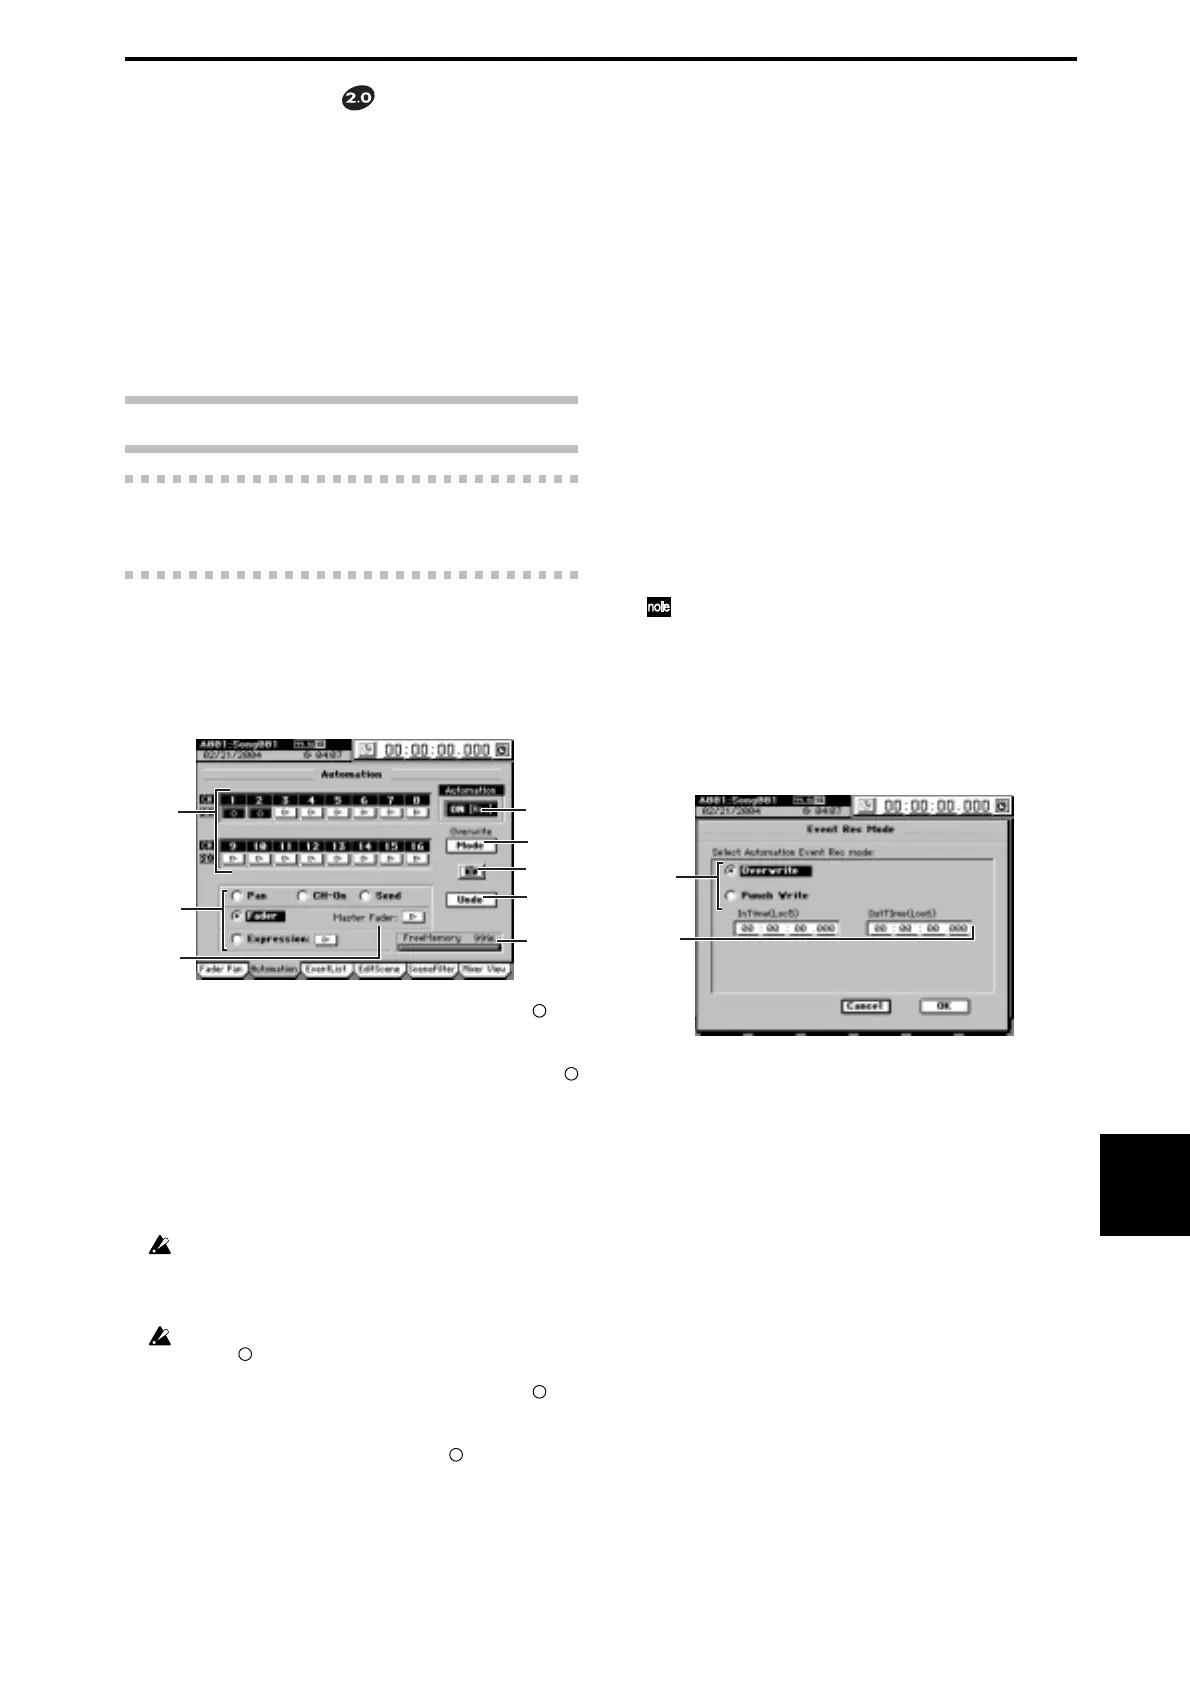
1. Record channel buttons [ , s]
Use these buttons to select the channels that you want to
record automation events. Events will be recorded for each
channel whose button you press to make it indicate
(Rec) .
2. Record parameter buttons
[Fader, Pan, CH ON, Send, Expression]
Use these buttons to select the parameter that you wish
to automate. You can select only one parameter at a time;
press a radio button to highlight the desired parameter.
If you select Send, automation will be recorded for sends whose
Send key (INTERNAL 1/2, AUX 1/2) is lit when recording
begins. However, “6. Snap Shot” will record all Send param-
eters.
If you select Expression, press the sbutton located at the side
to select (Rec) before you start recording.
3. Master Fader [ , s]
If you selected “Fader” as the record parameter, and you
want to record the operations of the MASTER fader as
well, press the s button so it indicate “
”.
4. Automation
This button turns the playback and recording of automa-
tion events on and off.
OFF: Automation playback/recording will not occur.
On (Play): Turn on the automation playback. The Au-
tomation indicator will light.
During song playback or recording, when the song
reaches the location at which an event is recorded, that
setting will be recalled, automatically changing the
settings of the mixer. The fader level will automatically
move when this occurs. New automation events will
not be recorded.
ON (Rec): Turns on the automation playback and event
recording. The Automation indicator will light.
During song playback or recording, when the song
reaches the location at which an event is recorded, that
setting will be recalled, automatically changing the
settings of the mixer. The fader level will automatically
move when this occurs. In addition, new events will
be recorded for channels whose record channel button
is set to (Rec), according to the settings of the Event
Rec Mode dialog box. When the recorder stops, this
setting will automatically change to ON (Play).
If automation is on and you have not stored any scene, the
Default Scene will automatically be selected. If you want to
edit scene-related parameters, be sure to store the scene.
5. Mode
When you press this button, the Event Rec Mode dialog
box will appear, allowing you to select the automation
recording method. Press the OK button to apply your se-
lection, or press the Cancel button to cancel it.
5a
5b
5a.Recording mode
Overwrite: Automation data will be overwritten from
the point you begin playing/recording the song until
the point where you stop. If you do not record events,
all the previously-recorded events will be erased.
Punch Write: Parameters you adjust between the In
Time (the location where you begin recording events)
and Out Time (the location where you stop) will be
recorded. Previously-recorded events will remain un-
changed in the areas where you do not record param-
eter operations.
5b.In Time, Out Time
If the recording mode is “Punch Write” and you se-
lected a parameter other than Fader as the parameter
to be recorded, these settings specify the locations at
which event recording will begin and end.
Use the LOC5 key to register the In Time (the location
at which event recording will begin), and the LOC6
key to register the Out Time (the location at which
event recording will end) (→Manual: p.38).
 Loading...