ATTENTION!
Thank you for purchasing our Apollo heated grips. Before installing, please read carefully the instruction sheet and retain it for future reference.
wh111am01b
INSTRUCTION
1.The Apollo heated grips are made to work on DC 12 volts applications only.
2.For proper installation, please follow the steps in the instruction sheet. Any damages casused by wrong installation shall be imputed to the users.
3.Opening of modifiying the heated grips will void any warranty. Maintenance should be executed by our professinals only.
PRESS THE
BUTTON
ONCE
MARK MEANING
Some procedures must be followed to avoid damages to the vehicle.
If any information in the instruction sheets remains unclear, please seek for professional assistance.
Some procedures must be followed to avoid damages to the product.
Some procedures must be followed to avoid damages to the user or others.
WARNING!
CAUTION!
READ CAREFULLY!
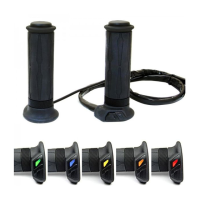
Bar-end cap x 2Heated grip x 2 Harness kit x 1
3
40%
100%
●No color mean the grips are ‘’OFF’’
●Press the button once to enter Level 1
●Level 1:
Heating Output = 20%
Color of Light - Blue
●Press the button once to enter Level 2
●Level 2:
Heating Output - 40%
Color of Light - Green
●Press the button once the enter level 3
●Level 3:
Heating Output - 60%
Color of Light - Yellow
●Press the button once to enter Level 4
●Level 4:
Heating Output - 80%
Color of Light - Orange
●Press the button once to enter level 5
●Level 5:
Heating Output - 100%
Color of Light - Red
●Press the button once to turn-Off
Press and hold the button for 3 seconds will turn-off the heated grips at any level.
The Apollo heated grips features a memory function. When the grips are switched OFF, press the control button for 3 seconds to restore
automaticaly the previous heating level.
20%
60% 80%
HEATING FUNCTION INSTRUCTION
Heated grip (Accessory 1)
Bar-end Cap (Accessory 3)
Harness Kit (Accessory 2)
Red/Positive +DC12v
(Connect to DC 12v
ignition switch)
Black/Ground wire connect to the vehicle body
or the engine. (It must be a good ground)
Fuse (4A)
ACCESSORIES
Please contact your local distrbutor if the items received are not the same as the one listed above.
NOTE
WIRING INSTALLATION INSTRUCTIONS
1
2
NOTE
NOTE