This document is an installation guide for Kraus Air Gap models KAG-1 and KAG-2, which are plumbing fixtures designed to prevent backflow in dishwashers. The guide provides detailed instructions for installation, a parts list, dimensions, and warranty information.
Function Description:
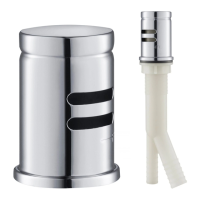
The Kraus Air Gap is a plumbing device that creates an air break between a dishwasher's drain hose and the sanitary drain system. This air break prevents contaminated water from the drain system from siphoning back into the dishwasher, thus protecting against potential health hazards. The air gap is designed to be installed on the sink deck, ensuring that the flood level mark (F/L) is at or above the flood level of the sink or other receptacle connected to the sanitary drain. The device has two inlets/outlets: a smaller diameter leg for the dishwasher outlet hose and a larger diameter leg for the drain hose connecting to a "Y" fitting or disposer.
Important Technical Specifications:
- Pre-drilled hole size requirement: 1 3/8"
- Max countertop thickness: 1 1/4"
- Dimensions:
- Overall height: 9" (227.1mm)
- Width of cap: 1 7/8" (46.3mm)
- Height of visible body above sink deck: 2 1/2" (63.0mm)
- Height from bottom of cap to top of threaded body: 1 1/4" (31.1mm)
- Hose Connections:
- Dishwasher outlet hose (inlet): 5/8" I.D. (smaller diameter leg)
- Drain hose (outlet): 7/8" I.D. (larger dimension leg)
- Materials: The specific materials are not explicitly listed, but the product is manufactured and tested to high-quality standards by Kraus USA Inc.
- Color Options (for Cap): Polished Chrome (CH), Spot Free Stainless Steel (SFS), Matte Black (MB), Oil Rubbed Bronze (ORB), Brushed Gold (BG), Black Stainless (SB), Brushed Brass (BB), Spot Free Antique Champagne Bronze (SFACB), Spot Free Black Stainless (SFSB).
Usage Features:
- Easy Installation: The guide provides a step-by-step process for installation, starting with removing the cap and nut/washer, inserting the air gap body through the sink deck hole, and then threading the cap and nut/washer back on.
- Clear Markings: The air gap body includes a "FL" (Flood Level) mark to ensure correct installation height relative to the sink's flood level.
- Secure Connections: The installation requires the use of hose clamps (not included) to secure the dishwasher outlet hose and drain hose to the air gap's inlet and outlet, respectively, ensuring leak-free operation.
- Versatile Drain Connection: The air gap's larger diameter outlet can connect to either a "Y" fitting or directly to a garbage disposer, offering flexibility in plumbing configurations.
- Aesthetic Integration: Available in multiple finish/color options for the cap, allowing it to match various kitchen faucet and sink aesthetics.
Maintenance Features:
- Durability: Kraus warrants the structure and finish of the Kitchen Accessories, including the air gap, to be free from defects in material and workmanship under normal usage for a period of one (1) year.
- Cleaning Guidelines: The warranty section advises against using abrasive cleaners such as powders, bleach, ammonia, alcohol, or chlorine, and abrasive pads, steel wool, or wire brushes, as these can damage and wear down the finish. This implies that gentle cleaning methods should be used to maintain the product's appearance and integrity.
- Replacement Parts Availability: The guide includes a "Replacement Parts" list with part numbers for the cap, nut & washer, washer, and nut, indicating that individual components can be replaced if damaged or lost. This extends the lifespan of the air gap by allowing for repair rather than full replacement.
- Customer Support: Kraus provides customer service contact information (toll-free number and email) for technical assistance, replacement parts, and warranty claims, facilitating easy access to support for maintenance and troubleshooting.
- Professional Installation Recommended: While the guide provides step-by-step instructions, Kraus recommends hiring a licensed professional for installation to ensure proper setup and adherence to plumbing codes, which can contribute to the longevity and correct functioning of the device.