GB-4
GB
Output bytes (master ▶ PFA)
Bit Byte 0 Byte 1 Byte 2
0
PFU 1
PFU 9
A
PFU 8
1
ϑ
PFU 2
A
PFU 1
A
PFU 9
2
PFU 3
A
PFU 2
PFA
3
PFU 4
A
PFU 3
P
4
PFU 5
A
PFU 4
1
5
PFU 6
PFU 5
2
6
ϑ
PFU 7
A
PFU 6
3
7
PFU 8
A
PFU 7
4
PFA 70
▷
Input/output bytes: inputs 5 bytes, outputs
5bytes.
Input bytes (PFA ▶ master)
Bit Byte 0 Byte 1 Byte 2 Byte 3 Byte 4
0
PFU 1
PFU 3
PFU 5
PFU 7
PFA
1
PFU 1
PFU 3
PFU 5
PFU 7
1
2
2
PFU 1
2
PFU 3
2
PFU 5
2
PFU 7
2
3
PFU 1 PFU 3 PFU 5 PFU 7
3
4
PFU 2
PFU 4
PFU 6
PFU 8
4
5
1
PFU 2
1
PFU 4
1
PFU 6
1
PFU 8
6
2
PFU 2
2
PFU 4
2
PFU 6
2
PFU 8
7
PFU 2 PFU 4 PFU 6 PFU 8
PFA
Output bytes (master ▶ PFA)
Bit Byte 0 Byte 1 Byte 2 Byte 3 Byte 4
0
1
PFU 1
1
PFU 3
1
PFU 5
1
PFU 7
PFA
1
2
PFU 1
2
PFU 3
2
PFU 5
2
PFU 7
1
2
A
PFU 1
A
PFU 3
A
PFU 5
A
PFU 7
2
3
3
4
1
PFU 2
1
PFU 4
1
PFU 6
1
PFU 8
4
5
2
PFU 2
2
PFU 4
2
PFU 6
2
PFU 8
P
PFA
6
PFU 2
PFU 4
PFU 6
PFU 8
7
Legend
Ready for operation
Burner start-up signal
Start-up signal, pilot burner
2
Start-up signal, main burner
P
Purge
A
External air valve control
Burner operating signal
1
Operating signal, pilot burner
2
Operating signal, main burner
Fault signal
Reset
Input signal
Output signal
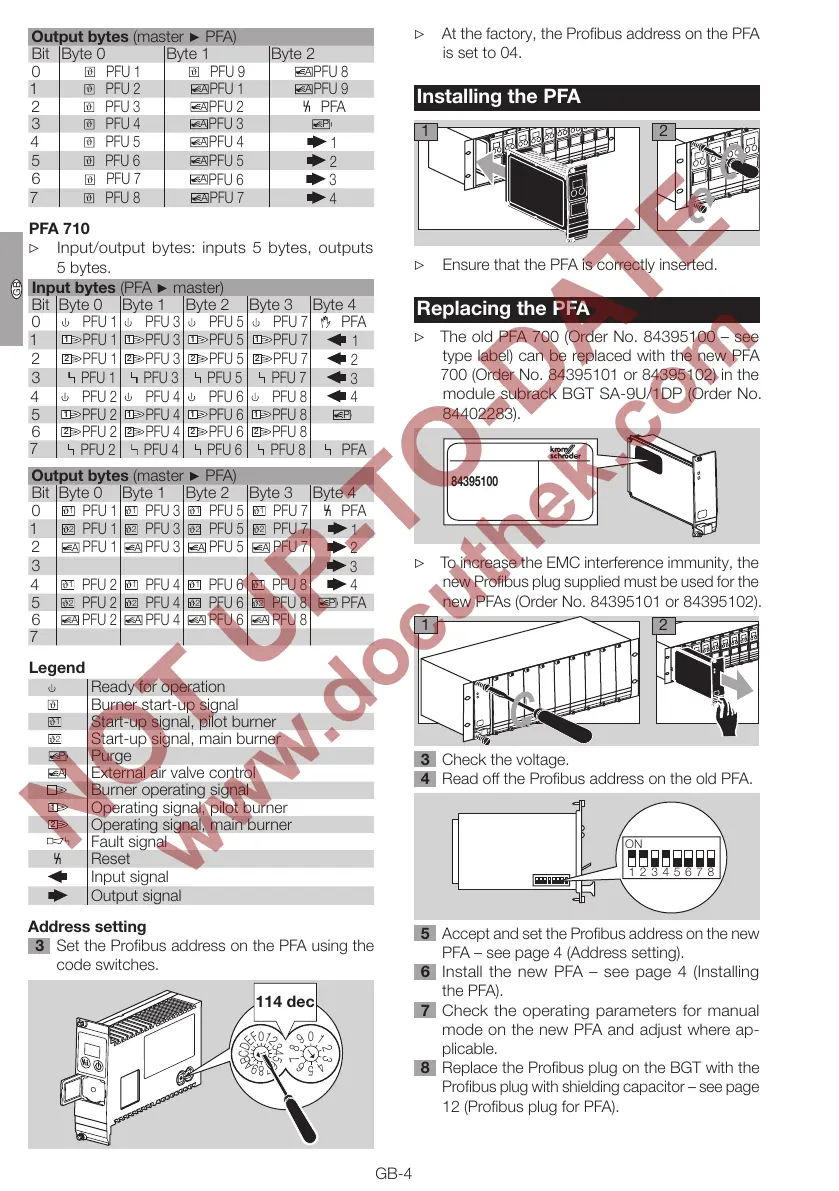
Address setting
Set the Profibus address on the PFA using the
code switches.
0
8
7
6
5
4
3
2
1
0
E
D
C
B
A
9
8
7
6
5
4
3
2
1
F
9
114 dec
▷ At the factory, the Profibus address on the PFA
is set to 04.
Installing the PFA
2
1
▷ Ensure that the PFA is correctly inserted.
Replacing the PFA
▷
The old PFA 700 (Order No. 84395100 – see
type label) can be replaced with the new PFA
700 (Order No. 84395101 or 84395102) in the
module subrack BGT SA-9U/1DP (Order No.
84402283).
84395100
▷ To increase the EMC interference immunity, the
new Profibus plug supplied must be used for the
new PFAs (Order No. 84395101 or 84395102).
2
1
Check the voltage.
4 Read off the Profibus address on the old PFA.
ON
12345678
5 Accept and set the Profibus address on the new
PFA – see page 4 (Address setting).
6 Install the new PFA – see page 4 (Installing
the PFA).
7 Check the operating parameters for manual
mode on the new PFA and adjust where ap-
plicable.
8 Replace the Profibus plug on the BGT with the
Profibus plug with shielding capacitor – see page
12 (Profibus plug for PFA).