Do you have a question about the Krups Slice/IT 213 A and is the answer not in the manual?
Select the desired cutting thickness by turning the slice thickness selector wheel from 1 to 8.
Attach the end piece holder to the food slide and guide with your left hand.
Turn the retaining screw anti-clockwise with a coin to remove the sharp blade.
Pull out the sliding table using the recessed grip after folding it up.
Turn the slice thickness selector anti-clockwise until the face plate disengages.
Unplug the slicer, fold it up, and store the cord for compact storage.
A special nonserrated ham/prosciutto blade is available separately.
KRUPS product is covered for defects in materials or workmanship for two years.
Instructions for service, repairs, and parts orders for KRUPS appliances.
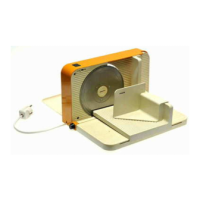
The KRUPS SLICE/IT, Model # 213 A, is an electric fold-up food slicer designed for home use, offering a range of features for efficient and safe food preparation. Its primary function is to slice various food items to a desired thickness, from very thin to approximately 2 mm (1/12 of an inch), with a maximum thickness setting of 8. This appliance is not intended for commercial applications or for slicing frozen food.
The slicer is equipped with a stainless steel cutting blade (d), which is noted as being extremely sharp, emphasizing the need for careful handling. The slice thickness is controlled by a selector wheel (a) with settings from 1 to 8. The appliance incorporates several safety features, including a safety push button (b) and a starter button (c) that must be pressed in sequence to operate the slicer.
Key components for food handling include a face plate (e), a slicing table (f), a food slide (g), and an end piece holder (h). The food slide and end piece holder are essential for guiding food safely towards the blade and protecting the user's hands, especially when slicing smaller pieces. The device also features cord storage (i) for neat organization when not in use.
Before operation, the slicer needs to be assembled. This involves unfolding the slicing table (f) and engaging the food slide (g) with the sliding table, ensuring it inserts properly into the groove between the slicer and the table. The end piece holder (h) should be unfolded and attached to the food slicer, making sure it is properly engaged with the food slide. A plate should be placed on the other side of the slicer to catch the cut food. The cord should be unwound from the cord storage (i) and guided through the small opening slot on the base, ensuring the slicer sits on a flat and even surface.
The desired cutting thickness is selected by turning the slice thickness selector wheel (a). The numbers on the top of the face plate indicate the current setting. Each number corresponds to approximately 2 mm (1/12 of an inch). After slicing, it is crucial to turn the thickness selector wheel anti-clockwise until the dots to the right of setting 1 are clearly visible. This action ensures the face plate extends over the cutting blade, covering it for safety. Turning the selector further anti-clockwise may cause the face plate to come out.
To operate the slicer, first, plug in the appliance. Place the food item on the food slide (g). Press and hold the starter button (c), then push down the safety push button (b). Once both buttons have been pressed, the slicer will start. The user can then release the starter button, continuing to hold the safety push button with their thumb. The food slide is guided with the other hand, gently pressing the food against the face plate (e) while slicing. Releasing the safety push button will stop the slicer.
For slicing small pieces, the unfolded end piece holder (h) should be attached to the food slicer and engaged properly with the food slide. The left hand guides the end piece holder and food slide, while the thumb of the right hand holds the safety push button down.
The manual emphasizes several critical safety precautions:
Before cleaning, always unplug the cord. The plastic parts of the housing can be wiped with a damp cloth; scouring agents should not be used. Detachable plastic parts are not dishwasher safe. A thorough cleaning is recommended to prevent food residues from accumulating on the machine, behind the face plate, or behind the cutting blade. The end piece holder and food slide should be removed for cleaning.
To remove the cutting blade (d), turn the retaining screw anti-clockwise with a coin. Simultaneously, gently push the cutting blade with the other hand against the slicer to prevent it from falling accidentally. Extreme caution is advised due to the blade's sharpness.
The sliding table (f) can be folded up. To remove it, pull it out using the recessed grip. The table can only be assembled in the fold-up position; ensure the two hooks opposite the recessed grip are placed inside the slicing table holder, then push the table back into position. If the sliding table does not come out, turn the slice thickness selector clockwise until the sliding table regains the exact vertical position.
To remove the face plate (e), turn the slice thickness selector anti-clockwise until the face blade disengages.
When not in use, unplug the slicer. Ensure the face plate extends slightly over the cutting blade. The slicer can then be folded up. The cord should be stored in the cord storage (i). If the sliding table does not remain in the vertical position, turn the slice thickness selector clockwise until it stays upright. For compact storage, the food slide and the end piece holder can be clipped together.
A special non-serrated ham/prosciutto blade (model #009) is available separately for slicing densely textured meats. This can be ordered from the KRUPS Customer Service Department.
The KRUPS product comes with a two-year warranty covering defects in materials or workmanship. To claim warranty service, the owner must return the securely packed product and proof of purchase to KRUPS Customer Service. It is important not to return any loose or non-defective parts to avoid damage and loss in transit. The warranty is void if malfunction is caused by accident, misuse, use on incorrect frequency or voltage, abuse (including tampering), damage in transit, or commercial use. KRUPS offers repair or replacement without delay and covers shipping costs if a receipt for regular UPS or Parcel Post charges is provided. For repairs after the warranty period, customers will be billed for material and labor. All repair work and replaced parts carry an extended 90-day warranty. For parts orders or operational questions, customers can contact the KRUPS Customer Service Department via a toll-free number. When sending the appliance for service, include the owner's name, address, appliance type number, duration of ownership, and a brief description of the defect. Only send the defective appliance itself, keeping all removable parts at home.
| Brand | Krups |
|---|---|
| Model | Slice/IT 213 A |
| Category | Kitchen Appliances |
| Language | English |