6 EEB 6500.0 USA
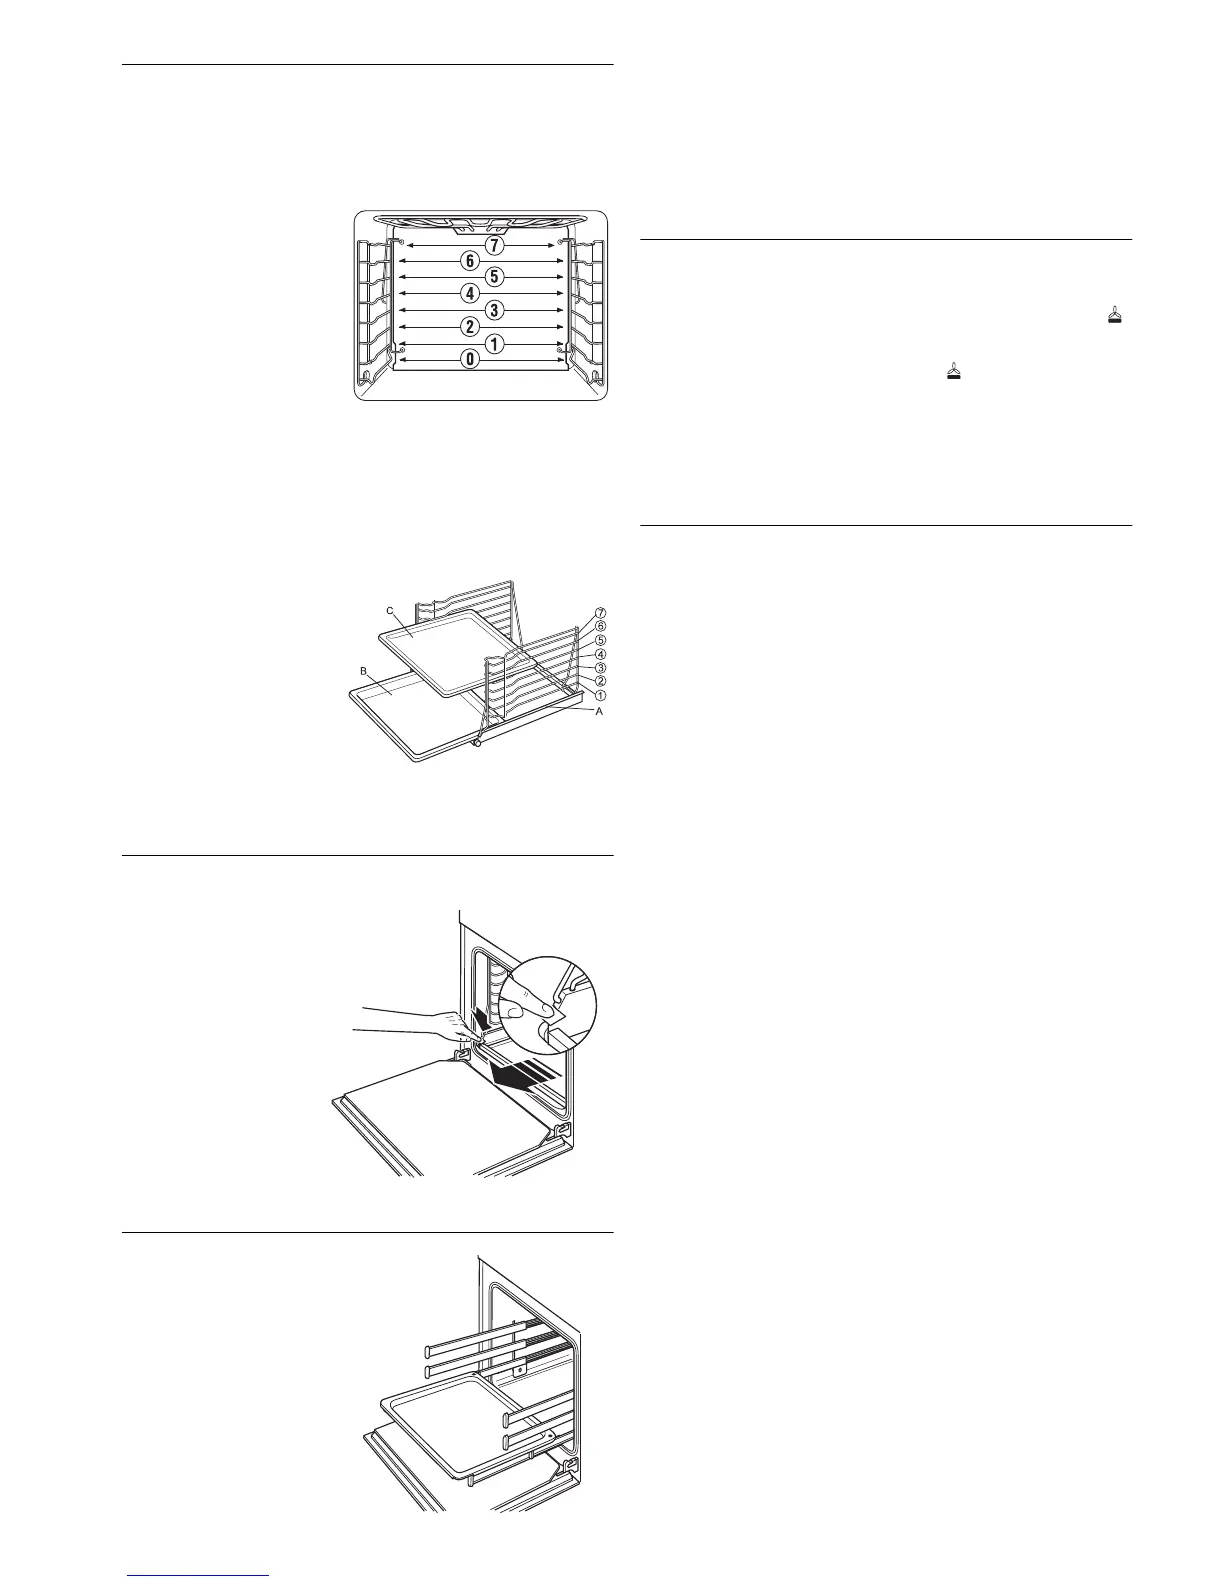
Rack levels
F
If you use telescopic glide-out shelves (acc. no. 601) please note the in-
structions on page 11!
There are eight levels in the side racks. The rack levels are numbered from 0
to 7 from the bottom up. For example, the drip pan can be inserted into rack
level 0.
Side racks:
Rack level 0 is the lowest level
possible.
backmobil
®
(acc.-no. 600A):
The backmobil
®
has seven rack levels (1-7) for oven racks and sheets and a
lowest rack level (level 0) for the drip pan (B) or the pizza stone positioned on
a oven rack. The rack levels are counted from the bottom. Rack level 0 is the
level under the first metal rod.
Example: Baking sheet (C) at the 5th rack level from the bottom and the drip
pan (B) at rack level 0.
1-7Rack levels
A Rack level 0
B Drip pan at rack level 0
C Baking tray at rack level 5
Sliding
the
backmobil
®
(acc.-no. 600)
out of the
oven
/into the oven
Sliding the backmobil
®
out of the oven
– Press down the lock at the
bottom left: The backmo-
bil
®
moves out of the ov-
en.
Sliding the backmobil
®
into the oven
– Slide in slowly until it locks
into position.
Telescopic glide-out shelves (acc.-no.601)
These are oven rails that are avail-
able as accessories. They replace
the side racks and make it easier
to work in a hot oven.
Trays or oven racks are placed on
the glide-out shelves. They can be
pulled out separately and indepen-
dently of each other. If your oven
is fitted with glide-out shelves,
please read the instructions on
page 11.
How to use your oven
F
The rack level indicated in the following sections are optimal for the slide
racks or the backmobil
®
. When using the telescopic glide-out shelves
in your oven, you’ll get the best results by following the indications for
the rack levels on page 11.
Fast preheating
F
Do not insert food for roasting or baking into the oven until fast preheating
is over and the oven has been set to the normal mode of operation.
F
An empty oven can be preheated relatively quickly on the Pizza mode .
– Close the oven door.
– Set the mode selector switch to Pizza mode .
– Set the temperature you want. The heating-up indicator will come on.
– As soon as the heating-up indicator goes off, select your desired mode.
– Put the food into the oven.
Roasting
F
Use the drip pan and the oven rack.
F
You can roast very accurately using the roasting thermometer. Please
read the notes on p. 14.
■ You should only cook meat or fish in the oven if it weighs more than 2 lbs.
■ The roasting time is determined by the type of meat you are roasting, the
quality of the meat, and the thickness of the joint. To measure the joint, lift
it slightly as it collapses under its own weight.
■ If the meat you are roasting has a layer of fat, cook it twice as long.
■ If you are cooking several small pieces of meat or small poultry in the oven,
increase the cooking time by about 10 minutes per piece. Roast a single
chicken for about an hour, roast two chickens 65-75 minutes.
F
Be sure to follow the instructions about rack levels!
Rack levels (count from bottom!):
Roasting on the oven rack
■ Cook large roasts directly in the drip pan or on the oven rack with the drip
pan inserted underneath (i.e. turkey, 3-4 chickens).
■ Turn the roast after 2/3 of the cooking time unless you are using the Hot
air convection mode
#
.
Roasting in a pan (oven)
F
Select Intensive hot air convection
0
at 350-400 °F / 180-200 °C.
■ Roast lean meats in the roasting pan with the lid closed (i.e. veal roast, mar-
inated beef, braised beef or frozen meat). The meat remains juicier that way.
■ Use any kind of pan (stainless steel, enameled, cast iron or glass) that
doesn't have plastic or wooden handles.
■ If you use an earthenware cooking pot, follow the manufacturer's instruc-
tions.
The following procedure is recommended:
– Rinse out the pan with water or grease it lightly.
– Prepare the meat with desired spices and place it into the pan. Put the lid
on the pan and place the pan on the rack in the cold oven.
– Select Intensive hot air convection 0 and set the temperature to between
350-400 °F / 180-200 °C.
Intensive hot air
convection
0
Drip pan: rack level 0, oven rack: rack level 1
Hot air convection
#
Drip pan: rack level 1, oven rack: rack level 2
Top heat/bottom heat
$
Drip pan: rack level 1, oven rack: rack level 2



 To Next Page