EasyManua.ls Logo

La Crosse Technology 925-1418 - User Manual

La Crosse Technology 925-1418
2 pages
Print Icon
To Next Page IconTo Next Page
Loading...
Model: 925-1418 www.lacrossetechnology.com/support Page | 1
Model: 925-1418
Quick Setup Guide
DC: 121914
Sensor Weather Shield
The Sensor Weather Shield is designed to protect your outdoor
sensors from rain and snow. This shield will offer limited protection
from the sun’s heat.
Temperature sensor
Temperature/Humidity sensor
Probe sensor
Cover
Bracket
Zip Tie
Slots
Mounting
Screws
UP Arrow
Shows correct
way to mount
Sensor
Base
Probe Wire
for Sensor
Hole for
Probe Wire
Upright
Question and Answer IconNeed help?

Do you have a question about the La Crosse Technology 925-1418 and is the answer not in the manual?

Summary

Sensor Weather Shield Overview

Mounting and Sensor Installation

Mounting to a Flat Surface

Instructions for securing the sensor shield base to a flat surface using a screw.

Mounting to a Wall or Post

Guide to attaching the shield bracket to a wall or post via screws or zip ties.

Inserting the Sensor

Steps for attaching the sensor with Velcro or zip tie and placing it inside the shield.

Overview

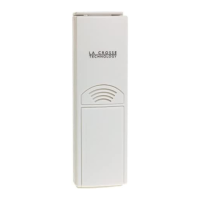
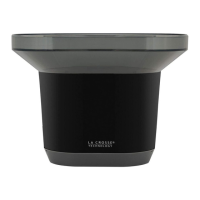
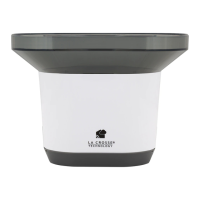
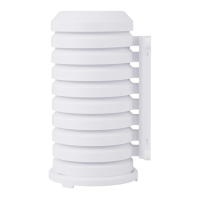
The Sensor Weather Shield is a protective enclosure designed to safeguard outdoor sensors from environmental elements, primarily rain and snow, while offering limited protection from the sun's heat. This device is compatible with various types of sensors, including temperature sensors, temperature/humidity sensors, and probe sensors, ensuring their longevity and accurate operation in diverse weather conditions.

Function Description

The primary function of the Sensor Weather Shield is to create a barrier between the delicate electronic components of an outdoor sensor and harsh weather. By deflecting rain and snow, it prevents moisture ingress that could lead to corrosion, short circuits, or malfunction of the sensor. While its main purpose is protection from precipitation, the shield also provides a degree of thermal insulation, mitigating extreme temperature fluctuations caused by direct sunlight. This limited sun protection helps maintain a more stable microclimate around the sensor, which can contribute to more consistent readings, although it is not designed for comprehensive solar radiation shielding. The design incorporates multiple louvered vents that allow for air circulation, preventing heat buildup within the shield while still keeping out precipitation. This balance is crucial for accurate ambient temperature and humidity measurements. For probe sensors, a dedicated hole in the base allows the probe wire to pass through, ensuring the sensor itself remains protected within the shield while the probe extends to its measurement point.

Usage Features

The Sensor Weather Shield offers versatile mounting options and straightforward sensor insertion, making it user-friendly for various outdoor setups.

Mounting Options:

The shield can be mounted in two primary ways: to a flat surface or to a wall/post.

  • Mounting to a Flat Surface:

    1. To begin, twist the cover clockwise to detach it from the base.
    2. Insert a single long screw through the central hole located in the base.
    3. Tighten the screw until its head is flush with the base, taking care not to overtighten, which could damage the plastic. This method provides a stable, direct attachment to a horizontal surface.
  • Mounting to a Wall or Post:

    1. First, slide the mounting bracket downwards to remove it from the cover.
    2. Observe the "UP ARROW" on the back of the bracket; this indicates the correct orientation for mounting.
    3. Select a shaded location for installation to further enhance the sensor's protection from direct sun exposure.
    4. Attach the bracket to the wall or post using the four screws provided, or by utilizing the two zip ties for attachment to a post. It is important to leave sufficient room above the bracket to allow the cover to slide onto it easily.
    5. Once the bracket is securely in place, slide the shield downwards onto the bracket until it locks into position. This method ensures the sensor is positioned vertically, allowing for optimal air circulation and drainage.

Sensor Insertion:

Inserting a sensor into the shield is a simple process designed to secure the sensor and ensure its proper functioning.

  1. Remove the Cover: Twist the cover clockwise to separate it from the base.
  2. Secure the Sensor:
    • For most sensors, attach the provided Velcro tape to both the sensor and the upright support on the base. This prevents the sensor from tipping over and ensures it remains stable within the shield.
    • Alternatively, a zip tie can be used to secure the sensor to the upright, offering another robust attachment method.
  3. Probe Sensor Specifics: If using a probe sensor, ensure that the probe wire is carefully threaded through the designated round hole in the base. This allows the probe to extend outside the shield for measurement while the main sensor unit remains protected inside.
  4. Reattach the Cover: Once the sensor is securely in place, position the cover over the sensor and base. Twist the cover counter-clockwise until it locks into place, ensuring a snug fit. It is crucial that the entire sensor fits completely within the shield to receive full protection.
  5. Final Placement: After assembly, mount the sensor shield in a location where the sensor is within the operational range of its corresponding display unit.

Maintenance Features

The Sensor Weather Shield is designed for minimal maintenance, focusing on durability and ease of access for sensor management.

  • Durable Construction: The shield is constructed from robust materials that are resistant to outdoor elements, reducing the need for frequent replacement or repair.
  • Easy Access for Sensor Management: The twist-off cover design allows for quick and easy access to the sensor inside. This is beneficial for:
    • Battery Replacement: When the sensor's batteries need to be changed, the cover can be removed without dismounting the entire shield, simplifying the process.
    • Sensor Inspection: Periodically, users may want to inspect the sensor for dust, debris, or any signs of wear. The accessible design facilitates these checks.
    • Sensor Replacement: If a sensor needs to be replaced, the process is as straightforward as inserting a new one, thanks to the modular design.
  • Cleaning: While the louvered design helps keep most debris out, occasional cleaning of the exterior may be necessary to maintain its appearance. The smooth surfaces are easy to wipe down.
  • Mounting Hardware: The use of standard screws and zip ties for mounting means that replacement hardware is readily available if needed. The design also allows for easy re-mounting or repositioning should the user's needs change.

In summary, the Sensor Weather Shield is a practical and essential accessory for anyone using outdoor sensors. Its protective capabilities, combined with user-friendly mounting and sensor insertion features, ensure that sensors remain functional and accurate, providing reliable data regardless of the weather. The design prioritizes ease of use and durability, making it a low-maintenance solution for outdoor environmental monitoring.
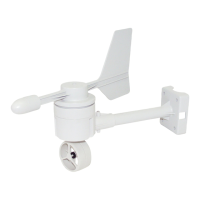
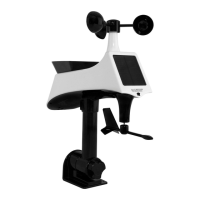
La Crosse Technology 925-1418 Specifications

General IconGeneral
TypeWireless Weather Station
Indoor Temperature Range32°F to 122°F (0°C to 50°C)
Outdoor Temperature Range-40°F to 140°F (-40°C to 60°C)
DisplayLCD
Model Number925-1418
ColorBlack
MaterialPlastic
Power2 AA batteries (not included)
Compatible ModelsLTV-W1 sensor

Related product manuals