Do you have a question about the La Crosse Technology Wattz 2.0 and is the answer not in the manual?
Explains each button's operation and purpose.
Guides on how to set the desired alarm time and snooze duration.
Explains turning the alarm ON/OFF and using the snooze function.
How to adjust brightness and position the projection image.
Steps for charging and compatible phone models.
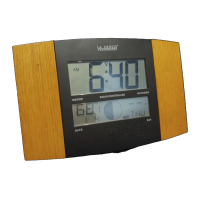
This document describes the La Crosse Technology Wattz 2.0 Projection Alarm Clock, model number C75709, a versatile 5-in-1 device designed to enhance your bedside experience.
The Wattz 2.0 serves as a multi-functional projection alarm clock with several integrated features. Its primary function is to display time, temperature, and humidity, both on its LCD screen and via a projection onto a wall or ceiling. It includes a 10W wireless charger for Qi-enabled phones, USB-A and USB-C charging ports for other devices, and an optional add-on sensor for outdoor temperature and humidity data. The alarm clock also features an adjustable backlight, auto-dim settings, and various display modes to suit user preferences.
To power up the device, insert the 9V Power Adapter into an outlet and plug it into the power jack on the bottom of the clock. Remove the insulation tab from the battery compartment. A greeting will appear on the LCD, and the clock will automatically enter the Settings Menu. To access the Settings Menu after initial startup, hold the SET button on the top of the clock. The menu order includes Beep On/Off, 12/24 Format, Hour, Minutes, Year, Month, Date, and Fahrenheit/Celsius settings. Use the +/- buttons on the top of the clock to adjust values and the SET button to confirm selections. You can exit the Settings Menu at any time by pressing the SNOOZE/BACKLIGHT button. Weekday settings will adjust automatically after the year, month, and date are set.
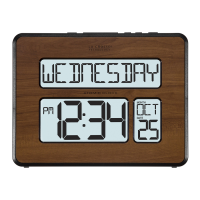
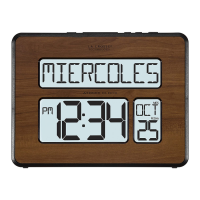
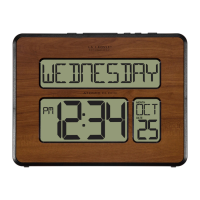
The LCD display shows various information, including AM/PM indicator, alarm indicator, time, auto-dim indicator, calendar, display modes, temperature, alarm status, auto-scroll for all modes, and a low battery indicator. To adjust the LCD display brightness, press the SNOOZE/BACKLIGHT button. There are four brightness levels and an off option.
To program the LCD display to dim automatically during preselected times, hold the SNOOZE/BACKLIGHT button to enter the Auto-Dim Settings Menu. Use the +/- buttons to turn the feature on or off, then press SNOOZE/BACKLIGHT to confirm. Adjust the starting and stopping hours using the +/- buttons, confirming each with SNOOZE/BACKLIGHT. The AUTO DIM icon will appear on the LCD when activated.
Tap the DISPLAY OPTION button on the front of the clock to select a display mode or automatically cycle through all available options. Display modes include Weekday Month + Date, Indoor Temp/Humidity, Alarm Time ON/OFF, Snooze Countdown, and Outdoor Temp/Humidity (requires an add-on sensor). The red icons on the right side of the LCD indicate the current display mode, and the cycle icon appears when Cycle Mode is active.
To set the alarm, hold the ALARM button on the top of the clock. Use the +/- buttons to set the desired time and press ALARM to confirm. Next, use the +/- buttons to set the desired snooze duration (5 to 120 minutes) and press ALARM to confirm and exit. The alarm is now active, indicated by an alarm icon on the LCD. To activate or deactivate the alarm, press the ALARM button. The alarm icon will appear on the normal time display when active. The ascending alarm feature increases in frequency over a 2-minute period. After this, the alarm will stop if not snoozed or turned off. When the alarm sounds, press the SNOOZE/BACKLIGHT button to snooze for the preselected duration. A countdown will appear, and when it reaches "00," the alarm will sound again.
The projection alarm displays time, outdoor temperature, and humidity. To adjust the projection's brightness (HI/LOW/OFF), press the PROJECTION button. The Projection Arm can be tilted forwards and backwards to adjust the image location. Use the Rotation Wheel on the Projection Arm to rotate the viewing angle. If an outdoor sensor is connected, hold the PROJECTION button to toggle between projection options (time only, outdoor temperature & humidity only, or cycle through both). If no sensor is connected, this button only adjusts brightness. Time is the default projection image.
10W Wireless Charger: Place your Qi-Enabled phone on the platform, ensuring it is centered and flush. A solid blue Charging Indicator Light indicates successful charging. A slow flash means the device is not positioned correctly or is incompatible. Removing large cases may help. Phone compatibility includes iPhone 8 or newer, Galaxy S8 or newer, and Galaxy Note 8 or newer. Adjustable Charging Coil: The Phone Charger Adjustment Handle can be slid up or down to match various phone sizes for optimal charging. USB Charging Ports: The clock has a USB Type-A and a USB Type-C charging port on the back. Connect your external device's USB charging cable (not included) to these ports. Charging times may vary, and the USB power output is 1 Amp maximum current.
The clock includes a Smart Watch Stand, Earbuds Dock, Dock Cover, and Small/Large Cable Fittings, all stored in the bottom compartment. Earbud Charging: Remove the Dock Cover, open the Accessory Compartment, and find the Earbud Dock and Cable Fittings. Feed your earbud charging cable (not included) through the Earbud Dock, securing it with the correct Cable Fitting. Wrap extra cord inside the compartment and feed the charging end through the bottom hole, then plug it into the appropriate 1 amp USB Charging Port. Smart Watch Stand: Remove the stand from the Accessory Compartment, insert it into the left side of the clock, place your watch on it, and attach its charging cord to the correct USB port. Smartwatch and charging cords are not included. Cable Organizer: Use the included Cable Organizer to keep cords neat. Insert it into the Cable Clip Keyhole and slide it down to lock. Lift and pull to remove.
An optional Thermo-Hygro Sensor can provide real-time outdoor temperature and humidity data. To set it up, insert 2 "AA" batteries into the sensor. Hold the + button on the clock to search for the sensor. Press the TX button inside the sensor to transmit a signal. The sensor's data will then be viewable on the LCD and as a projection option.
Lost Connection (Add-On Sensor): If the sensor loses connection, the clock will show "NO" after 30 minutes. The Sensor Reception Icon will disappear, and the clock will search for up to 3 minutes every hour to reestablish connection. To manually reconnect, hold the + button on the top of the clock. Dashes will show while searching, and the icon will flash until connected.
Low Battery (Add-On Sensor): The low battery icon will appear on the LCD when the sensor batteries need to be replaced.
Settings Backup: The CR2032 Battery (included) saves Time and Alarm Settings if power is lost, but projection will not show.
Consider the environment when disposing of the product. Incorrect disposal can have negative impacts. Check with local donation centers for reuse or federal agencies, local governments, and certified retailers for electronic recycling programs.
La Crosse Technology provides a 1-year limited warranty for manufacturing defects. For full details, visit www.lacrossetechnology.com/support. For detailed product videos, manuals, and support, visit bit.ly/c75709_support. For additional assistance, contact customer support online at bit.ly/contact_techsupport or by phone at 1.877.408.2678 (Monday-Friday, 8:00am to 6:00pm CST). Stay in touch via Youtube, Twitter, Facebook, and Instagram.
| Power Source | Battery |
|---|---|
| Battery Type | AAA |
| Battery Quantity | 2 |
| Display Type | LCD |
| Alarm | Yes |
| Snooze | Yes |
| Calendar | Yes |
| Temperature | Yes |
| Temperature Units | °C/°F |
| Time Display | 12/24-hour format |