EasyManuals Logo

Lab.gruppen FP 2200 User Manual

Lab.gruppen FP 2200
18 pages
To Next Page IconTo Next Page
To Previous Page IconTo Previous Page
Page #13 background imageLoading...
Page #13 background image
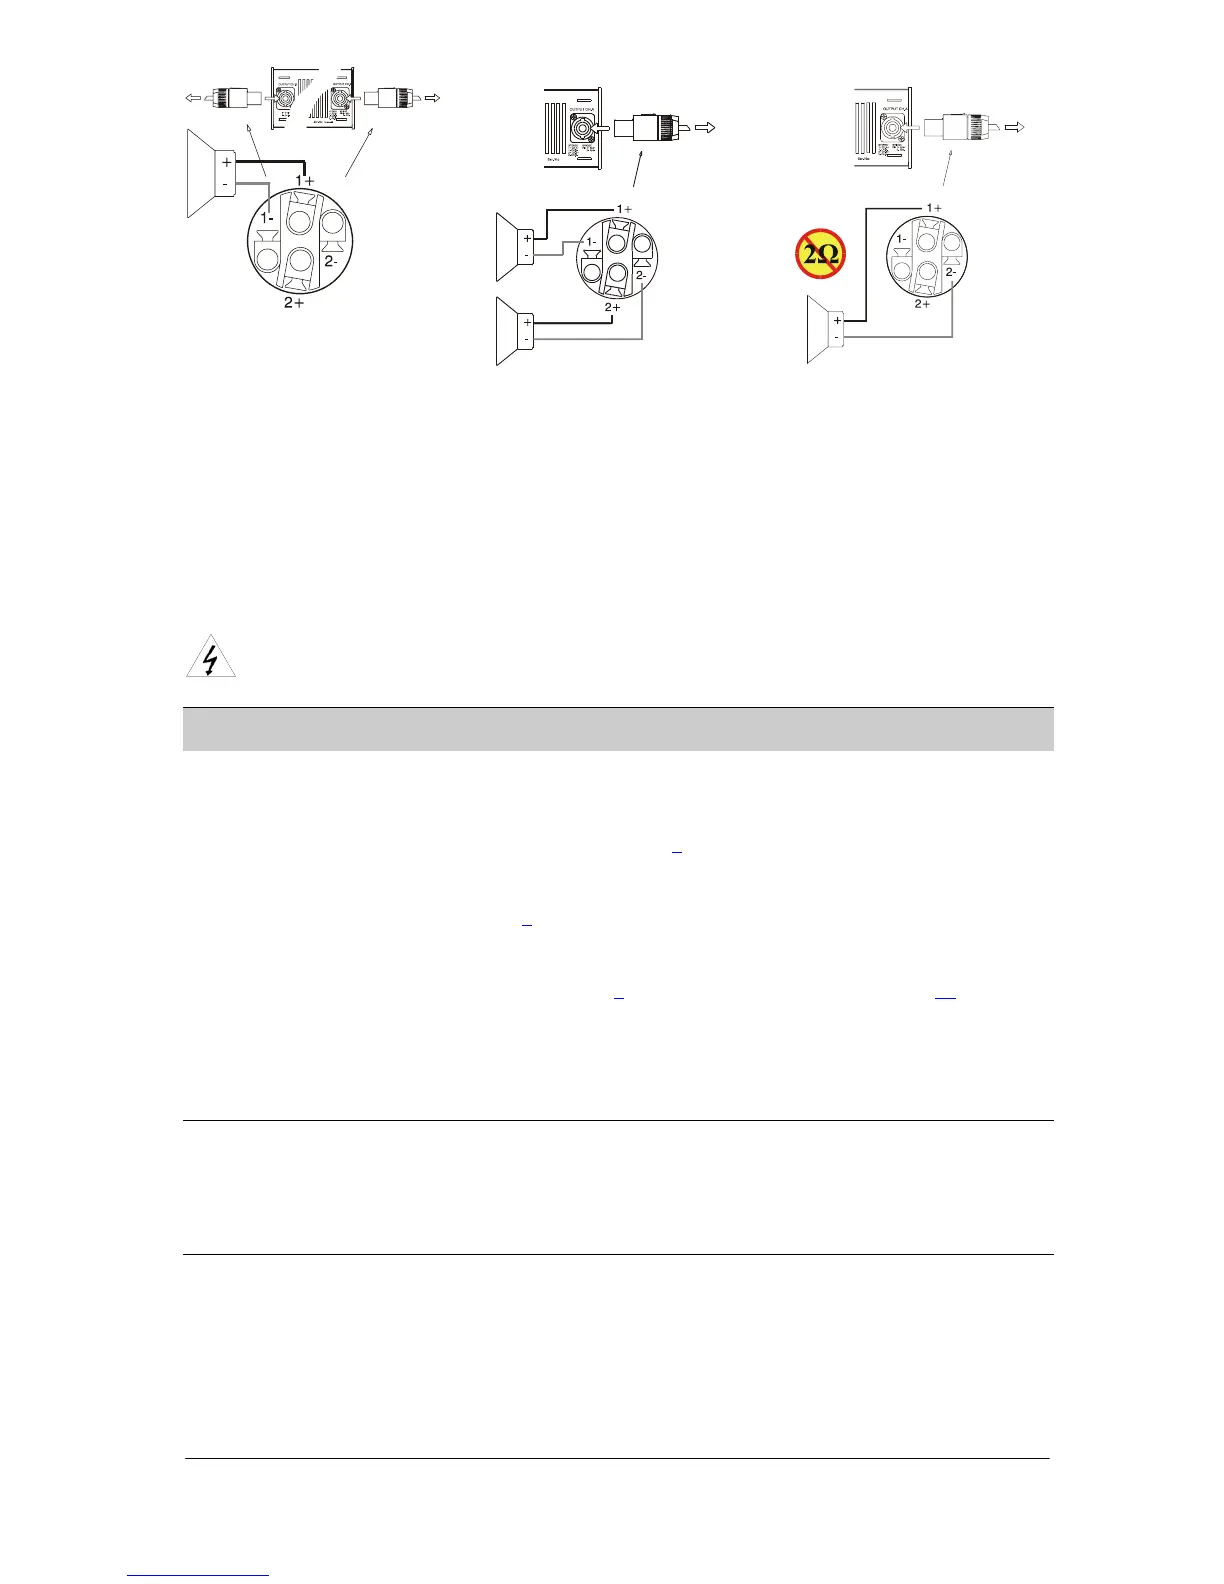
Channel A and B into two separate
Speakons
Channel A and B into one Speakon
(Stereo and Bi-amp)
Bridge mono
Never connect either output terminal to ground or to some other output or input terminal.
For regular two-channel operation connect each speaker load across the output’s positive and negative
terminals. Pay attention to speaker polarity; loudspeakers connected out of polarity degrade sound
quality, and may be damaged as a consequence.
Keep the speaker cable leads as short as possible, and use a good quality stranded speaker cable. Do not
use shielded leads, such as microphone or guitar cable. Remember that the speaker cable robs the power
of the amplifiers in two ways: by increasing the load impedance, and by introducing resistive power
losses.
WARNING: To prevent from electrical shock, do not operate the amplifier with any
portion of the speaker wire’s conductor exposed.
U= lmbo^qflk=
UKN= léÉê~íáçå=éêÉÅ~ìíáçåë=
Make sure that the power switch is set to “off” before connecting any input or output, or
operating the switches on the rear panel. See page 8
regarding installation.
Make sure that the AC mains voltage is correct, and the same as the one printed on the rear
panel of the amplifier. See page 8
regarding operating voltage and power consumption.
Make sure that the switches on the rear panel for operation modes, gain switch and clip limiter
switch are in the correct position. See page 7
regarding operation modes and page 13 regarding
clip limiters.
It is always a good idea to turn down the gain controls during power-up to prevent from speaker
damage in case of a high signal being present at the input.
UKO= mçïÉêáåÖ=ìé=Ó=pçÑí=ëí~êí=
When you power up the amplifier it takes a couple of seconds to check its circuits. This is known as the
"soft-start" or "slow-start" sequence. The fans first blow at high speed before going into "idle", and the
two bottom green LED’s illuminate to show that the amplifier is operational.
UKP= fåéìí=~ííÉåì~íçêë=
The two input level attenuators on the front panel adjust the signal level for their respective amplifier
channel in all modes. They are calibrated in dB to assist the setup of active loudspeaker systems, or to cut
down unwanted noise from the input signal.
In bridge mode both controls must be in the same position, so that the speaker load will be shared equally
between the channels.
i~ÄKÖêìééÉå== = = = = ====================== ========================NO
rëÉê=j~åì~ä===Ñm=OOMM======sÉêëáçå=MKV========OMMPJNMJMT=

Other manuals for Lab.gruppen FP 2200

Questions and Answers:

Question and Answer IconNeed help?

Do you have a question about the Lab.gruppen FP 2200 and is the answer not in the manual?

Lab.gruppen FP 2200 Specifications

Power Output IconPower Output
max output power at 8 Ω per channel (EIA)350 W
max output power at 8 Ω per channel (FTC)340 W
max output power at 4 Ω per channel (EIA)650 W
max output power at 4 Ω per channel (FTC)630 W
max output power at 2 Ω per channel (EIA)1100 W, 1175 W
max output power at 2 Ω per channel (FTC)950 W
max output power at 8 Ω bridged (EIA)1400 W
max output power at 8 Ω bridged (FTC)1300 W
max output power at 4 Ω bridged (EIA)2200 W
max output power at 4 Ω bridged (FTC)1900 W
Voltage Specifications IconVoltage Specifications
max output voltage at 8 ohms load, MLS @ 0 dB53 Vrms
peak voltage, no load77 V
slew rate40 V/µs
Distortion and Noise IconDistortion and Noise
THD 20 Hz–20 kHz and 1 W to full power0.03 %
THD @ 1 kHz and –1 dB under clip0.006 %
DIM 30 at –3 dB under clip0.008 %
hum and noise<–110 dB
channel separation @10kHz70 dB
Input Specifications IconInput Specifications
gain, selectable20, 23, 26, 29, 32, 35, 38, 41 dB
impedance20 kohm
common mode rejection50 dB
Power Requirements IconPower Requirements
operation voltage (230 V version)130 V–265 V AC
operation voltage (115 V version)65 V–135 V AC
minimum start voltage (230 V version)175 V
minimum start voltage (115 V version)85 V AC
full output power at 4 ohms (230 V version)180 V–265 V AC
full output power at 4 ohms (115 V version)90 V–130 V AC
peak inrush current (soft start limited)5 A
Current Draw IconCurrent Draw
quiescent power (no load) (230 V version)0.9 Arms
quiescent power (no load) (115 V version)1.8 Arms
1/8 of full power (–9 dB) (230 V version)5 Arms
1/8 of full power (–9 dB) (115 V version)10 Arms
1/3 of full power (–5 dB) (230 V version)8 Arms
1/3 of full power (–5 dB) (115 V version)16 Arms
at full power (0 dB) @1 kHz 1% THD (230 V version)14 Arms
at full power (0 dB) @1 kHz 1% THD (115 V version)28 Arms
Weight and Dimensions IconWeight and Dimensions
net dimensions (mm)483 W ✕ 88 H ✕ 287 D
net dimensions (inch)19˝ W ✕ 3.5˝ H ✕ 11.3˝ D
shipping dimensions (mm)560 W ✕ 180 H ✕ 500 D
shipping dimensions (inch)22˝ W ✕ 7.1˝ H ✕ 19.7˝ D
net weight7.9 kg (17 lbs)
shipping weight9.6 kg (21.2 lbs)