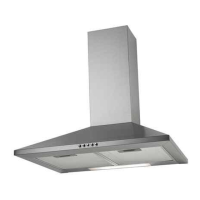
This document is a user manual for the Lamona 90cm Chimney Extractor, model HJA2540 (Stainless Steel), manufactured for Howdens Joinery Co. It provides comprehensive information on the product's function, installation, operation, and maintenance.
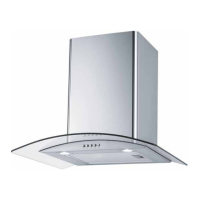
The Lamona 90cm Chimney Extractor is designed to remove unwanted odours, steam, and condensation from the kitchen. It offers two methods of extraction: ducting to the outside atmosphere or recirculating air through charcoal filters. The choice of extraction method is made during installation, and both systems are detailed in the manual. When ducting to the outside, charcoal filters are not required. For recirculation, charcoal filters are essential to minimize odours. The appliance is intended for domestic use and should not be used with a naked flame in direct contact with the grease filters or within the extractor hood. The light on the appliance should only be used during the operation of the cooker hood and not as a permanent lighting source.
Important Technical Specifications:
- Power Supply: 230/240V ~ 50Hz
- Rating: 220 W
- Fuse Rating: 3 A
- Light Bulbs: 2 x S.E.S. Lamps 40 W each
- Recommended Fixing Height Above Worktop: 750mm (Minimum 700mm)
- Ducting Tube Length (Maximum): 3 metres
Parts Identification:
The product package includes:
- Extractor Hood
- Two-piece Telescopic Decorative Chimney (Upper and Lower sections)
- Bag of Wall Fixings and Screws
- Two Wall Fixing Brackets (Upper and Lower Chimney Brackets)
- Ducting Connector
- Recirculation Deflector
- Wall Fixing Template Drawing
Installation Features:
Installation is recommended to be carried out by two people.
- Preparation: Remove grease filters to access lower hood fixing holes.
- Mounting: Mark and drill six holes (6mm diameter) for the extractor and lower chimney bracket. Screw in the top two hood securing screws (A) first, leaving approximately 2mm between the screw head and the wall. Locate the hood on these screws and tighten. Fit the remaining two securing screws (B) from inside the hood.
- Glass Canopy: Carefully attach the glass canopy to the extractor body using provided screws and washers.
- Ducting Connection: Connect the ducting connector to the top of the hood.
- Ducting Mode: Connect an external ducting kit to the extractor's outlet. Ensure the ducting tube is as short as possible with minimal bends (maximum 3 metres). Ducted air must not be discharged into a flue used by other non-electric appliances. Adhere to local authority requirements for exhaust air discharge. Adequate room ventilation must be provided when the extractor is used with other non-electric appliances. Never duct into a central heating duct. It is strongly advised to fit exterior outlets with a non-return valve or louvered slatting.
- Recirculation Mode: Connect the recirculation deflector to the chimney section. Attach two charcoal filters (HJA2900 - pack of 2) to the sides of the motor inside the hood. Charcoal filters are not needed if ducting out.
- Decorative Chimney Fitting:
- Secure the lower chimney bracket to the wall.
- Slide the upper chimney section inside the lower section and fit it into the recess on top of the hood, ensuring the return flanges fit into the recesses on the lower chimney bracket.
- Secure the upper chimney bracket to the wall vertically above the lower fixing bracket, adjacent to the ceiling.
- Extend the upper chimney section to the ceiling and secure it to the upper chimney bracket.
- Fit the grease filters to the hood.
- Electrical Connection: The appliance must be connected to fixed wiring via a double pole switched fused spur outlet with at least 3mm contact separation. The isolation switch must be accessible after installation. A qualified electrician is recommended for connection. The blue wire is Neutral (N/BLACK), and the brown wire is Live (L/RED). Ensure the electricity supply is switched off before connecting.
Usage Features:
The extractor controls are located on the front panel and include:
- Motor On Lamp: Indicates when the motor is running.
- Motor Off Switch: Turns the motor off.
- Light Switch: Controls the extractor's lights.
- Motor Speed Selectors (1, 2, 3): Allows selection of three different motor speeds for varying extraction needs.
Maintenance Features:
- Safety First: Always disconnect the electrical supply before cleaning or performing any maintenance.
- General Cleaning: Wipe external surfaces regularly with warm water and a mild detergent. Abrasive cleaners should never be used.
- Grease Filters: Made of metallic material, these filters should be washed using a neutral detergent or in a dishwasher.
- Removal: Press the latch towards the side of the extractor and lower the filter to remove.
- Importance: Ensure grease filters are in position before operating the extractor to prevent fire hazards from grease deposits.
- Carbon Filters (for recirculation mode): These filters have a limited life and should be changed when a noticeable drop in performance occurs, typically every 6 months, depending on usage.
- Access: Remove the grease filters first.
- Replacement: Remove old filters and reposition new charcoal filters (HJA2900 - pack of 2).
- Light Bulbs:
- Replacement: Ensure power is switched off and bulbs are cool. Remove grease filters to access bulbs. Unscrew and replace with a new lamp of the same type and wattage.
- Note: Lamp replacement is not covered by the guarantee.
Troubleshooting:
A simple fault-finding guide is provided:
- Halogen Lamps Fail to Operate: Check if the lamp is correctly fitted. Disconnect mains electricity before replacing. Do not touch lamps with bare fingers; use a cloth. (Lamps are not covered by guarantee).
- Motor On but Fan Inefficient: Check and clean grease filters. If clean, check carbon filters (if fitted) and replace if they haven't been changed in over six months. Accumulated grease can reduce efficiency.
- Works Normally but Cooking Smells Linger: In recirculation mode, change the charcoal filter.
- Appliance Does Not Work At All: Check if the extractor is switched on at the mains and if there is power to your home (e.g., by checking adjacent lights).
- Still Not Working: If issues persist after troubleshooting, contact the Lamona Service Line.
Guarantee and Support:
The appliance comes with a comprehensive manufacturer's guarantee covering breakdown repairs, details of which are on the proof of purchase document.
- Guarantee Conditions: Claims must be accompanied by proof of purchase. The product must be correctly installed and operated for normal domestic purposes. The guarantee does not cover accidental damage, misuse, alterations, or repairs by unauthorised persons.
- Reporting a Fault: Have the product's model and serial numbers, Howdens Proof of Purchase document, and full contact details ready.
- Lamona Service Line: 0845 00 60 006.
Lamona maintains a policy of continuous improvement and reserves the right to adjust and modify its products without prior notification.