3. Register & Update (Cont.)
Quick Start Guide
2. Network Setup
3. Register & Update
The tablet has dual built-in wireless communication modules. One is used to communicate
with the VCI device, and the other allows the tablet to get online. Once you're online, you can
register your tool, update the diagnostic software & APK, surf the Internet and send email on
your network.
If the VCI device is successfully activated, the tablet will automatically obtain the VCI ID and
connect to it. In this case it is not necessary for the user to manually configure it again. Hence
user only needs to set the WLAN connection.
*Note: For details on how to activate the VCI device, refer to Section 3. Register & Update.
Follow the steps below to proceed:
->
the tablet
the tablet
*Note: Once WLAN is set as ON, the tablet will consume more power. While it keeps unused, please
set it off to save power. While WLAN is not in use, please turn it off to conserve battery power.
1. On the home screen, select Tablet Settings WLAN.
2. Slide the WLAN switch to ON, will start searching for all available wireless
networks.
3. Select a wireless network:
If the chosen network is open will connect automatically.
If the selected network is encrypted a network password will need to be entered.
1. Launch App: On the home screen, tap “Login” on the upper right corner of the screen, a
dialog box similar to the following will pop up on the screen.
a. If you are a new user, tap on “New Registration” to start your sign-up. Refer to Steps 2-4.
b. If you have registered to be a member, type in the username and password and tap on
“Login” directly.
c. If you forgot the password, tap on “Retrieve password” to set a new password.
2. Create an App Account: Tap on “New Registration” in Figure A, input the information
(items with * must be filled) and then tap on “Register”. Refer to Figure B.
3. Activate VCI Connector: Input the Product S/N and Activation Code (can be obtained
from the Private & Confidential Sheet), and then tap on “Activate”. Refer to Figure C.
4. Finish Registration: To download the diagnostic software, tap on “Yes” to navigate to the
download page. Tap on “No” to download and install it later.
On the download page, tap on “Update” to start downloading until it is complete.
Select Country
*
Email
*
Confirm Password
*
Password
*
Username
*
CAPTCHA CAPTCHA
Register
2 3
1
Create an Account
Activate VCI
Finish Registration
Register
B
Create an Account
Activate VCI
Finish Registration
Register
1 3
2
Serial Number
Activation Code
Where is my activation code?
>> Skip
Activate
C
Register
1
2
3
Yes
No
Congratulations! You have registered successfully. Do you download vehicle
software now?
Create an Account
Activate VCI
Finish Registration
D
LAUNCH
Login
Username
Password
Retrieve password
New Registration
Login
a
b
c
1). OBD II Vehicle Connection
the vehicle’s OBD II DLC.
Connect one end of the OBD II extension cable to the OBD-16 connector, and the other end to
A. For Passenger Cars:
B. For Commercial Vehicles:
2). Non-OBD II Vehicle Connection
VCI Device
VCI Device
OBD I Adaptor
OBD II Extension Cable
Non-16pin Connector
Adaptor Cable
To Vehicle’s DLC
To Vehicle’s DLC
Cigarette Lighter Cable/
Battery Clamps Cable
Cigarette Lighter Cable/
Battery Clamps Cable
To Cigarette Lighter Receptacle/
To Vehicle's Battery
To Cigarette Lighter Receptacle/
To Vehicle's Battery
If the power supply on vehicle diagnostic socket is insufficient or the power pin is damaged,
you can get power in the following ways:
1. Locate Vehicle’s DLC
The DLC (Data Link Connector) is typically a connector
where diagnostic code readers interface with the
vehicle's on-board computer.
For commercial vehicles, it is generally located in the
driver's cab.
For passenger cars, it is usually located on driver’s side,
about 12 inches away from the center of dashboard. See
Figure DLC Location.
Quick Start Guide
5. Start Diagnostics
LAUNCH
4. Vehicle Connection
*Note:
suggested to check for updates on a frequent basis and
keep synchronized with the latest available software.
For more detailed operations, please refer to the User
Manual.
To enjoy more and functions, you are capabilities
Preparation
Before diagnosing a vehicle, please make sure the
following:
ü Switch the ignition on.
ü
~ 14V or 18V ~ 30V.
ü Throttle should be in a closed position.
Vehicle battery voltage range should be 11V
Statement: LAUNCH owns the complete intellectual property rights for the software used by this
product. For any reverse engineering or cracking actions against the software, LAUNCH will
block the use of this product and reserve the right to pursue their legal liabilities.
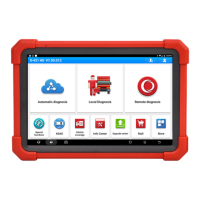
There are three kinds of diagnosis approaches available on the tablet: Intelligent Diagnosis,
Manual Diagnosis and Remote Diagnosis.
Intelligent Diagnosis:
Through simple wireless communication between the tablet and VCI device, you can easily
get the VIN (Vehicle Identification Number) information of the currently identified vehicle.
Once the VIN is successfully identified, the system will retrieve it from the remote server and
then guide you to vehicle information page without the necessity of step-by-step manual
menu selection. *Note: This method only applies to the passenger vehicles.
Manual Diagnosis:
In this mode, you have to diagnose a vehicle by performing the menu-driven command
manually. For new users, please follow the operation chart shown below to get familiar with
and start using this tool.
Tap on "Local Diagnose"
Select vehicle
Follow the prompts
on the screen
Select software version
and tap on “OK”
2. Vehicle Connection
DLC Location
If the DLC cannot be found, refer to the vehicle’s service manual for the exact location.
For more product information, please visit:
www.x431.com www.cnlaunch.com
If you have any questions on the operation of the unit, please
contact LAUNCH customer service number: +86 755 8455 7891
A
Remote Diagnosis:
This option aims to help repair shops or professional technicians launch instant messaging
and remote diagnosis, making the repair job getting fixed faster.
 Loading...
