Do you have a question about the Ledj EasiLED 4 and is the answer not in the manual?
Crucial safety warnings and precautions before initial use.
Warnings regarding moisture, liquids, and high voltage risks.
Manufacturer liability, operating conditions, and warranty notes.
Key capabilities including fixture control, colour selection, and special functions.
Details on power supply, dimensions, weight, and order code.
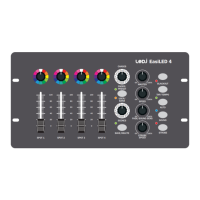
Identification and description of all controls and indicators on the panel.
Steps for connecting power, DMX cables, and fixtures.
Guide to setting DMX start addresses and connecting fixtures in a chain.
Visual examples for setting DMX addresses for different fixture types.
Overview of Manual, Auto, and Sound control modes.
Detailed steps for setting colours, intensity, and fade times.
Instructions for saving, deleting, and playing back scenes.
Using rotary controls for preset colour selection.
Using faders for individual fixture intensity.
Using selectors for chases (12 settings) and scenes (12 settings).
Using Preset/User bank, Save/Delete buttons.
Adjusting master intensity and chase speed.
Adjusting fade time and strobe speed.
Functionality of Blackout and TAP/Tempo controls.
Activating and controlling Auto and Sound modes.
Activating the strobe function.
3-Pin DMX output, start address, and channel selection.
Microphone/audio select, audio input jack, power switch.
Details of the DC power input connector and requirements.
How to assign start addresses to fixtures.
Explanation of the DMX communication protocol.
Connecting multiple fixtures in a DMX chain.
Specifications for DMX data cables.
Precautions for connecting DMX cables correctly.
Details the pinout for 3-pin XLR DMX connectors.
Importance and method of using a DMX terminator.
Information on using 5-pin XLR connectors with 3-pin systems.
Guidelines for environmentally responsible disposal of WEEE.
| DMX Channels | 4 |
|---|---|
| DMX Connection | 3-pin XLR |
| Channels | 4 |
| Power Consumption | 5W |
| Power Input | 12V DC |
| Control Modes | DMX |
| Power Supply | External |
| Storage Temperature | -20°C to +60°C |