Do you have a question about the Leister SEAMTEK 36 and is the answer not in the manual?
Explains text formatting, symbols, and cautionary notes used throughout the manual for clarity and safety.
Outlines the ten distinct sections of the operating manual for easy navigation and reference.
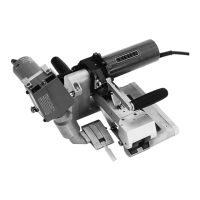
Introduces the SEAMTEK 36 as a high-quality, computer-controlled hot air welder for industrial fabrics.
Explains how the machine directs hot air onto fabric surfaces to create seams using drive wheels.
Lists utility requirements, weight, and precision capabilities for the SEAMTEK 36 machine.
Provides contact details for Leister Technologies AG for further assistance with the SEAMTEK 36.
Introduces the various modular components that make up the SEAMTEK 36 system.
Describes the sturdy steel construction of the machine's base, providing a stable platform.
Details the metal box housing the power management, control computer, and motor drives.
Explains the air pump that delivers constant airflow to the welding nozzle for consistent operation.
Describes the aluminum extrusion design allowing easy side-to-side adjustment of modules.
Explains the secure fastening method for components on the upper beam extrusion.
Details the touch screen operator interface for machine control and feedback.
Explains the UWM's role in the weld head assembly and its lever action for seam navigation.
Describes the AHAM's heating element, nozzle, and air cylinder movements for welding.
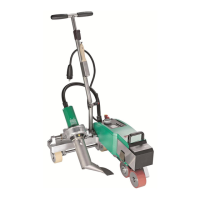
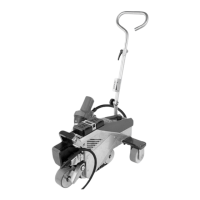
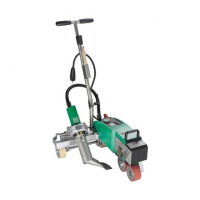
Introduces the three types of independently driven lower wheel modules available for the SEAMTEK 36.
Details the Pedestal LWM, its versatility for various seam types, and material compatibility.
Explains the Side Arm LWM for welding tubular items and specific operations like taping.
Describes the Quick Arm LWM for creating continuous tubes and flat panel seams.
Introduces optional attachments and accessories that enhance the SEAMTEK 36's flexibility.
Explains the TDS module for supplying seam tape to the weld head for sealing applications.
Lists available wheel sizes and types for creating various seam widths and styles.
Mentions the use of standard or custom guides for applications similar to sewing.
Provides essential information and steps for setting up and installing the SEAMTEK 36.
Specifies criteria for the installation area, focusing on dryness, ventilation, and temperature.
Outlines the sequential steps for unpacking, positioning, and leveling the machine.
Lists critical checks to perform before starting the machine, including safety precautions.
Details the necessary electrical power and clean, dry air specifications for the SEAMTEK 36.
Guides on checking the electrical supply voltage and configuration against the machine's rating label.
Explains the process of connecting the SEAMTEK 36 to the workshop's pneumatic air source.
Introduces the various controls used for weld setup, operation, and process management.
Details the touch screen operator interface and associated switches on the control module.
Explains toggle switches that control air cylinders for the Hot Air Module and Upper Wheel Module.
Details the regulators used to adjust both clamp pressure and weld pressure for the wheels.
Describes the red EMERGENCY STOP button and its function to immediately shut down the machine.
Introduces the foot pedal assembly and its six switches for controlling the welding process.
Explains foot pedals for starting/stopping drive motors and controlling cylinder movement.
Describes foot pedals used for hands-free wheel speed adjustments during welding.
Guides on providing power to the machine and safely shutting it down.
Steps to provide electrical current, start the self-test, and prepare the machine for operation.
Procedures for safely shutting down the machine, including the mandatory cool-down cycle.
Covers the essential procedures for setting up the SEAMTEK 36 for effective welding.
Details how to adjust the clamp pressure and weld pressure for the upper wheel module.
Explains how to activate the rotary vane pump that supplies air to the weld head.
Guides on establishing initial weld air temperature and base speed settings.
Defines weld air temperature as a critical pre-weld parameter for fabric sealing.
Defines base speed as the nominal wheel speed reference for all subsequent adjustments.
Provides step-by-step instructions for entering temperature and base speed values via the keypad.
Covers fabric placement, welding test strips, and performing typical seam welds.
Details the precise process of positioning fabric correctly within the weld head for a good seam.
Explains how to choose and engage the appropriate lower wheel module for the task.
Guides on welding test strips to identify optimal speed and temperature combinations.
Details the process for running test strips, including screen operations and button functions.
Guides on performing a typical seam weld using the previously determined temperature and speed settings.
Details how to pause or completely stop the welding process using different foot pedal actions.
Explains using foot pedals for seam heat correction and hands-free freewheeling.
Describes using foot pedals to adjust seam heat by modifying drive wheel speed.
Explains the use of the BOTH + foot pedal as a hands-free switch for fabric adjustment.
Details using foot pedals to correct top fabric piece alignment errors during welding.
Guides on adjusting drive wheel effective diameter and other calibration settings.
Explains setting differential speed for the top wheel to maintain exact fabric registration.
Provides fundamental practices and tips for producing high-quality seams with hot air welding.
Offers tips for ensuring smooth, drag-free fabric movement through the weld head.
Advises on using slower wheel speeds when welding complex or curved fabric patterns.
Suggests running the machine cold to get accustomed to new patterns or settings.
Advises on safely stopping and restarting the welding process from the same spot.
Encourages maintaining a comfortable position and taking breaks to manage concentration.
Details the steps necessary to change over and adjust the SEAMTEK 36's modular features.
Explains how to reconfigure the different Lower Wheel Modules for various product requirements.
Provides instructions and illustrations for positioning and securing the Pedestal LWM.
Details how to position the Side Arm LWM into place using kip handles for operation.
Shows how to mount the Quick Arm LWM into position using kip handles.
Outlines the general procedures applicable to changing wheel width or type on all modules.
Illustrates the steps for removing and changing the wheel assembly on the Upper Wheel Module.
Details the process for removing and changing the wheel assembly on the Pedestal LWM.
Explains how to remove and change the wheel assembly on the Side Arm LWM.
Details the process for removing and changing the wheel assembly on the Quick Arm LWM.
Provides simple, step-by-step instructions for changing the welding nozzle.
Explains how to adjust the nozzle's position closer/further and raise/lower it relative to the wheels.
Describes how to easily install the Tape Delivery System tower onto the Upper Wheel Module.
| Voltage | 230 V |
|---|---|
| Frequency | 50 / 60 Hz |
| Weight | 7.5 kg |
| Temperature Range | 20-650 °C |
| Power Supply | 230 V |