Do you have a question about the Leister FUSION 1 and is the answer not in the manual?
Specifies the type and size of welding rod to use.
Step-by-step guide to powering up the device.
Instructions for initiating the welding operation.
Procedures for safely powering down the device.
Concise steps for turning on and starting the FUSION 1.
Concise steps for safely powering down the FUSION 1.
Explains error codes and messages shown on the LCD.
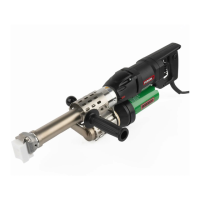
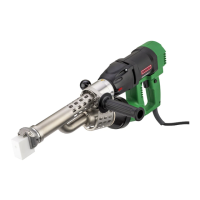
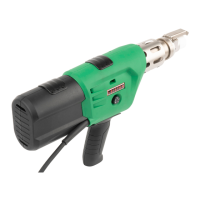
The LEISTER FUSION 1 is a manual extrusion welder designed for professional use in welding thermoplastic materials such as PE and PP. This device is suitable for various applications including container construction, pipeline construction, apparatus construction, landfill and contaminated sites, and repairs. It is engineered to meet the latest technological standards in the plastics-processing industry and is built with high-quality materials, ensuring reliable performance.
The FUSION 1 operates by extruding a heated welding rod onto a pre-warmed surface, creating a strong, homogeneous weld. The device features a hot-air blower that preheats the welding area, ensuring optimal material fusion. The welding rod is automatically drawn through the device, plasticized by internal heating elements, and then extruded through a welding shoe.
To begin operation, the user connects the FUSION 1 to the electrical supply and switches on the hot-air blower. The air temperature can be adjusted using a dedicated potentiometer, with the set value displayed on the LCD. Once the operating temperature is reached (typically after about 5 minutes), the device is ready for welding. The LED light indicates when the operating temperature is achieved.
The welding process involves pressing the on/off drive switch, which starts the extrusion of the welding rod. The device should always be operated with a welding rod inserted. The welding rod must be clean and dry to ensure proper fusion. The output (extrusion speed) can be regulated using another potentiometer, allowing for adjustments based on the rod geometry and material type. The set speed is shown as a bar graph on the LCD display.
Before applying the extruded material, the prewarming nozzle is used to prewarm the area to be welded with oscillating movements. After prewarming, the FUSION 1 is placed on the prepared area, and the drive switch is pressed to start the extrusion. The user can then create and analyze a sample weld to ensure proper settings. Both the hot-air temperature and output volume can be adjusted during the process to achieve the desired weld quality. The welding rod is automatically fed into the device, and it should be possible to insert the rod without resistance.
The FUSION 1 includes several safety and operational features. It has overheating protection for the drive, which automatically switches off the drive if it overheats or if the material's melting temperature in the screw is too low. An error message (Er 0400) will appear on the display, and the device should be disconnected from the line supply and allowed to cool down. The device also has a starting protection mechanism that prevents the drive from starting or allows it to run only for a short time if the material is insufficiently plasticized. In such cases, reheating occurs for 2 minutes, indicated by a countdown counter on the LCD.
For switching off, the user presses the on/off drive switch to stop the drive motor. It is important to remove any remaining welding material from the welding shoe to prevent damage. The air temperature potentiometer should then be rotated to "0" to initiate a cooling process. During cooling, the LCD displays a snowflake symbol, a flashing downward arrow, and the actual temperature. Once the temperature drops below 50 °C, "OFF" appears on the display, and the FUSION 1 can be safely disconnected from the power supply.
The device offers a setup menu accessible by disconnecting from the line supply and then reconnecting while holding down the drive button. This menu allows for switching between °C and °F temperature units and for locking the temperature setpoint. Locking the setpoint prevents accidental changes during operation, a useful feature for maintaining consistent weld parameters. When the setpoint is locked, a padlock symbol appears on the status display. The air supply can also be temporarily switched off, allowing extrusion without hot air for a maximum of 60 seconds, which can be useful in specific welding scenarios. A countdown counter appears on the LCD during this mode.
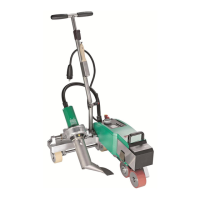
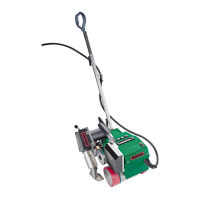
The FUSION 1 is designed for user convenience and control. The handle can be mounted for ergonomic use, and the device's compact dimensions and weight make it manageable for manual operation. The LCD display provides clear feedback on status, setpoint, actual welding temperature, and drive motor activity. Status display symbols indicate heating countdown, cooling process, locked setpoint, and power presence when switched off.
The device's type plate provides essential identification information, including model designation and serial number, which are crucial for support and service inquiries. The scope of delivery includes various accessories such as a motor/blower filter set, a CL 14 welding shoe, and hexagon wrench keys for maintenance and adjustments.
The FUSION 1 is equipped with potentiometers for precise adjustment of output regulation and air temperature. The output regulation potentiometer allows the user to fine-tune the extrusion speed, which is critical for achieving optimal weld quality with different rod geometries and materials. The air temperature potentiometer enables accurate control over the preheating air, ensuring the material is at the correct temperature for fusion.
The welding shoe is replaceable and can be rotated to accommodate different welding directions, providing flexibility for various applications. This feature is particularly useful when working in confined spaces or on complex geometries. The clamping screws allow for easy detachment and rotation of the welding shoe.
Regular maintenance is essential for the longevity and optimal performance of the FUSION 1. Key maintenance tasks include cleaning the air inlet, which involves removing the filter by gently pressing the side clips and pulling them off. This prevents dust and debris from affecting the motor and blower.
The extruder nozzle should be cleaned every time the welding shoe is replaced. This involves removing any welding residue to ensure a tight fit and proper material flow. It is important to note that the extruder nozzle has a left-hand thread.
Users should also regularly check the power cord and plug for any interruptions or mechanical damage to ensure electrical safety and reliable operation.
The device's carbon brushes, both for the drive motor and the blower motor, have specified operating hour limits. The drive motor carbon brushes should be checked by a Leister Service Center after approximately 300 operating hours, as the drive will automatically switch off once the minimum carbon length is reached. The blower carbon brushes typically last around 550 operating hours and must be replaced by a Leister Service Center. To protect the heating element, the heater is no longer activated if the blower carbon minimum length is undercut.
The FUSION 1 also provides warnings and error messages on the LCD display and via LED lights to alert the user to potential issues. These messages can indicate problems such as a faulty thermocouple, overheating, worn carbon brushes, drive overload, or voltage supply errors. In most cases, an error message will cause the heating to switch off and the drive to be blocked, requiring user intervention or service. For example, if the blower carbon brushes are worn, the heater will no longer activate to protect the heating element.
Leister Technologies AG offers training courses and introductory training classes for users to ensure proper operation and maintenance of the FUSION 1. Additionally, authorized Leister Service Centers provide professional repair services with original spare parts, ensuring that the device can be maintained and repaired to the highest standards.
| Rod diameter | 3 - 4 mm |
|---|---|
| Voltage | 230 V |
| Frequency | 50/60 Hz |
| Temperature Range | 20 - 600 °C |
| Material | Plastic housing |