Do you have a question about the LG LCF610IR and is the answer not in the manual?
Crucial warnings for preventing electric shock, fire, and damage.
Guidelines for safe operation while driving and environmental considerations.
Safety measures related to the product's laser system.
Proper procedures for battery removal and environmentally sound disposal.
Guidance on setting the disc format for compatibility with LG players.
Warning about incorrect connections and display indications.
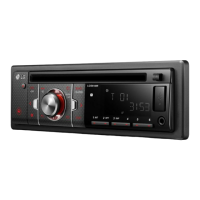
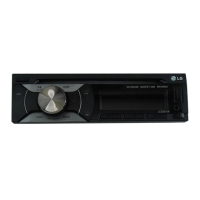
Detailed layout and functions of the LCS510IR/LCS510UR front panel.
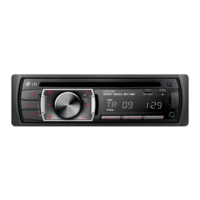
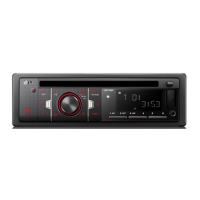
Detailed layout and functions of the LCF610IR front panel.
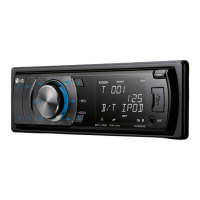
Explanation of the functions and buttons on the remote control.
Instructions for installing the battery in the remote control.
Information, attachment, and detachment of the control panel.
Information, attachment, and detachment of the control panel.
Steps for basic unit installation and ISO-DIN mounting.
Instructions for removing the old receiver unit from the dashboard.
Detailed guide on connecting the unit to the vehicle's system and speakers.
Basic operations, sound muting, clock display, and display light control.
Procedure to reset the unit to its factory default settings.
How to adjust sound, light, and other general settings via unit or remote.
Detailed adjustments for sound quality and display lighting effects.
Various other settings, CD insertion, playback, and pausing.
How to search within tracks and set the clock manually.
How to skip tracks and view music file information.
Methods for playing tracks/files using INT, RPT, and SHF modes.
Details on the compatibility of MP3/WMA discs with the unit.
Instructions for connecting and playing music from external devices via AUX.
How to manage volume levels when switching between audio sources.
Steps for tuning into radio stations and saving them to presets.
How to select and listen to stored preset radio stations.
Configuration options for the tuner, including Auto Store and sensitivity.
Explanation of Radio Data System features like PTY, AF, and TA.
Instructions for connecting and using USB storage devices.
Methods to search files and record audio to USB from CD/FM.
Specifications and limitations for compatible USB devices.
How to connect and play music from iPod or iPhone devices.
Features for playback control, searching, and music information.
How to browse and play files using music categories.
List of compatible iPod and iPhone models for the unit.
Common problems, their causes, and solutions for unit operation.
Technical specifications of the unit, including power, dimensions, and performance.
This document is an owner's manual for an LG Car CD/MP3/WMA Receiver, specifically models LCS510IR, LCS510UR, and LCF610IR. It provides comprehensive information on the device's functions, usage, and maintenance.
The manual begins with crucial safety information, emphasizing the risk of electric shock and the importance of not opening the unit. It warns against exposure to rain or moisture and advises against installing the equipment in confined spaces. Users are cautioned about the potential for the unit's exterior to become hot after prolonged use. The device is designed for vehicles with a 12-volt battery and negative grounding, and users are instructed to disconnect the battery cable before installation to prevent electrical shorts. The manual also highlights that the unit cannot play 8cm discs, only 12cm discs, and advises maintaining a proper sound volume while driving. It stresses the importance of safe vehicle operation, urging users not to be distracted by the device and to pull over before making adjustments. The operating temperature range is specified as -10 °C to 60 °C. A laser product warning is included, advising against direct exposure to the laser beam and stating that servicing should only be performed by authorized personnel. Instructions for safe battery removal are provided, emphasizing proper disposal to prevent environmental contamination.
This section details the physical components and initial setup.
The front panel features an eject button, SRC/OFF button for source selection and power control, play/pause button, mute button, and a volume knob that also confirms settings and checks tracks/files. Other buttons include 'F' for playback items, BAND/TA for tuner functions, a remote sensor, display window, and a button to open the front panel. Additional controls include 'R' for recording to USB, a settings menu activator, back button, skip/search/seek/tune buttons, EQ for sound quality adjustments, DISP for clock and display light control, INT for intro scan, RPT for repeat playback, SHF for random playback, numeric buttons (1-6) for preset stations, AUX for external portable players, and a USB port.
Similar to the LCS510IR/LCS510UR, this model includes SRC/OFF, play/pause, mute, volume knob, 'F' for playback items, BAND/TA, display window, remote sensor, OPEN button, and 'R' for recording to USB. It also has a settings menu activator, back button, skip/search/seek/tune buttons, EQ, DISP, AUX, and a USB port.
The remote control mirrors many front panel functions, including SRC/OFF, FUNC (for playback items and settings menu), BAND/DRV (for tuner and USB drive selection), play/pause, SHF (random playback), MUTE, VOLUME up/down, skip/search/seek/tune, back, list up/down, and ENTER/LIST (for confirming settings and checking tracks/files). It also has DISP, RPT (repeat), INT (intro scan), and numeric buttons (1-6) for preset stations.
Instructions for installing the CR2025 (3 V) lithium battery in the remote control are provided, including warnings about proper polarity, removing the battery during long periods of disuse, and avoiding exposure to heat or metallic tools.
This section covers the physical installation and wiring of the receiver.
The manual provides detailed steps for attaching and detaching the control panel for both LCS510IR/LCS510UR and LCF610IR models. It advises aligning the panel with the stopper and pushing it until it clicks for attachment, and pressing the open button and sliding the panel to detach. Users are instructed to store the detached panel in its protective case. Important cautions include ensuring proper attachment for button functionality, avoiding exposure to high temperatures or direct sunlight, preventing strong impacts, and keeping volatile agents away from the panel surface. Regular cleaning of the contacts with alcohol-moistened cotton is recommended, with a reminder to turn off the ignition and remove the key before cleaning.
Both basic and ISO-DIN installation methods are described. Basic installation involves removing the existing receiver, making connections, installing the sleeve, and then the unit. ISO-DIN installation involves sliding the unit into the ISO-DIN frame, fitting screws, sliding the unit and frame into the dash, installing the dash panel (if needed), trim ring, and control panel. Instructions for removing an existing receiver unit are also included.
A wiring diagram illustrates how to connect the receiver to the car's electrical system, including power antenna, dimmer, ignition, battery, ground, and remote on. It also shows connections for optional audio out (sub-woofer and front/rear speakers) and audio in (for an amplifier). Speaker wiring for front right, front left, rear right, and rear left is detailed with color codes.
This section explains how to use the various functions of the receiver.
To turn on the unit, press any key. Select a source using SRC. Adjust volume with the volume knob or remote control. If a source is not connected, it will not be recognized.
Press the mute button on the unit or remote control to temporarily stop the sound, and press it again to resume.
The EQ function enhances sound quality. Repeatedly pressing EQ cycles through various sound modes like XDSS+, POP, CLASSIC, ROCK, JAZZ, SALSA, SAMBA, REGGAE, RUSSY, USER 1, USER 2, and Off. Users can customize sound levels (BASS, MID, TRB, BAL, FAD, SWC) in USER 1/2 modes.
Press DISP to check the clock, and press it again to remove it from the display.
Press and hold DISP to turn off the display light, and press and hold again to turn it on. The light will automatically turn off after a few seconds if no keys are pressed.
If the unit malfunctions, detach the control panel and press the RESET hole with a sharp object.
Settings for SOUND, LIGHT, and OTHER can be adjusted via the unit or remote control.
Adjusts LED color (COL1/COL2/AUTO), dimmer brightness (OFF/ON/AUTO), and dimmer level (DIM L).
Adjusts BASS, MID, TRB, BAL, FAD, and SWC levels, especially in USER 1/2 EQ modes.
Includes settings for AUX (ON/OFF), DEMO (OFF/ON), SW (Subwoofer) frequency (OFF/55Hz/85Hz/120Hz), A-EQ (Auto EQ) (ON/OFF) for genre-based sound adjustment, BEEP (2ND/ALL) for key press sounds, and CLK (Clock) for time adjustment, including manual setting or using RDS CT information.
For LCS510IR/LCS510UR, insert a CD and adjust volume. For LCF610IR, open the control panel, insert a CD, close the panel, and adjust volume. An eject button is available.
Press the play/pause button on the unit or remote to pause and resume playback.
Press and hold skip buttons on the unit or remote during playback, then press play/pause at the desired point.
Use the skip buttons on the unit or remote. For MP3/WMA files, you can also use the volume knob or remote arrows to select a ROOT, folder, or specific track/file. To skip to the previous track, press the back button briefly within 3 seconds of playing time.
Press DISP repeatedly during MP3/WMA/CD TEXT playback to view Title, Artist, or Album information. "NO TEXT" is displayed if no information is available.
This section covers INT (Intro Scan), RPT (Repeat), and SHF (Shuffle) functions, accessible via dedicated buttons or the FUNC button on the unit/remote.
Connect an external device to the AUX jack, select AUX source, play music on the device, and adjust volume.
Adjust the GAIN (0/+6) setting to prevent sudden volume changes when switching to AUX source.
Select TUNER source, then BAND. For manual search, press and hold skip buttons until "MANUAL" appears, then repeatedly press to select frequency. For auto search, press skip buttons until "SEARCH" appears. Adjust volume with the knob or remote.
Select BAND, press and hold skip buttons until a beep, then repeatedly press to select frequency. Press and hold a preset button (1-6) or rotate the volume knob to store the station. Storing a new station on an occupied preset number will erase the old one.
Select BAND, then use the volume knob or remote arrows to select a preset station, or directly press a numeric preset button (1-6).
Settings like A/S (Auto Store), P/S (Preset Scan), SENS (Tuner Sensitivity: MID/HI/LOW), PTY (Program Type), AF (Alternative Frequency) (ON/OFF), REG (Region) (ON/OFF), TA (Traffic Announcement) ALARM/SEEK, PI (Programme Identification) SOUND/MUTE, and CT (Clock Time) (ON/OFF) can be adjusted. PTY allows searching by program type (NEWS, FINANCE, CHILDREN, etc.).
Open the USB cover, connect the USB device, select USB source, and adjust volume. For multi-reader devices, use BAND/DRV to switch drives.
Connect an iPod/iPhone to the USB connector, select USB source, and adjust volume. Refer to the manual for compatible iPod models (iPod classic, nano, touch, iPhone, iPhone 3G, iPhone 3GS, iPhone 4, with OS Version 4.2.1 or more recommended).
Press the play/pause button on the unit or remote to pause and resume.
Press and hold skip buttons on the unit or remote during playback, then release at the desired point.
Press DISP repeatedly during MP3/WMA playback to view Title, Artist, or Album information.
Access music menus (PLAYLISTS, ARTISTS, ALBUMS, GENRES, SONGS, COMPOSER, AUDIO BOOK, PODCAST) using the volume knob or remote, then select and play files. SPD (BOOK SPEED) allows adjusting audiobook speed (NOR, SLOW, FAST).
This section provides solutions for common issues:
| Tuner Bands | FM/AM |
|---|---|
| Preset Stations Quantity | 30 |
| RMS output power | 4 x 50 W |
| Audio formats supported | MP3, WMA |
| Equalizer | Yes |
| Equalizer bands quantity | 5 |
| Display Type | LCD |
| AUX in | Yes |
| Subwoofer out | Yes |
| ISO connector | Yes |
| Product color | Black |
| Resolution | 320 x 240 |
| Radio | Yes |
| USB Port | Yes |
| Bluetooth | Yes |
| Rear Camera Input | Yes |
| Power Output | 4 x 50W |
| Display Size | 3 inches |
| Compatible Devices | iPod |