INSTALLATION INSTRUCTION
7
ENGLISH
6
INSTALLATION INSTRUCTION
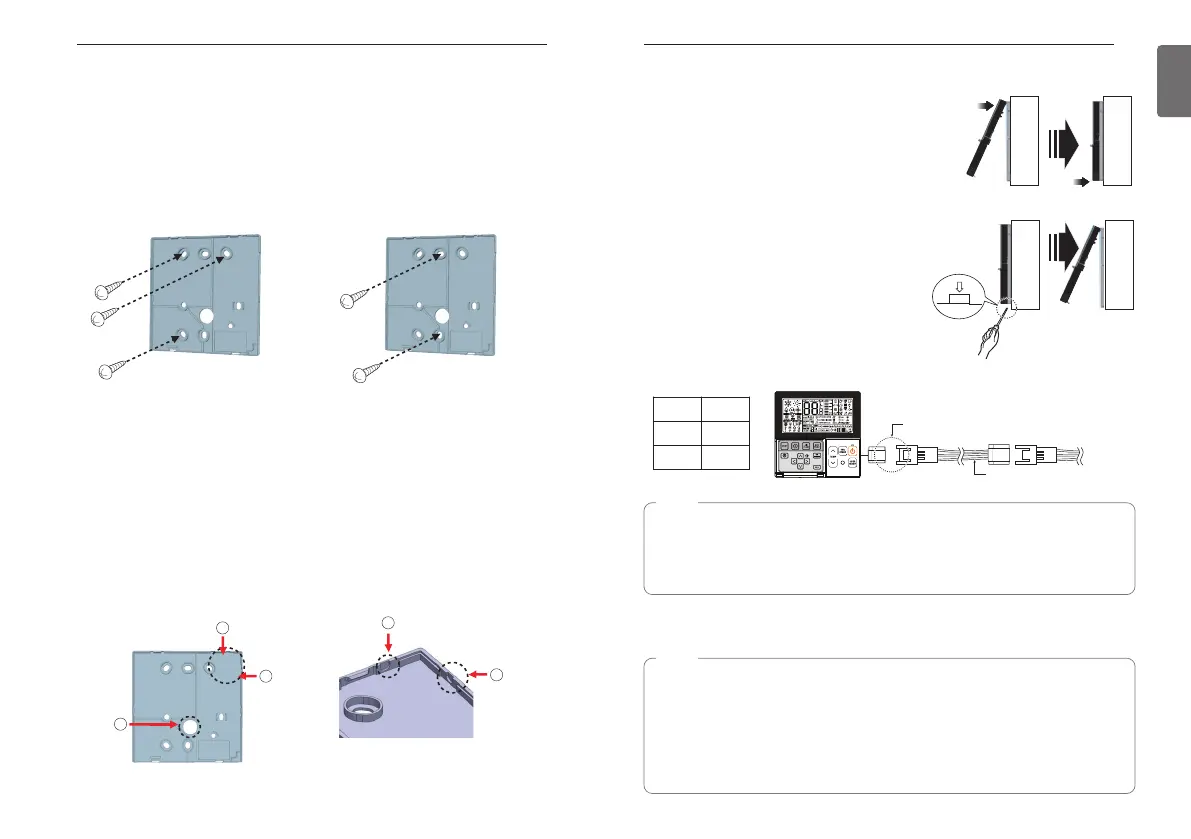
Please fix remote controller upper part into the setup board
attached to the surface of the wall, as the picture below, and
then, connect with setup board by pressing lower part.
- Please connect not to make a gap at the remote controller and
setup board’s upper and lower, right and left part.
- Before assembly with the installation board, arrange the Cable
not to interfere with circuit parts.
When separating remote controller from setup board, as
the picture below, after inserting into the lower separating
hole using screw driver and then, spinning clockwise,
remote controller is separated.
- There are two separating holes. Please individually separate
one at a time.
- Please be careful not to damage the inside
components when separating.
Wall
Side
Wall
Side
Wall
Side
Wall
Side
<Connecting order>
<Separating order>
Please connect indoor unit and remote controller using connection cable.
Please use extension cable if the distance between wired remote controller and
indoor unit is more than 10 m.
Please check if connector is normally connected.
Connecting cable
Indoor
Unit side
DC 12 V Red
Signal Yellow
GND Black
Please fix tightly using provided screw after placing remote controller setup
board on the place where you like to setup.
- Please set it up not to bend because poor setup could take place if setup board bends.
Please set up remote controller board fit to the reclamation box if there is a reclamation box.
- Install the product so as not to make a gap with the wall side and to prevent shaking after the
installation.
Can set up Wired remote controller cable into three directions.
- Setup direction: the surface of wall reclamation, upper, right
- If setting up remote controller cable into upper and right side, please set up after removing
remote controller cable guide groove.
h Remove guide groove with long nose.
① Reclamation to the surface of the wall
② Upper part guide groove
③ Right part guide groove
<Wire guide grooves>
INSTALLATION INSTRUCTION
NOTE
• Installation work must be performed in accordance with the national wiring standards by
authorized personnel only.
• Installations must comply with the applicable local/national or international standards.
• Apply totally enclosed noncombustible conduit (metal raceway) in case of local electric &
building code require plenum cable usage.
NOTE
When installing the wired remote controller, do not bury it in the wall. (It can cause damage
in the temperature sensor.)
Do not install the cable to be 50 m or above. (It can cause communication error.)
• When installing the extension cable, check the connecting direction of the connector of
the remote controller side and the product side for correct installation.
• If you install the extension cable in the opposite direction, the connector will not be
connected.
• Specification of extension cable: AWG 24, 3 conductor or above.
 Loading...