EasyManua.ls Logo

Linear HSLG Series User Manual

Linear HSLG Series
36 pages
To Next Page IconTo Next Page
To Previous Page IconTo Previous Page
Page #6 background image
HSLG Slide Gate Operator Installation Guide - 4 - P1220 X14
Gate Bracket and Chain Assembly
NOTE: The item numbers shown in these illustrations
are for reference only. For the actual part numbers, refer
to the parts lists in the rear of this manual.
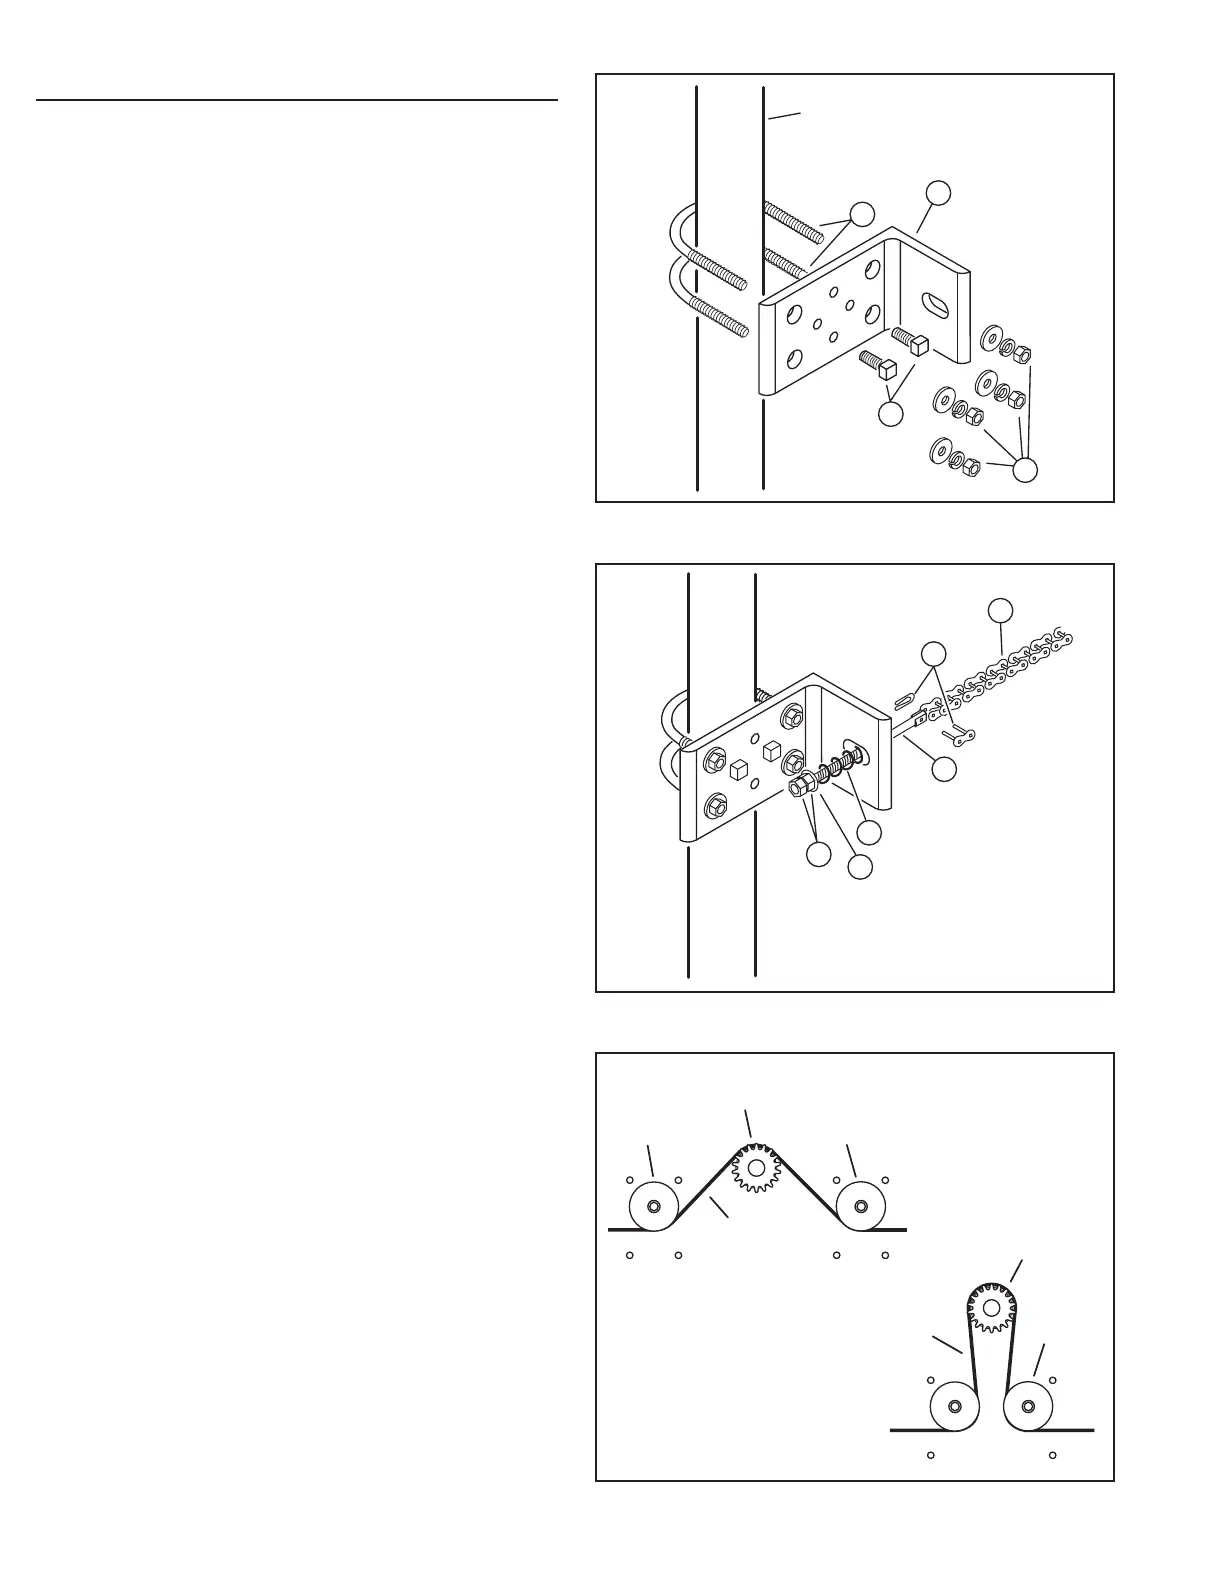
Assemble a gate bracket (1) to the front edge of the gate, using
two U-bolts (2), and mounting hardware (3). Before tightening down
completely, be sure the bracket is parallel to the gate. Tighten the U-bolt
hardware the rest of the way, then screw the square head bolts (4) into
the threaded holes in the gate plate until they bottom out against the
gate. These will help keep the bracket from twisting on the pipe.
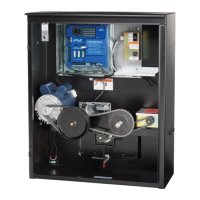
Slide a threaded chain pin (5) through the bracket as shown, with spring
(6), at washer (10), and two hex nuts (7). Attach one end of the drive
chain (8) to the chain pin using master link (9) and begin unrolling the
chain toward the operator.
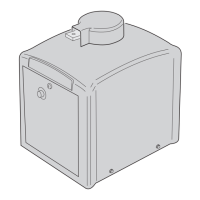
Remove the rain cover from the back of the slide gate operator. Carefully
thread the drive chain under the rst idler, over the drive sprocket, and
then under the last idler. Make sure you feed most of the chain through
the idlers and sprocket before attaching the chain to the back end of
the gate.
Assemble the other gate bracket on the rear edge of the gate, using
the same process as the front gate bracket. Once this is done, take the
other chain pin, spring and jam nuts and assemble with the end of drive
chain and the other master link.
At this point you should be able to adjust the chain tension by tightening
the jam nuts on each end. Approximately 1/4” to 3/8” of slack
per foot of drive chain is acceptable. Make sure the chain
does not drag on the ground, across the gate rollers or the idler frame
of the operator.
Additional mounting holes have been provided in the gate bracket for
installer convenience.
END OF GATE PIPE SHOWN
REFERENCE ONLY
1
2
3
4
Figure 3. Mounting Gate Bracket to Gate
Figure 4. Chain Pin and Chain Assembly
8
9
5
6
7
10
NOTE: IDLER CONFIGURATION
MAY APPEAR DIFFERENT DEPENDING
ON THE SLIDE OPERATOR MODEL
DRIVE
SPROCKET
DRIVE SPROCKET
IDLER
WHEEL
IDLER WHEEL
CHAIN
PATH
CHAIN
PATH
IDLER WHEEL
Figure 5. Chain Path
www.LinearGateOpeners.com | (888) 378-1053 | Sales@LinearGateOpeners.com
Question and Answer IconNeed help?

Do you have a question about the Linear HSLG Series and is the answer not in the manual?

Linear HSLG Series Specifications

General IconGeneral
BrandLinear
ModelHSLG Series
CategoryGate Opener
LanguageEnglish

Summary

Pre-installation Information

Before You Begin

Instructions before unpacking and installation.

Always Check the Gate's Action

Ensure the gate slides freely and level before installing the operator.

Gate Operator Classifications

Details the four classifications for gate operator usage.

Approved Obstruction Detection Devices

Lists approved contact or non-contact obstruction detection devices.

Safety Information and Warnings

Cautionary Notes

Warning regarding potential damage to the gate or operator.

Mechanical Hazard Warnings

Warning regarding mechanical hazards that may cause serious injury or death.

Electrical Hazard Warnings

Warning regarding electrical shock hazards that may cause serious injury or death.

Regulatory Warnings

Important Installation Safety Instructions

Crucial safety steps to follow before proceeding with installation.

Wiring Specifications

AC Power Wiring

Details on selecting wire gauge and maximum distance for AC power connections.

DC Control and Accessory Wiring

Guidelines for running DC control wiring and using shielded cable.

Mounting Pad Installation

Gate Preparation

Steps to ensure the gate slides freely and is covered appropriately.

Mounting Specifications

Details on posts, footings, and attaching the operator securely.

Operator Setup

Controller Access

How to access the controller by removing the protective dust cover.

Manual Disconnect

Procedure to disconnect the operator for manual gate operation.

AC Power Connection

Instructions for connecting AC power, emphasizing licensed electrician use.

Earth Ground

Importance and procedure for installing a proper earth ground connection.

Open and Close Limit Adjustment

How to adjust limit nuts for proper gate travel limits.

Limit Nuts Rough Adjustment

Initial adjustment steps for setting the gate limit nuts.

Limit Nuts Fine Adjustment

Fine-tuning the limit nut adjustments for precise gate operation.

Torque Limiter Adjustments

Procedure for adjusting the torque limiter to prevent clutch slipping.

Controller Features

Indicator Descriptions

Terminal Descriptions

Operator Accessory Connections

Basic Controller Programming

Programming Overview

Explanation of programming fields, functions, and groups (basic/advanced).

Entering Programming Mode

Steps to enter programming mode using UP/DOWN buttons.

Exiting Programming Mode

How to exit programming mode manually or via inactivity.

Programming Keystrokes

Typical method for navigating and changing controller settings.

Left or Right Hand Operation

How to set the operator for left or right-hand installation.

Dual Gate Enable

How to enable dual gate operation via COMM LINK terminals.

Auto Close Timer

Setting the auto close timer duration for automatic gate closing.

Run Alarm and Pre-start Alarm

Configuration for the operator's beeper during startup and operation.

Maximum Open Direction Current Setting

Setting the current limit to detect obstructions during opening.

Maximum Close Direction Current Setting

Setting the current limit to detect obstructions during closing.

Obstruction Detection Type

Open Obstruction Input Active

Setting for enabling open obstruction input for slide gates.

Close Obstruction Input Active

Setting for enabling close obstruction input for single/paired gates.

Remote Open Obstruction Active

Setting for the other operator's open obstruction input.

Remote Close Obstruction Active

Setting for the other operator's close obstruction input in paired mode.

Advanced Controller Programming

Entering Advanced Programming Mode

Procedure to enable advanced programming functions.

Maximum Run Time

Setting the maximum time the operator will run before stopping.

Single Button Input Setup

Configuring the single input for various gate operations.

Stagger Mode

Setting for delayed opening/closing in dual gate installations.

Stagger Delay Time

Setting the delay duration for stagger mode.

Auxiliary Relay Mode

Configuring the auxiliary relay for functions like maglocks or strobes.

Reverse Delay Time

Setting delay before reversing direction after an obstruction.

Brake Delay Time

Setting delay before applying the brake after the gate stops.

Constant Pressure Mode

Configuring buttons to require constant pressure for operation.

Shadow Loop Open Prevention

Preventing closing or opening based on shadow loop triggers.

Reset Cycle Count

Procedure to reset the operator's cycle count.

Maintenance Alert Trigger

Setting alerts for maintenance based on cycle counts.

Mid-travel Stop Position

Programming the gate to stop at a partial open position.

Anti-tailgate Enable

Enabling feature to prevent tailgating after shadow loop clears.

Radio Enable

Enabling or disabling the internal radio receiver.

Antenna Installation

Instructions for connecting a remote antenna.

Radio Transmitter Learn

Steps to store transmitter IDs in the radio receiver.

Radio Transmitter Delete

How to delete stored transmitter IDs individually or all.

MGT Obstacle Transmitter Learn

Programming MGT transmitters for obstruction detection.

MGT Obstacle Transmitter Delete

Deleting MGT transmitters from memory.

MGT Monitoring Function

Monitoring MGT transmitter battery and connection status.

Motor Type Selection

Setting the controller to match the operator's motor type.

Reset Controller to Factory Defaults

Restoring all programmed data to factory settings.

Loop Layout Illustration

Safety Edge Layout Illustration #1

Safety Edge Layout Illustration #2

Photoeye Installation Illustration

Picket Gate Installation

Track Gate Installation

Dual Gate Installations

Dual Gate Enable

Enabling dual gate operation via COMM LINK connection.

Stagger Mode

Setting delayed open/close for dual gate operation.

Stagger Delay Time

Setting the delay duration for Stagger Mode.

Optional In-Cabinet Heater

Gate Operation

Open Button

Function of the open button to initiate gate opening.

Close Button

Function of the close button to initiate gate closing.

Stop Button

Function of the stop button to halt gate movement.

Single Input

Operation via a single input button or radio receiver.

Fire Department Input

Full gate opening triggered by fire department input.

Open Input

Alternative input for initiating gate opening.

Open Obstruction

How the gate reacts to an obstruction during the opening cycle.

Close Obstruction

How the gate reacts to an obstruction during the closing cycle.

Reverse Input

Reversing gate travel when the reverse input is triggered.

Open Loop

Gate operation triggered by an open loop detector.

Reverse Loop

Gate reversal triggered by a reverse loop detector.

Shadow/Reset Loop

Holding gate position with a shadow/reset loop detector.

Operation Indications

Display indications for power-up, idle, and gate status.

Pre-start Delay

Countdown display showing time before operator starts.

Reverse Delay

Countdown display for delay before reversing gate direction.

Run Timer

Display showing current running time during gate operation.

Error Indications

Entrapment Errors

Conditions and reset procedures for entrapment errors.

COMM LINK Connection Failure

Troubleshooting dual gate communication link failures.

MGT Obstacle Transmitter Trouble

Alerts for MGT transmitter issues like low battery or tamper.

Maximum Run Time Exceeded

How to handle and clear errors when maximum run time is exceeded.

WARNING: Reset Button Location

Location and activation requirements for reset controls.

Troubleshooting

Contacting Technical Support

Contact information for technical assistance with gate operators.

Operator Fails to Start

Diagnosing why the operator may not start, checking for overload or power issues.

Motor Operates, Gate Does Not Move

Troubleshooting issues when motor runs but gate doesn't move, checking clutches.

Motor Sounds Harder Than Normal

Identifying causes for motor sounding strained, checking gate movement.

Limit Switch Timing Issues

Diagnosing and fixing limit switch timing issues due to chain slack.

Gate Stops Unexpectedly

Troubleshooting gates that stop unexpectedly without visible obstruction.

Gate Stays Open With Automatic System

Resolving issues where gate remains open due to detectors or inputs.

How to Order Replacement Parts

Steps for ordering replacement parts from Linear.

Preventative Maintenance

General Maintenance

General advice on unit inspection and systematic maintenance.

Lubrication Requirements

Lubrication requirements for bearings and motors.

Drive Chain and Sprocket Maintenance

Inspection and maintenance for drive chains and sprockets.

6-Month Preventative Maintenance Checklist

Detailed checklist for semi-annual maintenance tasks.

FCC Notice

Compliance information regarding FCC and Industry Canada rules.

Model HSLG Exploded View

HSLG Mechanical Parts List

Single Phase Controller Parts List

Three Phase Controller Parts List

Gate Operator Installation Checklist

Related product manuals