12
PROGRAMMING ACCESS
The RE-1 can be programmed locally or remotely. The system’s
built-in programming software can be accessed on-site or off-site
using a computer with any Internet browser.
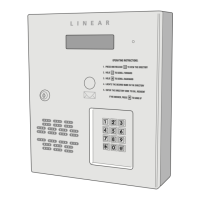
Without a computer, the RE-1 can be programmed from its main
keypad, from any local TouchTone® telephone connected to the
same line, or from any remote TouchTone® telephone by calling
the unit. To guide you through the programming, the RE-1’s voice
synthesizer will announce programming prompts over the telephone.
Programming with a Computer
Navigating through the RE-1’s programming “pages” is similar to
browsing through your favorite web site’s pages. Anyone familiar with
the Internet will fi nd programming the RE-1 with a computer very
easy. The RE-1’s memory contains the “pages” that the computer
will view. When selections and changes are made on the computer,
the RE-1’s memory is programmed to your custom settings.
System Requirements
✦ NOTE: These requirements are for a PC running the Windows™
operating system. For other types of computers and operating systems
call Linear Technical Services for assistance.
1. A dial-up modem must be installed.
2. Dial-up networking must be installed.
3. An internet browser must be installed.
Windows98™ Setup (SEE NEXT PAGES FOR WINDOWS XP™ AND
WINDOWS VISTA™ SETUP)
Creating a Local Computer Dial-up Connection
1. From “My Computer” select “Dial-up Networking” and select “Make
New Connection”.
2. Name the connection “Local RE-1” and verify that the installed
modem is listed as the device then select “Next”.
3. For the telephone number enter “###”, select “Next”, then select
“Finish”.
✦ NOTE: The “###” prefi x to access programming is the default value for
the RE-1. It can be changed in the RE-1 using PPN #72. Be sure the
prefi x entered as the telephone number matches what has been set in
the RE-1 if it has been changed from the default.
4. Right-click on “Local RE-1” and select “Properties”.
5. From the “General” tab, in the “Connect Using” area, select
“Confi gure...”.
6. From the “General” tab, in the “Speaker volume area”, set the
volume to “High”.
7. Select the “Connection” tab.
8. Select “Advanced...”
9. In the “Use error control” area, de-select “Compress data” and
select “OK”
10. Select “OK” again.
11. Select the “Server Types” or “Networking” tab.
12. In the “Advanced Options” area, de-select “Enable software
compression”.
13. In the “Allowed network protocols” area, de-select “NetBEUI” and
de-select “IPX/SPX Compatible”. Only “TCP/IP” should be selected.
14. Select “TCP/IP Settings...”.
15. Select “Specify an IP address”.
16. Enter “192.168.20.11” as the “IP address”.
17. De-select “Use IP header compression” and de-select “Use default
gateway on remote network” then select “OK”.
18. Select “OK” again to complete the properties settings.
Connecting Locally
1. Start your browser software. If your browser is set to automatically dial
your normal Internet provider when the browser is opened, cancel the
dialing when it starts.
2. Start “Dial-up networking”.
3. Double-click on “Local RE-1”. (The Local RE-1 icon can be dragged
to the desktop for easy future access).
4. Enter the RE-1’s programming master password (123456, unless
changed) into the “Password” area. Select “Save Password” if you
want the computer to retain the password.
5. Select “Connect” and wait for the modem to connect to the RE-1.
6. Switch to the browser software and enter into the address line:
“http://192.168.20.10/re1.html” (save this address as a “favorite” or
“bookmark” so you won’t have to enter it each time you connect).
7. Follow the screen links to select the RE-1 items to program.
8. When fi nished programming, double-click on the dial-up networking
icon in the status area of the task bar and select “Disconnect” to
terminate the connection.
✦ NOTE: Be sure to disconnect when programming is completed.
Creating Remote Computer Dial-up Connection
1. From “My Computer” select “Dial-up Networking” and select “Make
New Connection”.
2. Name the connection “Remote RE-1” and verify that the installed
modem is listed as the device the select “Next”.
3. For the telephone number enter the telephone number of the line that
the RE-1 is installed on, select “Next”, then select “Finish”.
4. Right-click on “Remote RE-1” and select “Properties”.
5. From the “General” tab, in the “Connect Using” area, select
“Confi gure...”.
6. From the “General” tab, in the “Speaker volume area”, set the
volume to “High”.
7. Select the “Connection” tab.
8. Select “Advanced...”
9. In the “Use error control” area, de-select “Compress data” and
select “OK”
10. Select “OK” again.
11. Select the “Server Types” or “
Networking” tab.
12. In the “Advanced Options” area, de-select “Enable software
compression”.
13. In the “Allowed network protocols” area, de-select “NetBEUI” and
de-select “IPX/SPX Compatible”. Only “TCP/IP” should be selected.
14. Select “TCP/IP Settings...”.
15. Select “Specify an IP address”.
16. Enter “192.168.20.11” as the “IP address”.
17. De-select “Use IP header compression” and de-select “Use default
gateway on remote network” then select “OK”.
18. Select “OK” again to complete the properties settings.
Connecting Remotely
1. Start your browser software. If your browser is set to automatically dial
your normal Internet provider when the browser is opened, cancel the
dialing when it starts.
2. From “My Computer” select “Dial-up networking”.
3. Double-click on “Remote RE-1”. (The Remote RE-1 icon can be
dragged to the desktop for easy future access).
4. Enter the RE-1’s programming master password (123456, unless
changed) into the “Password” area. Select “Save Password” if you
want the computer to retain the password.
5. Select “Connect” and wait for the modem to dial the RE-1.
6. Select “Cancel” after two rings.
7. Wait about 10 seconds, but not longer than 30 seconds, then repeat
Steps 3-5. The RE-1 should answer.
8. Wait for the connection to establish.
9. Switch to the browser software and enter into the address line:
“http://192.168.20.10/re1.html” (save this address as a “favorite” or
“bookmark” so you won’t have to enter it each time you connect).
10. Follow the screen links to select the RE-1 items to program.
11. When fi nished programming, double-click on the dial-up networking
icon in the status area of the task bar and select “Disconnect” to
terminate the connection.
✦ NOTE: Be sure to disconnect when programming is completed.
 Loading...