Rev: 08.19.21 Page 3 CCD-0004029
Installation
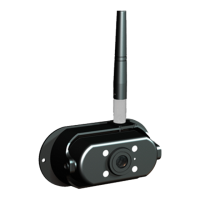
1. Locate a mounting area that allows electrical connection of the camera (Fig. 1) to the trailer's power
source and allows the camera lens to have a clear view of the rear area.
2. Prepare the trailer and camera for installation:
A. Clean the area on the trailer where the camera will be mounted and allow to dry.
B. With the antenna base facing up, rotate the camera into a downward viewing angle (Fig. 1).
C. Remove the protective film (Fig. 2) tape on the back of the camera.
Fig. 1 Fig. 2
Protective film
3. Drill a hole to access the unit ground wire and power supply and apply silicone sealant to the hole.
4. Make sure the trailer's power is off, then connect the camera's red power wire and black ground wire to
the unit as follows (Fig. 3).
Note: If necessary, use wire strippers to expose enough of the bare wire to make a good connection.
A. Connect the camera black wire to the unit ground wire.
B. Connect the camera red wire to a 12V DC power supply.
5. Secure the camera to the wall with two OEM-supplied #8 pan head screws.
6. Use all weather silicone sealant and seal around the perimeter of the camera and the heads of the
panhead screws.
7. Screw the antenna clockwise to the antenna base on the camera (Fig. 3).
Lens
Electrical Wire
Protective Film
Fastener
location
Camera
Antenna
Antenna base
Fig. 3