This document describes the Livoo 2-slot electric retro toaster, designed for household use. It emphasizes safety, proper operation, and maintenance to ensure user satisfaction and product longevity.
Function Description
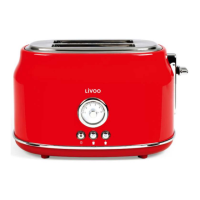
The Livoo retro toaster is designed to toast bread slices, offering various darkness settings, a defrost function for frozen bread, and a reheat function for cooled toast. It features two bread slots and controls for adjusting toast darkness, stopping the toasting cycle, and reheating. The appliance automatically ejects toast when the cycle is complete and includes a lift function for easier removal of smaller items.
Usage Features
General Operation:
Before first use, it's recommended to remove all packaging, check for accessories, clean the toaster with a damp cloth, and ensure all parts are correctly assembled and stable. The toaster should be placed with sufficient space from walls or other appliances as it heats up during operation. Connect the toaster to a 220-240V~ 50-60Hz power supply. For the initial use, perform one toasting cycle without bread to burn off any manufacturing residues. The toast lever will lock down and automatically jump up when the cycle is finished.
Toasting:
- Place bread slices into the toasting slots.
- Use the darkness control to select the desired toast darkness. Settings range from 1 (very light) to 6 (very dark), with the middle position recommended for golden brown toast.
- Press the toast lever down until it locks into place. The "Stop" indicator lamp will light up, and toasting will begin.
- The toasting cycle can be interrupted at any time by pressing the "Stop" button.
- Once the bread reaches the set darkness, it will be automatically ejected, and the appliance will shut off.
- For easier retrieval of toasted bread, push the toast lever upward to activate the lift function.
Thawing (DEFROST function):
The DEFROST function first thaws the bread and then toasts it, resulting in a slightly longer cycle than normal toasting.
- Place frozen bread slices into the toasting slots.
- Press the toast lever down until it locks into place.
- Select the desired toast darkness setting. Recommended settings:
- Low (1-2) for bread from the refrigerator or thin frozen bread slices.
- Medium (3-4) for frozen waffles.
- High (5-6) for thicker frozen bread slices and thick toast.
- Press the toast lever down until it locks into place.
- Immediately press the "DEFROST" button; its indicator lamp will light up.
- The bread or roll will be thawed and toasted.
- The cycle can be interrupted at any time by pressing the "Stop" button.
- Upon completion, the bread will be automatically ejected, and the indicator lamps will turn off. The appliance will shut off automatically.
Reheat Function:
This function allows you to re-heat toast that has cooled down too quickly.
- Place the cooled toast back into the toaster.
- Set the browning control to a low setting.
- Push the loading handle down.
- Press the "REHEAT" button; the reheat indicator will light up. Ensure the toast does not burn.
- The loading handle will automatically rise when the toast is reheated.
Tips for Ideal Toasting Results:
- Different types of bread have varying moisture content, affecting toasting results. Adjust darkness settings accordingly.
- For slightly dry bread, use a lower toast darkness setting.
- For fresh or whole grain bread, use a higher toast darkness setting.
- Bread with an irregular surface may require a higher toast darkness setting.
- Thick bread slices may need more time or even a second toasting cycle.
- When toasting raisin bread, remove all raisins from the surface to prevent burning.
- If toasting only one slice, select a low toast darkness setting.
- When toasting multiple slices consecutively, subsequent slices may be darker due to residual heat.
- For frozen bread or waffles, always use the thaw button.
Maintenance Features
Cleaning and Storage:
Regular cleaning and proper storage are crucial for the appliance's longevity and safe operation.
- Always allow the toaster to cool completely before cleaning.
- Before cleaning, turn off the appliance and unplug it from the power supply.
- Never immerse the appliance or its power cord in water or any other liquid, and do not wash it in a dishwasher.
- Wipe the toaster with a damp cloth and a small amount of dishwashing detergent. Avoid abrasive scouring agents, steel wool, metal objects, hot cleaning agents, or disinfectants, as these can damage the appliance.
- If bread slices get stuck, unplug the toaster, turn it over, and shake gently. Never use sharp or pointed tools or silverware to dislodge stuck bread.
- The crumb tray should be emptied regularly to prevent crumb accumulation, which could pose a fire risk. Pull the crumb tray out from the side, empty it, wipe it with a damp cloth, dry it thoroughly, and push it back into the appliance.
- Ensure the appliance is completely dry before using it again.
Safety Advices:
- Read the instructions carefully before first use.
- The appliance is intended for household use only; outdoor use is forbidden.
- Ensure the wall outlet voltage matches the appliance's rated voltage.
- Connect the appliance only to an earthed socket.
- Children aged 8 and above, and persons with reduced physical, sensory, or mental capabilities, can use the appliance if supervised and instructed on safe use, understanding the hazards.
- Children should not play with the appliance.
- Cleaning and user maintenance should not be performed by children unless they are over 8 years old and supervised.
- Keep the appliance and its cord out of reach of children under 8 years.
- Never leave the appliance unsupervised when in use.
- Unplug the appliance when not in use or during cleaning.
- Do not use the appliance if the power cord is damaged, if it malfunctions, if it has been damaged in any manner, or if it has been submerged in water.
- If the supply cord is damaged, it must be replaced by the manufacturer, its service agent, or similarly qualified persons to avoid hazards.
- Never immerse the base of the appliance in water or any other liquid, nor place it in a dishwasher.
- For cleaning surfaces in contact with food, refer to the "cleaning" paragraph.
- To reduce the risk of electric shock, do not operate with wet hands.
- Do not let the cord hang over the edge of a table or counter, or touch hot surfaces.
- Never unplug the appliance by pulling the cord.
- Unwind the cord completely to avoid superheating.
- Do not place the appliance on or near a hot gas burner or heated oven.
- The appliance is not intended for operation by an external timer or separate remote control system.
- Keep the appliance clean at all times, especially as it comes into direct contact with food.
- Surfaces are liable to get hot during use.
- Do not place or insert anything above the appliance.
- Do not toast or reheat bread with butter or jam.
- Do not toast bread of unsuitable size or deformed bread.
- Place the appliance on a stable, flat, clean, and heat-resistant surface.
- Do not attempt to remove bread during the heating cycle.
- Do not place the appliance near electric or gas hot plates or warm ovens.
- The toasting lever must be in the "Up" position before plugging in or unplugging the appliance.
- Ensure the crumb tray is clean and correctly placed before using the appliance.
- The supplier is not responsible for bad operation or if safety instructions are not followed.
- Do not insert hands or utensils like pins or needles into the toaster, as this poses a risk of fire or electric shock.
- Bread can burn; do not use the toaster near or below combustible materials like curtains. Always monitor the toaster during use.
- Use the appliance only for domestic purposes as indicated in the instructions.