EasyManua.ls Logo

Lorex LNB4421 Series - User Manual

Lorex LNB4421 Series
2 pages
Print Icon
To Next Page IconTo Next Page
Loading...
4MP HD IR Bullet IP Camera
LNB4421_QSG_EN_R3
Quick Start Guide
English Version 3.0
Copyright © 2018 Lorex Corporation
As our products are subject to continuous improvement, Lorex reserves
the right to modify product design, specifications and prices, without
notice and without incurring any obligation. E&OE. All rights reserved.
For a full list of compatible recorders, visit lorex.com/compatibility.
Not intended for submersion in water. Installation in a sheltered
location recommended.
This camera includes an Auto Mechanical IR Cut Filter. When the
camera changes between Day/Night viewing modes, an audible clicking
noise may be heard from the camera. This clicking is normal, and
indicates that the camera filter is working.
Disclaimers
Dimensions
6.3” / 161mm
2.8” / 71mm
LNB4421 SERIES
IR Bullet IP Camera
Mounting Kit*
Ethernet Extension Cable*
* Per camera in multi-camera packs.
Package Contents
ATTENTION:
It is recommended to connect the camera to the NVR or an external PoE
switch. If using a DC power adapter (not included) with the camera, a
REGULATED power supply is REQUIRED for use with this camera. Use of
a non-regulated, non-conforming power supply can damage this product
and voids the warranty.
Use the camera only with compatible Lorex NVRs.
Read this guide carefully and keep it for future reference.
Follow all instructions for safe use of the product and handle with care.
Use the camera within given temperature, humidity and voltage levels
noted in the camera’s specifications.
Do not disassemble the camera.
Do not point the camera directly towards the sun or a source of
intense light.
Use only a regulated power supply with the product (optional). Use of a
non-regulated, non-conforming power supply can damage the product
and void the warranty.
Periodic cleaning may be required. Use a damp cloth only. Do not use
any harsh, chemical-based cleaners.
The supplied cable is rated for surface mounting only. Cables for in-wall
and floor-to-floor installations are sold separately (CMR type). These
and other cables are available at lorex.com.
Safety Precautions
Point the camera where there is the least amount of obstructions
(i.e., tree branches).
Install the camera where vandals cannot easily reach.
Secure cabling so that it is not exposed or easily cut.
This camera is rated for outdoor use. Installation in a sheltered
location is recommended.
Installation Tips
www.lorex.com
Using the Weather Resistant Cap (Optional)
Camera Ethernet Connector
O-Ring
Barrel
End Cap
1. Fit the O-ring around the camera Ethernet connector.
2. Connect the cable to the camera Ethernet connector.
3. Twist the barrel securely onto the camera Ethernet connector. The
O-ring becomes compressed when the seal is properly tight.
4. Twist the end cap securely onto the barrel.
Need Help?
Visit us online for up-to-date software
and complete instruction manuals
Click on the Downloads tab
4
Visit lorex.com
Search for the model
number of your product
Click on your product
in the search results
3
2
1
Resources
Question and Answer IconNeed help?

Do you have a question about the Lorex LNB4421 Series and is the answer not in the manual?

Summary

Package Contents

Safety Precautions

Installation Tips

Using the Weather Resistant Cap

Resources and Support

Dimensions

Disclaimers

Installing the Camera

Before Installing the Camera

Decide on cable routing and note cable notch for flush mounting.

Connecting the Camera

Cable Extension Options

Troubleshooting

Overview

This document describes the Lorex LNB4421 Series 4MP HD IR Bullet IP Camera, a device designed for surveillance and security applications. It provides comprehensive instructions for installation, connection, troubleshooting, and general usage.

Function Description:

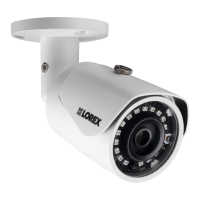
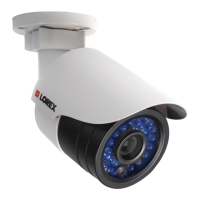
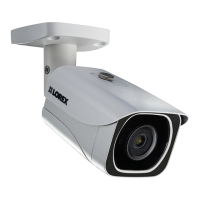
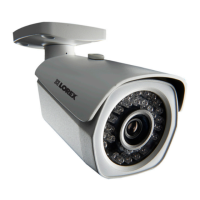
The Lorex LNB4421 is an IP bullet camera capable of capturing 4-megapixel high-definition video. It features infrared (IR) capabilities for night vision, allowing it to record in low-light or dark conditions. The camera is designed to be integrated into a surveillance system, primarily with compatible Lorex Network Video Recorders (NVRs). It supports H.265 compression, which helps optimize storage space and bandwidth usage for recorded video. The camera includes an Auto Mechanical IR Cut Filter, which automatically adjusts between day and night viewing modes to ensure optimal image quality in varying light conditions. This filter produces an audible clicking noise during mode transitions, which is a normal part of its operation. The camera is rated for outdoor use, making it suitable for a variety of external surveillance needs, though installation in a sheltered location is recommended for enhanced durability.

Usage Features:

The camera is designed for straightforward installation and operation. It can be connected to an NVR either directly via its Power over Ethernet (PoE) ports or through a router/switch on a local area network (LAN). For direct NVR connection, the camera powers up automatically via PoE. If connecting to a router/switch that does not support PoE, an optional 12V DC power adapter (model#: CVA4902, not included) is required.

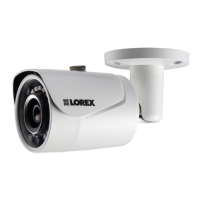
Installation involves mounting the camera to a surface using provided screws and, if necessary, drywall anchors. The camera's stand offers significant adjustability: the base can rotate 360°, the camera body can twist 360° around the stand, and it can tilt up to 90°. These adjustments allow users to precisely position the camera for optimal viewing angles. An adjustment screw secures the camera's position once set.

The camera's Ethernet cable can be extended up to 300 feet (92 meters) using CAT5e (or higher) Ethernet cable and RJ45 couplers. For longer runs beyond 300 feet, a switch is required. An optional weather-resistant cap is provided for the Ethernet connection, which involves fitting an O-ring, connecting the cable, and securely twisting a barrel and end cap to ensure a tight, sealed connection, protecting against environmental elements.

The camera's performance can be optimized by following several guidelines:

  • Placement: Point the camera away from direct sources of intense light (like the sun) to prevent overexposure. For bullet cameras with adjustable sunshades, these can be used to block excess light. Installing the camera where it is not easily accessible to vandals is also recommended.
  • Obstructions: Position the camera to minimize obstructions in its field of view, such as tree branches.
  • Night Vision: The night vision feature activates automatically when light levels drop. If night vision is not working, it might indicate too much ambient light in the area.
  • Image Quality: If the picture is too bright or too dark, users can adjust brightness and contrast settings on the NVR. If the picture is unclear, checking the camera lens for dirt, dust, or spiderwebs and cleaning it with a soft, clean cloth is advised. Ensuring the cable run is within specified limitations also contributes to clear imaging.
  • Color in Dark Conditions: The camera's image sensor is highly sensitive to light, allowing it to maintain color mode in low-light conditions. Instructions on how to manually switch the camera to night mode (monochrome) are available on lorex.com.
  • Reflection: If a bright spot appears in the video when viewing at night, it may be due to night vision reflecting off a window; repositioning the camera is recommended in such cases.

Maintenance Features:

The document emphasizes several maintenance and care points to ensure the longevity and optimal performance of the camera:

  • Cleaning: Periodic cleaning of the camera is required. Users should use a damp cloth only and avoid harsh, chemical-based cleaners. This is particularly important for the camera lens to maintain clear image quality.
  • Power Supply: If using a DC power adapter (not included), a REGULATED power supply is REQUIRED. Using a non-regulated or non-conforming power supply can damage the product and void the warranty.
  • Cable Management: The supplied cable is rated for surface mounting only. For in-wall and floor-to-floor installations, CMR-type cables, which are sold separately, should be used. Securing cabling to prevent exposure or easy cutting is also important for security and durability.
  • Environmental Considerations: While rated for outdoor use, installing the camera in a sheltered location is recommended to protect it from extreme weather conditions and extend its lifespan. The camera is not intended for submersion in water.
  • Firmware and Software: Users are encouraged to visit lorex.com for up-to-date software and complete instruction manuals, ensuring the camera operates with the latest features and improvements. This also includes information on enabling H.265 compression, which can be beneficial for system performance.
  • Troubleshooting: The manual provides a detailed troubleshooting section for common issues like "no picture/signal," "picture too bright/dark," "night vision not working," and "picture not clear," offering solutions that often involve checking connections, adjusting settings on the NVR, or cleaning the camera.

Lorex LNB4421 Series Specifications

General IconGeneral
Camera TypeBullet
Image Sensor1/3" CMOS
Weather ResistanceIP66
Power Supply12V DC
IR Cut FilterYes
Housing MaterialMetal
Resolution4MP
Video Resolution2560 x 1440
Operating Temperature-22°F to 140°F (-30°C to 60°C)

Related product manuals