4. MEASURING PROCEDURE
4-1 CO2 measurement
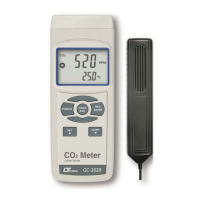
1)Plug the " CO2 Probe Plug " ( 3-15, Fig. 1 ) into the "
Probe Input Socket " ( 3-9, Fig. 1 ).
2)Power on the meter by pressing the " Power Button "
( 3-2, Fig. 1 ),
* The LCD will show the text " WARM UP "
*
in cycling.
Warm up time will take about 45 seconds, then
display will show the CO2 ( PPM ) value in the upper
When the " Sampling indicator " rotate one cycle,
the CO2 measuring value will update one time.
* Response Time of CO2 is < 2 min. typically,
however it is depend on the environment air
circulation.
3)The meter Temp. display unit is defaulted to " ". If℃
intend to let the meter's temperature unit default to " "℉
, then please refer section 5-2 ( page 9 ).
4-2 CO2 alarm setting
During the CO2 measurement, if press the " Alarm
Button " ( 3-6, Fig. 1 ) once, the display will show the
indicator " ALARM " and going on to execute the CO2
alarm function. If the measurement value over the "
Alarm setting value ", the buzzer will sound.
* If press the " Alarm Button " ( 3-6, Fig. 1 ) once again,
the CO2 alarm function will be disabled, the ' ALARM "
indicator on the LCD will be disappeared.
* The procedures of setting the CO2 alarm value, please
refer section 5-3 ( page 9 ).
6