EasyManua.ls Logo

Magic Chef CER3725AGW - User Manual

Magic Chef CER3725AGW
16 pages
Print Icon
To Next Page IconTo Next Page
Loading...
Form No. A/10/05 Part No. 8113P540-60 ©2005 Maytag Appliances Sales Co. Litho U.S.A .
U
SER
S
G
UIDE
U
SER
S
G
UIDE
Electric Smoothtop Range
CER3725AGW
Table of Contents
Important Safety Instructions 1-3
Care & Cleaning ....................... 4-5
Cleaning Procedures
Maintenance ............................. 6-7
Oven Window
Oven Light
Troubleshooting ....................... 7-8
Surface Cooking .................... 9-11
Surface Controls
Smoothtop Surface
Oven Cooking .......................11-14
Manual Clean Oven Control
Clock
Timer
Baking, Roasting and Broiling
Sabbath Mode
Question and Answer IconNeed help?

Do you have a question about the Magic Chef CER3725AGW and is the answer not in the manual?

Summary

Important Safety Instructions

To Prevent Fire or Smoke Damage

Provides guidelines to prevent fire and smoke hazards during appliance operation.

In Case of Fire

Details immediate actions to take in the event of a fire involving the appliance.

Child Safety

Cooking Safety

Cooktop Safety

Care & Cleaning

Cleaning Procedures

Provides step-by-step instructions for cleaning various parts of the appliance.

Troubleshooting

Troubleshooting Common Issues

Surface Cooking

Surface Cooking Areas & Cookware

Cooktop Protection Tips

Offers advice on preventing damage, marks, and stains on the cooktop.

Oven Cooking

Manual Clean Oven Control

Explains the operation of the oven controls for manual cleaning mode.

Baking, Roasting and Broiling

Setting the Controls For Baking or Roasting

Details how to set the oven for baking and roasting functions.

Setting the Controls For Broiling

Explains how to set the oven for broiling and top browning.

Automatic Shut-Off and Sabbath Mode

Adjusting Oven Temperature

Adjust Oven Temperature Settings

Step-by-step instructions for modifying oven temperature settings.

Overview

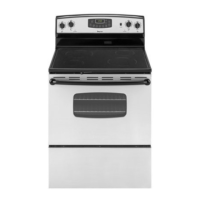
This document is a user's guide for the Magic Chef Electric Smoothtop Range, model CER3725AGW. It provides comprehensive instructions for safe operation, maintenance, and troubleshooting of the appliance.

Function Description:

The Magic Chef Electric Smoothtop Range CER3725AGW is a cooking appliance designed for both surface cooking and oven cooking. It features a glass-ceramic smoothtop surface with multiple electric heating elements for various cooking needs, and a manual clean oven for baking, roasting, and broiling. The range is equipped with controls for both the surface elements and the oven, a clock, and a timer. Safety features include an anti-tip device, hot surface indicator lights, and an automatic oven shut-off.

Important Technical Specifications:

  • Model Number: CER3725AGW
  • Oven Temperature Range: 170°F to 550°F (adjustable in 5° increments, or 10° increments when holding the pad)
  • Oven Light Bulb: 40-watt appliance bulb
  • Timer Range: 0:01 (1 minute) to 99:59 (99 hours and 59 minutes)
  • Surface Elements: Includes 6" single elements and 9" single elements.
  • Oven Racks: Two racks with a lock-stop edge. Rack positions are numbered 1 (lowest) to 5 (highest).
  • Automatic Oven Shut-Off: After 12 hours of continuous operation (can be canceled for Sabbath Mode).
  • Temperature Adjustment: Oven temperature can be adjusted by 5° to 35° (either increased or decreased).
  • Power: Appliance requires proper installation and grounding by a qualified technician. Power should be disconnected before servicing.

Usage Features:

  • Surface Cooking:
    • Controls: Infinite choice of heat settings from Low to High, adjusted by pushing in and turning the knobs. Each knob controls a specific surface element, indicated by a graphic on the control panel.
    • Hot Surface Light: An indicator light on the control panel illuminates when any cooking area is hot and remains on until the surface has cooled.
    • Heat Settings:
      • Low (2): For keeping foods warm and melting chocolate/butter.
      • Med. Low (3-4): For continuing to cook covered foods or steam foods.
      • Medium (5-7): For maintaining a slow boil for large liquid amounts and most frying.
      • Med. High (8-9): For browning meat, heating oil for deep fat frying/sautéing, and maintaining a fast boil for large liquid amounts.
      • High (10): For bringing liquids to a boil; setting should be reduced once boiling begins.
    • Smoothtop Surface: Retains heat after elements are turned off, allowing for continued cooking. Pans should cover the element and not extend more than 1/2 to 1 inch beyond the cooking area for efficiency.
    • Cookware Recommendations: Flat, smooth-bottom, heavy-gauge pans are recommended. Pans should be the same size as the element. Secure, tight-fitting lids are advised. Avoid very thin-gauge metal/glass pans, grooved/warped bottoms, pans significantly smaller/larger than the element, loose/broken handles, and ring-stand bottom woks.
    • Canning: Canners and large pots must have flat bottoms and be made from heavy-gauge materials. Base should not be more than 1 inch larger than the element. Use High heat only until boiling/pressure is reached, then reduce to the lowest heat setting that maintains the boil/pressure.
  • Oven Cooking:
    • Manual Clean Oven Control:
      • BAKE: Used for baking and roasting.
      • BROIL: Used for broiling and top browning (HI for normal, LO for longer cooking foods like poultry).
      • TIMER: Sets a countdown timer (does not control the oven).
      • CLOCK: Sets the time-of-day clock.
      • CANCEL: Cancels all operations except timer and clock.
      • Up/Down Arrows: Used to enter or change time and oven temperature.
    • Setting the Clock: Press CLOCK, then use up/down arrows to set the time.
    • Setting the Timer: Press TIMER, then use up/down arrows to set the desired time. Two short beeps signal the end of the operation.
    • Baking/Roasting: Press BAKE, use up/down arrows to set temperature (170°F-550°F). Oven preheats for 10-15 minutes, signaled by a single beep.
    • Broiling: Press BROIL, select HI or LO broil using up/down arrows. Preheat broil element for three minutes with the oven door open to the first stop position (about 4 inches).
    • Oven Racks: Two racks are provided. Rack positions 5 (highest) for toasting/thin foods, 4 for most broiling, 3 for most baked goods, 2 for small cuts of meat/casseroles, and 1 (lowest) for large cuts of meat/poultry. Multiple rack cooking is possible (e.g., 2 and 4, or 1 and 4).
    • Oven Light: Controlled by a switch on the control panel.
    • Sabbath Mode: Can be activated by pressing and holding CLOCK for five seconds. In this mode, BAKE is the only active function, and all other functions (except timer) are locked out. No audible beeps or prompts. The oven will run continuously for 72 hours unless canceled. To cancel, press and hold CLOCK for five seconds.
    • Adjusting Oven Temperature: If baking/browning is incorrect, the oven temperature can be adjusted by 5° to 35° (up or down). Press BAKE, enter 550°, press and hold BAKE until 0° appears, then use up/down arrows to adjust.
    • Changing Temp °C/°F: Press and hold CANCEL and BAKE simultaneously for three seconds. Use up/down arrows to switch between °F and °C.

Maintenance Features:

  • General Cleaning:
    • Backguard & Cooktop Porcelain Enamel: Clean with soapy water, rinse, and dry when cool. Avoid abrasive cleaners, oven cleaners, or wiping hot surfaces with a damp cloth.
    • Broiler Pan & Insert: Soak with soapy water, wash with warm soapy water, use a scouring pad for stubborn soil. Dishwasher safe. Do not cover insert with aluminum foil.
    • Clock & Control Pad Area: Wipe with a damp cloth and dry. Glass cleaners can be used if sprayed on a cloth first. Do NOT spray directly on the control pad.
    • Control Knobs: Remove in OFF position, wash, rinse, and dry. Avoid abrasive cleaners.
    • Oven Window (Glass): Wash with soap and water, rinse, and dry. Glass cleaner can be used if sprayed on a cloth first. Avoid excessive water. Do not use abrasive materials.
    • Oven Interior (Manual Clean): Clean frequently with mild abrasive cleaners and a plastic pad. Avoid metallic scouring pads. Follow manufacturer instructions for commercial oven cleaners. Wipe up acidic spills promptly.
    • Oven Door, Storage Drawer, Door Handle, Side Panels (Painted Enamel): Wash with warm, soapy water, rinse, and dry when cool. For stubborn soil, use mildly abrasive cleaning agents like baking soda paste or Bon Ami. Avoid abrasive, caustic, or harsh cleaning agents, steel wool pads, or oven cleaners. Wipe up spills (especially acidic/sugary) immediately.
    • Oven Racks: Clean with soapy water. Remove stubborn soil with cleansing powder or soap-filled scouring pad. Rinse and dry.
  • Smoothtop Surface Cleaning:
    • Allow cooktop to cool before cleaning.
    • General: Clean after each use with a damp paper towel and Cooktop Cleaning Creme (Part No. 20000001), then buff with a clean, dry cloth.
    • Heavy Soils/Metal Marks: Dampen a "scratchless" scrubber sponge, apply Cooktop Cleaning Creme, scrub, then apply a thin layer, cover with a damp paper towel and plastic wrap for 30-45 minutes (2-3 hours for heavy soil). Scrub again, then buff.
    • Burned-on/Crusty Soils: Scrub with a "scratchless" scouring pad and Cooktop Cleaning Creme. Use a razor blade scraper at a 30° angle for remaining soil.
    • Melted Sugar/Plastic: Immediately turn element to Low, scrape from hot surface to a cool area, turn element OFF, allow to cool, then clean with razor blade scraper and Cooktop Cleaning Creme.
    • Prevention: Clean cooktop daily. Clean spills immediately while hot (with extreme care). Do not allow spills to remain. Do not use abrasive cleansing powders, scouring pads, chlorine bleach, ammonia, or other non-recommended cleansers. Do not use glass pans, trivets, or wok rings between surface and pan. Do not slide aluminum or heavy metal pans. Ensure surface and pan bottoms are clean. Do not leave sugar, salt, or fats on the cooking area. Do not allow plastic, sugar, or high-sugar foods to melt on the cooktop. Do not let pans boil dry. Do not use cooktop as a work surface or cutting board. Do not cook food directly on the surface. Do not use small pans on large elements. Do not use non-flat, oversized, or uneven specialty items. Do not use foil or foil-type containers.
  • Oven Door Removal/Replacement:
    • Removal: Open door to first stop (about four inches), grasp sides, and lift evenly until it clears hinge arms.
    • Replacement: Align slots in door with hinge arms, slide down until completely seated, push down on top corners.
  • Oven Light Bulb Replacement:
    • Disconnect power. When cool, hold bulb cover, slide wire retainer off, remove bulb cover and light bulb. Replace with a 40-watt appliance bulb. Secure bulb cover with wire retainer. Reconnect power and reset clock.
  • Leveling Legs: Ensure the range is level by adjusting the leveling legs at each corner. Verify the anti-tip bracket secures one rear leveling leg to the floor.
  • Storage Drawer Removal/Replacement:
    • Removal: Empty drawer, pull out to first stop, lift front, pull out to second stop, grasp sides and lift top up and out.
    • Replacement: Fit drawer glide ends into rails, lift front and gently push to first stop, lift again and push until closed.

Magic Chef CER3725AGW Specifications

General IconGeneral
BrandMagic Chef
ModelCER3725AGW
CategoryRanges
LanguageEnglish

Related product manuals