Do you have a question about the Makita HM002G and is the answer not in the manual?
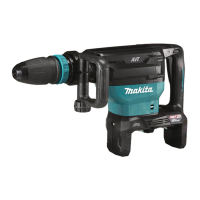
This document provides the instruction manual for the Makita Cordless Demolition Hammer, model HM002G. It covers safety warnings, functional descriptions, operating procedures, and maintenance guidelines for the tool and its accessories.
The Makita Cordless Demolition Hammer HM002G is designed for chiselling work in concrete, brick, stone, and asphalt. It can also be used for driving and compacting with appropriate accessories. The tool is equipped with electronic functions for easy operation, including constant speed control and soft start. The constant speed control maintains a consistent rotation speed regardless of load conditions, while the soft start function minimizes start-up shock, ensuring a smooth machine start.
The tool features a trigger-lock button to prevent accidental starting. To operate the tool, the trigger-lock button must be depressed from the 'A' side, and the switch trigger pulled. Releasing the switch trigger stops the tool. For continuous operation, the trigger-lock button can be depressed from the 'B' side while pulling the switch trigger, and then released. To stop continuous operation, the trigger-lock button is depressed from the 'A' side.
The HM002G also incorporates a tool/battery protection system that automatically cuts off power to the motor to extend the life of both the tool and the battery. This system activates under conditions such as overload, overheating of the tool or battery, and insufficient battery capacity (overdischarge protection). When the tool or battery overheats, the lamp blinks, and the tool stops automatically, requiring a cooling period before restarting. If the battery capacity is low, the tool stops, and the battery needs to be recharged.
A notable feature is the wireless activation function, which enables clean and comfortable operation by connecting to a supported vacuum cleaner. This allows the vacuum cleaner to run automatically in sync with the tool's switch operation. This function requires a wireless unit (optional accessory) and a compatible vacuum cleaner. The setup involves installing the wireless unit into the tool's slot, registering the tool with the vacuum cleaner, and then starting the wireless activation function. The wireless activation lamp on the tool indicates the status of this function, showing whether it's on standby, running, or in the process of tool registration or cancellation.
The cordless demolition hammer is designed for user convenience and safety. It requires a battery cartridge for operation, and users are advised to only use genuine Makita batteries and chargers specified in the manual to avoid injury or fire. The battery cartridge can be easily installed or removed by aligning the tongue with the groove in the housing and sliding it into place until it clicks. A red indicator on the button signals if the cartridge is not fully locked.
The tool's blows per minute can be adjusted using a dial marked from 1 (lowest speed) to 5 (full speed). This allows users to select the appropriate speed for different applications. It is crucial not to turn the adjusting dial while the tool is running to prevent loss of control and injury. The tool also features a soft no-load rotation function, where blows per minute are reduced at no load to minimize vibration, increasing to full speed once the bit engages with the workpiece.
For enhanced visibility, the tool includes a front lamp that lights up when the switch trigger is pulled and stays on for approximately 10 seconds after release. Users are cautioned not to look directly into the light source.
The side handle (auxiliary handle) is an essential safety feature that must always be used. It can be adjusted vertically and horizontally to any desired position by loosening and tightening the clamp nut, ensuring a firm grip and safe operation.
Installing and removing bits is straightforward. The shank end of the bit should be cleaned and coated with a small amount of grease (about 0.5 - 1g) before insertion to ensure smooth action and longer service life. The bit is inserted by turning and pushing it until it engages, and its secure placement should always be verified by attempting to pull it out. To remove, the release cover is pulled down, and the bit is pulled out. The bit angle can be adjusted to 12 different positions by sliding the change ring cover forward, turning it to the desired angle, and then sliding it back to lock.
For dust management, an optional dust extractor attachment can be installed. This involves attaching a hose holder to the tool and connecting it to a vacuum cleaner. The distance between the dust cover and the chisel tip can be adjusted, with a recommended range of 30 mm to 100 mm.
During chipping, scaling, or demolition operations, the tool should be held firmly with both hands. Applying slight pressure prevents uncontrolled bouncing, and excessive pressure does not increase efficiency. If the battery cartridge is cold, the tool's capability may be reduced; warming it up by running the tool at no load for a while can restore full capability.
Maintaining the Makita Cordless Demolition Hammer involves several key practices to ensure its safety, reliability, and longevity. Before any inspection, maintenance, or adjustment, it is crucial to always switch off the tool and remove the battery cartridge.
Users are explicitly warned against using gasoline, benzine, thinner, alcohol, or similar substances for cleaning, as these can cause discoloration, deformation, or cracks in the tool. For any repairs or adjustments, it is recommended to use Makita Authorized or Factory Service Centers and genuine Makita replacement parts to maintain product safety and reliability.
For optimal battery life, the manual provides specific tips:
For the wireless unit, important safety instructions include:
The manual also includes a troubleshooting guide for the wireless activation function, addressing common issues such as the lamp not lighting/blinking, failed tool registration/cancellation, or the vacuum cleaner not running or running unintentionally. This guide helps users identify probable causes (e.g., improper installation, dirty terminals, incorrect switch settings, radio interference) and provides corresponding remedies, such as reinstalling the wireless unit, cleaning contacts, adjusting settings, or performing registration procedures again.
| Model | HM002G |
|---|---|
| Voltage | 40V |
| Vibration Level | 7.5 m/s² |
| Overall Length | 275 mm |
| Chisel Type | Hex Shank |