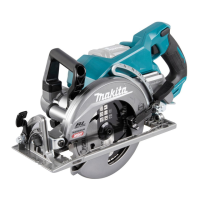
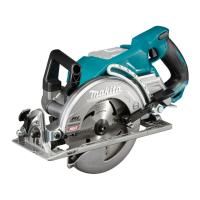
The Makita RS001G is a cordless rear handle saw designed for performing lengthways and crossways straight cuts and miter cuts with angles in wood while in firm contact with the workpiece.
Technical Specifications
- Model: RS001G
- Blade diameter: 185 mm
- Max. Cutting depth:
- at 0°: 65 mm
- at 45° bevel: 45 mm
- at 53° bevel: 38 mm
- No load speed: 6,400 min⁻¹
- Overall length: 446 mm
- Rated voltage: D.C. 36 V - 40 V max
- Net weight: 5.0 - 5.6 kg (depending on battery cartridge)
- Applicable battery cartridges: BL4025, BL4040*, BL4050F* (*Recommended battery)
- Applicable chargers: DC40RA, DC40RB, DC40RC
- Noise levels (A-weighted, according to EN62841-2-5):
- Sound pressure level (LPA): 92 dB(A)
- Sound power level (LWA): 103 dB(A)
- Uncertainty (K): 3 dB(A)
- Vibration total value (tri-axial vector sum, according to EN62841-2-5, cutting wood):
- Vibration emission (ah,w): 2.5 m/s² or less
- Uncertainty (K): 1.5 m/s²
Function Description
The RS001G features an automatic speed change function with "high speed mode" and "high torque mode." The tool automatically adjusts its operation mode based on the workload. For low workloads, it operates in "high speed mode" for quicker cutting. For high workloads, it switches to "high torque mode" for powerful cutting.
The tool is equipped with a tool/battery protection system that automatically cuts off power to the motor to extend tool and battery life under certain conditions:
- Overload protection: If the tool draws abnormally high current, it stops. Turn the tool off, stop the application, and restart.
- Overheat protection: If the tool/battery overheats, it stops. Allow it to cool down before restarting.
- Overdischarge protection: When battery capacity is low, the tool stops. Remove and charge the batteries.
The remaining battery capacity can be checked by pressing a button on the battery cartridge, which illuminates indicator lamps for a few seconds.
Usage Features
- Installing/Removing Battery Cartridge: Always switch off the tool and hold it firmly when installing or removing the battery. Ensure the battery cartridge is fully inserted until the red indicator is no longer visible. Do not use the battery adapter with the circular saw as its cable may hinder operation.
- Adjusting Depth of Cut: Loosen the lever on the depth guide, move the base up or down to the desired depth, and then tighten the lever securely. For cleaner and safer cuts, set the depth so that no more than one blade tooth projects below the workpiece to reduce kickback.
- Bevel Cutting: Loosen the lever and tilt the tool base to the desired angle, then tighten the lever securely. The tool includes a positive stopper for quick setting of designated bevel angles (22.5°/45°/53°).
- Sighting: For straight cuts, align the 0° position on the front of the base with the cutting line. For 45° bevel cuts, align the 45° position.
- Switch Action: The tool has a lock-off button to prevent accidental pulling of the switch trigger. To start, depress the lock-off button and pull the switch trigger. Release the trigger to stop. The tool features an electric blade brake that stops the blade quickly upon trigger release.
- Lower Guard Function: Before each use, check that the lower guard moves freely and closes instantly. Never clamp or tie the guard in an open position. The lower guard can be manually retracted for special cuts like "plunge cuts" and "compound cuts," but should be released as soon as the blade enters the material.
- Rip Fence (Guide Rule): An optional rip fence can be used for accurate straight cuts and repeated cuts of uniform width. It slides against the workpiece and is secured with a clamping screw.
- Hook: A hook is provided for temporarily hanging the tool. Lift it until it snaps into the open position for use, and lower it into the closed position when not in use. Always remove the battery when hanging the tool.
- Lanyard (Tether Strap) Connection: For working at height, the tool can be tethered using a lanyard. The maximum lanyard length is 2 m (6.5 ft), and the maximum permissible fall height is 2 m (6.5 ft). Use lanyards rated for at least 7.0 kg (15.4 lbs) and anchor them to a rigid structure.
Maintenance Features
- General Maintenance: Always ensure the tool is switched off and the battery cartridge is removed before performing any inspection or maintenance.
- Cleaning: Clean out the upper and lower blade guards regularly to prevent sawdust accumulation, which can impede guard operation. Compressed air is recommended for this. After each use, wipe off sawdust from the tool. Never use gasoline, benzine, thinner, alcohol, or similar substances, as they can cause discoloration, deformation, or cracks.
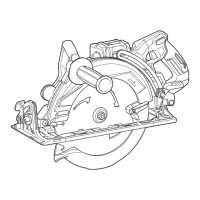
- Blade Installation/Removal: To remove the circular saw blade, press the shaft lock and use the offset wrench to loosen the hex bolt. To install, reverse the procedure, ensuring the blade teeth point up at the front of the tool and the arrow on the blade aligns with the arrow on the tool. Use only the Makita offset wrench. Ensure the hex bolt is tightened counterclockwise securely but not forcibly. If a ring is needed for mounting, ensure the correct ring for the blade's arbor hole is used between the inner and outer flanges.
- Adjusting 0°-cut Accuracy: If the 0°-cut accuracy is off, slightly loosen the lever on the bevel scale plate. Make the base perpendicular to the blade using a triangular or square rule by turning the adjusting screw. Then tighten the lever and perform a test cut.
- Vacuum Cleaner Connection (Optional): For clean cutting operations, connect a Makita vacuum cleaner to the dust nozzle using the front cuff 24. Remove the rubber cap from the dust nozzle before connecting the hose.
- Service: For product safety and reliability, repairs and other maintenance should be performed by Makita Authorized or Factory Service Centers using genuine Makita replacement parts. If the electric brake consistently fails to stop the blade quickly, have the tool serviced.