Do you have a question about the Mark Levinson N38 and is the answer not in the manual?
Details on how to unpack the preamplifier and its accessories.
Instructions for inserting batteries into the remote control unit.
Recommendations for positioning the Nº38 preamplifier for optimal performance.
Guidance on ensuring adequate airflow around the unit for heat dissipation.
Adjusts the display brightness, including an 'off' setting.
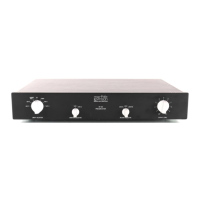
Shows operational status, modes, and source information.
Three LEDs indicating the current operational mode.
Cycles through Monitor, Record Select, and Balance operational modes.
LED indicating if the output polarity is inverted.
Adjusts listening volume or channel balance.
Toggles between stereo and mono operation.
Selects audio inputs for monitoring or recording.
Reduces the main output level by a user-defined amount.
Toggles the unit between normal operation and standby mode.
Connects to power amplifier balanced inputs for optimal signal integrity.
Describes using Y-adaptors for multiple balanced outputs to drive more power amplifiers.
Connects to power amplifier or crossover single-ended inputs.
Accepts balanced signals from sources with balanced outputs.
Connects to tape inputs of a recorder, unaffected by volume control.
Ports for linking with compatible Mark Levinson components.
Details on constructing or obtaining RJ-45 cables for linking.
Requirements for connecting a turntable via a phono preamp.
Input for infrared repeater systems for remote installation control.
Specifies voltage and polarity requirements for the IR input.
Toggles between stereo and mono playback modes.
Adjusts display brightness or places unit in standby.
Selects audio inputs remotely, also powers unit on from standby.
Controls listening volume with variable speed adjustments.
Inverts the output polarity of the preamplifier.
Changes operational modes (Monitor, Record Select, Balance).
Temporarily reduces output level by a programmable amount.
Describes RCA and XLR connectors for audio signal input and output.
How to connect the AC power cord and what happens upon first power-up.
Diagram showing AC power cord pin assignments.
General method for customizing preamplifier settings via a Set-Up mode.
Assigns alternative names to inputs for easier system identification.
List of pre-defined input aliases for system configuration.
Special alias for connecting an equalizer for proper operation.
Step-by-step guide to renaming input aliases.
Associates specific record outputs with selected inputs.
Discusses potential noise under non-standard test conditions.
Adjusts relative output levels of sources to match the loudest.
Sets a preferred volume level that automatically engages for a selected input.
Customizes the decibel reduction for the Mute button.
Establishes a maximum volume setting to prevent excessively loud playback.
Sets a timer for the preamplifier to enter standby mode automatically.
Explains how the unit times out from set-up modes to prevent accidental changes.
Standard preamplifier operation for listening to selected sources.
Selects sources to be sent to the record outputs for recording.
Fine-tunes relative volume levels between left and right channels.
Advice on using balance control for accurate soundstaging and imaging.
Explains why surround processors should not follow the preamplifier's volume control.
Discusses issues with using processors before the preamplifier's volume control.
Explains why tape loop integration is inappropriate for surround processors.
Details the Nº38's special interface for integrating surround sound processors.
Illustrates how to connect the Nº38 with a surround sound processor.
Describes a method to break ground loops causing hum in A/V systems.
Synchronizes display brightness across linked Mark Levinson components.
Links the standby state of the Nº38 with other compatible components.
Activates linked components and selects appropriate inputs upon playback.
Prevents inadvertent interruption of digital recording sessions.
Standard warranty coverage for defects in material and workmanship.
Information on extending the product's warranty coverage to five years.
Diagram showing the top view dimensions of the Nº38 preamplifier.
Diagram showing the side view dimensions of the Nº38 preamplifier.
| Brand | Mark Levinson |
|---|---|
| Model | N38 |
| Category | Amplifier |
| Language | English |