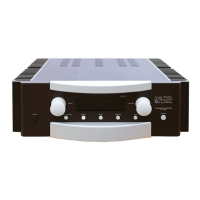
Do you have a question about the Mark Levinson 383 and is the answer not in the manual?
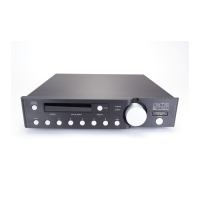
Explains the rationale behind creating an integrated amplifier from a brand known for separates.
Details the three power supplies and their role in providing clean DC power to various circuit elements.
Describes the five analog input pairs and how single-ended signals are converted to balanced.
Discusses the precision electronic control of analog volume using dual solid-state stepped attenuators.
Covers the output stage using devices from higher-end models and the cooling design.
Details internal and external component failure protection, including thermal and over-current protection.
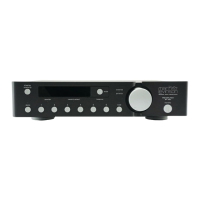
Explains the redesigned remote and user interface, including input naming and selector knob functionality.
Describes the software-controlled OS, updateability via RS-232, and DC trigger capabilities.
Highlights the attention to detail, component quality, craftsmanship, and testing for reliability and longevity.
Instructions for unpacking the amplifier and its accessories, including gloves.
Step-by-step guide on how to insert batteries into the remote control.
Guidance on positioning the N°383 for optimal performance and ventilation.
Recommends keeping the unit powered on via standby for optimal performance.
Specifies the necessary clearance for heat dissipation through air circulation.
Details the expected sound quality improvement over time and initial warm-up.
Describes the function of the power button for connecting/disconnecting AC mains power.
Explains its use for selecting inputs and navigating setup menus.
Details the twelve-character display for showing operation status, input names, and settings.
Explains the polarity inversion feature and its indicator LED.
Describes its use for adjusting listening volume and relative channel balance.
Controls display brightness levels and linked component displays.
Enters the setup mode for customizing amplifier settings.
Used to save changes made during the setup mode.
Allows adjustment of relative left and right channel volumes.
Reduces main output level by a user-modifiable amount.
Toggles the unit between standby mode and normal operation, with a special sleep timer function.
Explains the layout of left/right channel connections for channel separation.
Describes the custom gold-plated binding posts for loudspeaker termination.
Allows external control via infrared repeaters for installation flexibility.
Facilitates system control by passing trigger signals between components.
Used for software updates and external control by automation systems.
Enables "linking" functions with compatible Mark Levinson components.
Provides instructions on creating or obtaining RJ-45 cables for component linking.
Reserved ports for future PHASTLink™ communications.
Accepts balanced audio signals via XLR connectors, conforming to AES standards.
Accepts single-ended audio signals via RCA connectors from various sources.
Provides tape outputs unaffected by volume control for recording.
IEC-standard socket for connecting the removable AC power cord.
The window on the remote for transmitting infrared control signals to the N°383.
Toggles the unit between standby mode and normal operation.
Duplicates the front panel setup button for remote menu access.
Duplicates the front panel enter button for saving setup changes.
Used for remote selection of inputs and navigation within setup menus.
Adjusts the listening volume at varying speeds for fine or large changes.
Controls the front panel display brightness levels.
Toggles between normal output and a user-programmable mute function.
Allows fine-tuning of relative left and right channel balance from the listening position.
Inverts the polarity of the music signal to the outputs.
Instructions for accessing and replacing the AAA batteries in the remote control.
Explains the general method for tailoring system operation to user preferences.
Presents the complete N°383 Setup menu structure for reference.
Details the four ways each line-level input can be customized (Name, Gain, Offset, Record Output).
Lists the predefined names that can be assigned to inputs for easier identification.
Step-by-step instructions on how to change input names using the setup menu.
A shortcut for customizing the currently selected input directly.
Explains the default input names and the benefit of customizing them.
Guide to creating custom input names up to seven characters long.
Instructions for configuring an input for Surround Sound Processor mode.
Details the four preamplifier gain settings for optimizing source matching.
Explains how to program volume offsets for consistent playback levels across sources.
Allows associating any input with the record output for recording purposes.
Enables learning and broadcasting infrared commands for macro functionality.
Customizes the magnitude of volume reduction when the mute button is pressed.
Sets a maximum volume limit for the amplifier, useful for safety.
Configures the DC trigger output options (12V level or 5V pulse).
Identifies the current software version and its updateability.
Lists custom infrared commands and explains how to teach them to a remote.
Provides a complete list of all IR commands that can be learned or programmed.
Describes standard use, display indications, and volume knob behavior.
Allows fine control over relative left/right channel volumes in 0.1 dB increments.
Tips for using balance control for accurate soundstaging and imaging.
Allows inversion of music polarity to optimize sound for specific recordings.
Instructions on how to reset all customizable settings to factory defaults.
Explains why feeding a surround sound decoder with a preamplifier's variable output is inappropriate.
Discusses the issues of using a processor before the preamp and its outputs with the preamp.
Explains why placing a surround sound decoder within a tape loop is inappropriate.
Details how the N°383's SSP mode facilitates seamless integration with surround processors.
Addresses common A/V system noise issues like 50/60 Hz hum and ground loops.
Adjusting display brightness on one component affects all linked components.
Placing the N°383 in standby also puts linked components into standby.
Allows remote control of volume and mute status of the N°383 via a linked transport.
Enables selection of N°383 inputs using a remote from a linked transport.
Activating play on a linked transport can activate other linked components and select inputs.
Prevents inadvertent interruption of digital recording processes in linked components.
Automatically adjusts volume for HDCD recordings when components are properly linked.
Details the initial 90-day warranty period for defects in material and workmanship.
Explains the terms and conditions for the extended five-year warranty coverage.
| Type | Integrated Amplifier |
|---|---|
| Gain | 40 dB |
| Power Output | 100 watts per channel into 8 ohms |
| Inputs | 5 x RCA |
| Outputs | Speaker outputs |
| Output Impedance | 0.1Ω |
| Signal-to-Noise Ratio | >80 dB |
| Input Impedance | 50kΩ |