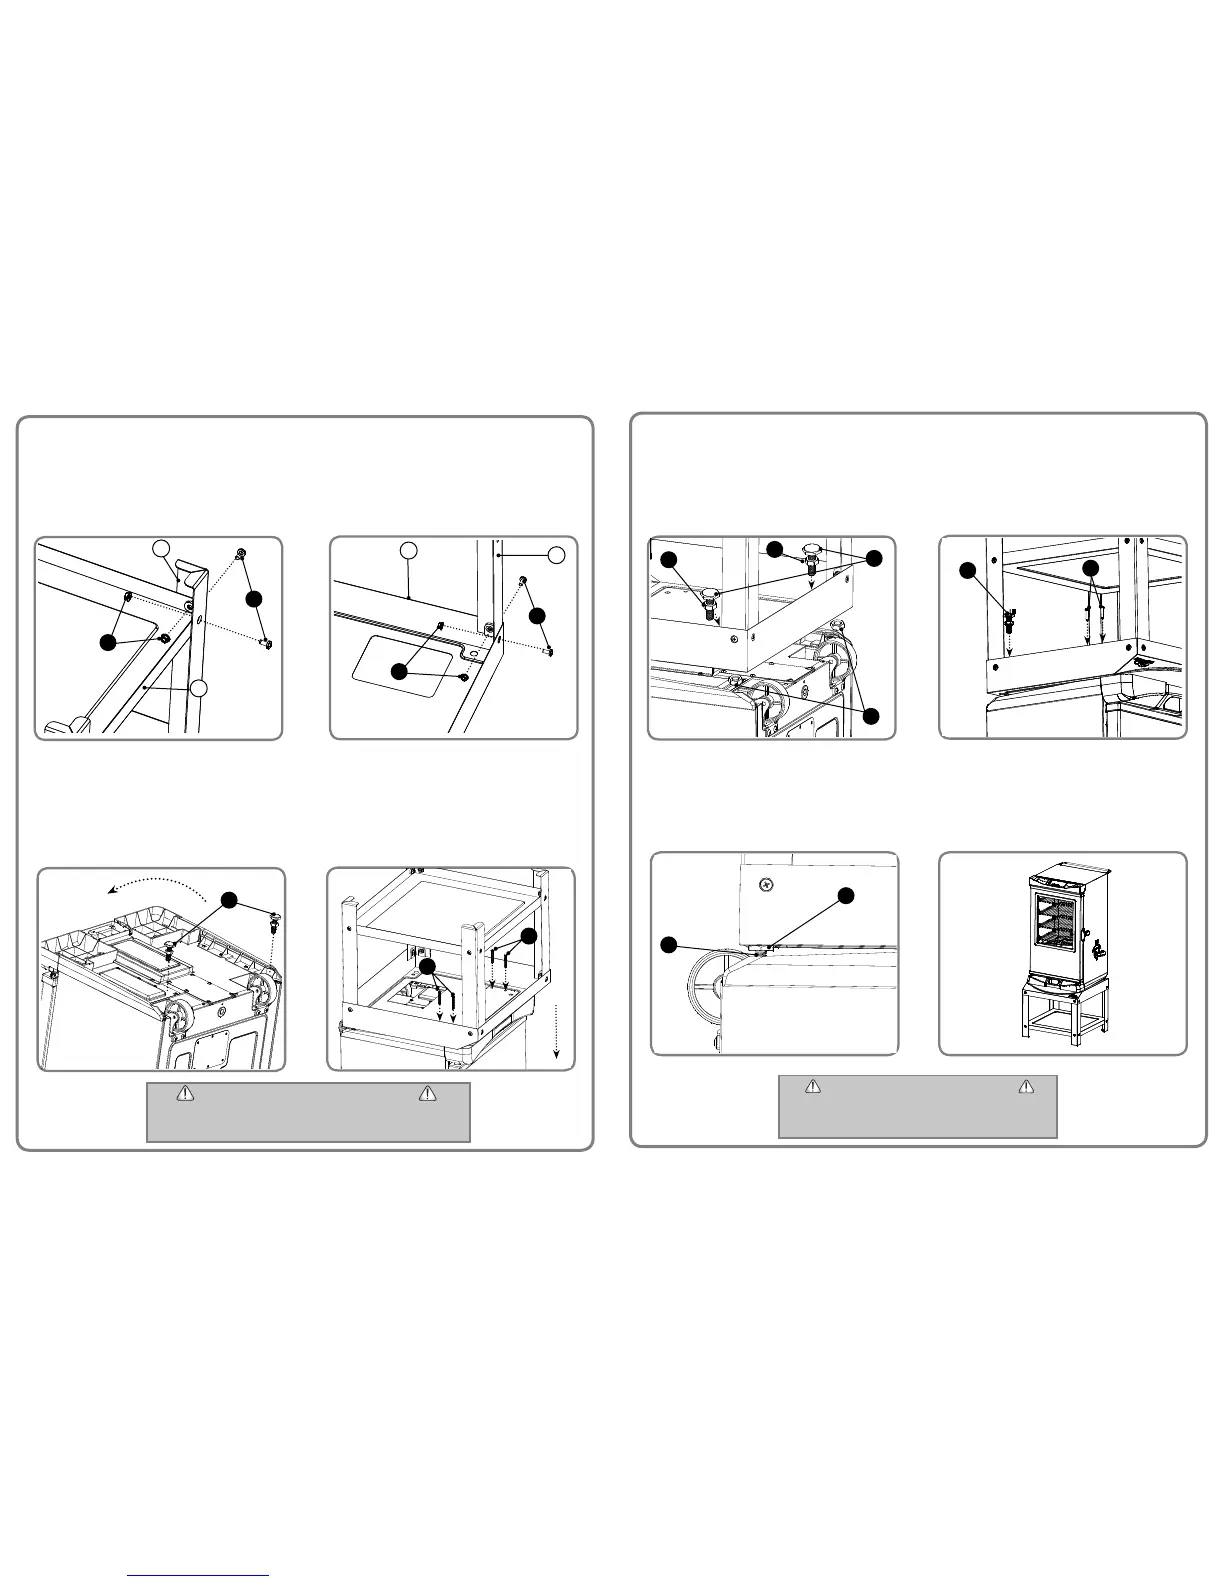
Coloque el ahumador con cuidado como se muestra en
la fi gura. Retire los tornillos niveladores M10 (D).
Nota: Retire las rejillas y bandejas antes de rotar la
unidad. Coloque la unidad sobre una superfi cie suave
para evitar daños. No tire la tuerca de los tornillos (D).
Guarde la tuerca para el paso 3
Coloque el soporte en la parte superior del ahumador,
como se muestra en la fi gura.
Nota: Es más fácil de ensamblar el soporte
y ahumador si están invertidos. Coloque los
componentes (C). Deje los componentes fl ojos hasta
que los tornillos niveladores M10 y la tuerca M10 estén
en el lado posterior del cuerpo del ahumador
1
PASO
2
PASO
INSTALACIÓN DE SOPORTE DE AHUMADOR
Masterbuilt Manufacturing, Inc. · 1 Masterbuilt Ct. Columbus, GA 31907 · Servicio al Cliente: 1-800-489-1581 · www.masterbuilt.com
1
PASO
2
PASO
Coloque la pata (2) dentro de la mesa (1) como se
muestra en la fi gura.
Asegure la pata (2) a la mesa (1) usando tornillos (A)
y tuercas (B). Repita este paso para las otras patas.
2
1
Coloque el estante inferior (3) dentro de las patas
(2) como se muestra en la fi gura.
Asegure el estante inferior (3) a las patas (2)
usando tornillos (A) y tuercas (B).
Repita este paso para las otras patas.
Nota: No ajuste por completo los componentes.
3
2
B
A
B
A
ENSAMBLAJE DE SOPORTE DE AHUMADOR
PRECAUCIÓN
· NO INTENTE LEVANTAR EL AHUMADOR USTED MISMO. PIDA AYUDA ANTES
DE COMENZAR LA INSTALACIÓN DEL AHUMADOR.
· NO LEVANTE EL AHUMADOR CON EL MANGO TRASERO.
C
D
C
Begin tightning screws (C) down through bottom of smoker
stand and into smoker body.
Begin tightning screw (D) down through bottom of smoker
stand and into smoker body. Repeat step on opposite side.
Note: Tighten screws (C) fi rst, before tightening screws (D).
Return attached smoker stand and smoker back to
upright position. Re-tighten all hardware. Installation
is complete.
Note: Replace racks, pans and trays.
6
STEP
SMOKER STAND INSTALLATION CONTINUED
STEP 3
STEP 4
C
D
Thread M10 nut (E) onto M10 screw (D) then isert through
rear holes of smoker stand. Thread a second M10 nut (F)
onto screw as illustrated, and secure to smoker base.
Note: M10 nuts (F) are from the original legs (F). Do not
fully tighten to allow M10 screw (D) to thread into unit. Nut
(F) is used to level stand with screw (D) before tightening
the above nut (F)
5
STEP
M10 screw (D) will show threads and extend into the
smoker base as illustrated.
Note: M10 nut (F) acts as spacer to level the smoker and
provide more stability
CAUTION
· SMOKER STAND INTENDED FOR USE WITH DESIGNATED MASTERBUILT
SMOKERS ONLY.
· DO NOT SIT ON SMOKER STAND.
· NEVER MOVE SMOKER STAND WHILE IN USE.
Masterbuilt Manufacturing, Inc. · 1 Masterbuilt Ct. Columbus, GA 31907 · Customer Service: 1-800-489-1581 · www.masterbuilt.com
D
F
F
D
F
F