model no. 058-9805-6 | contact us 1-800-689-9928
SETUP
OPERATING INSTRUCTIONS
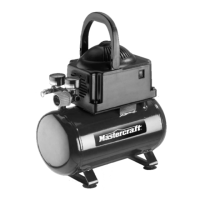
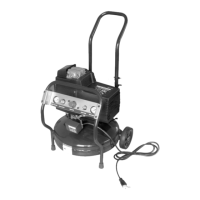
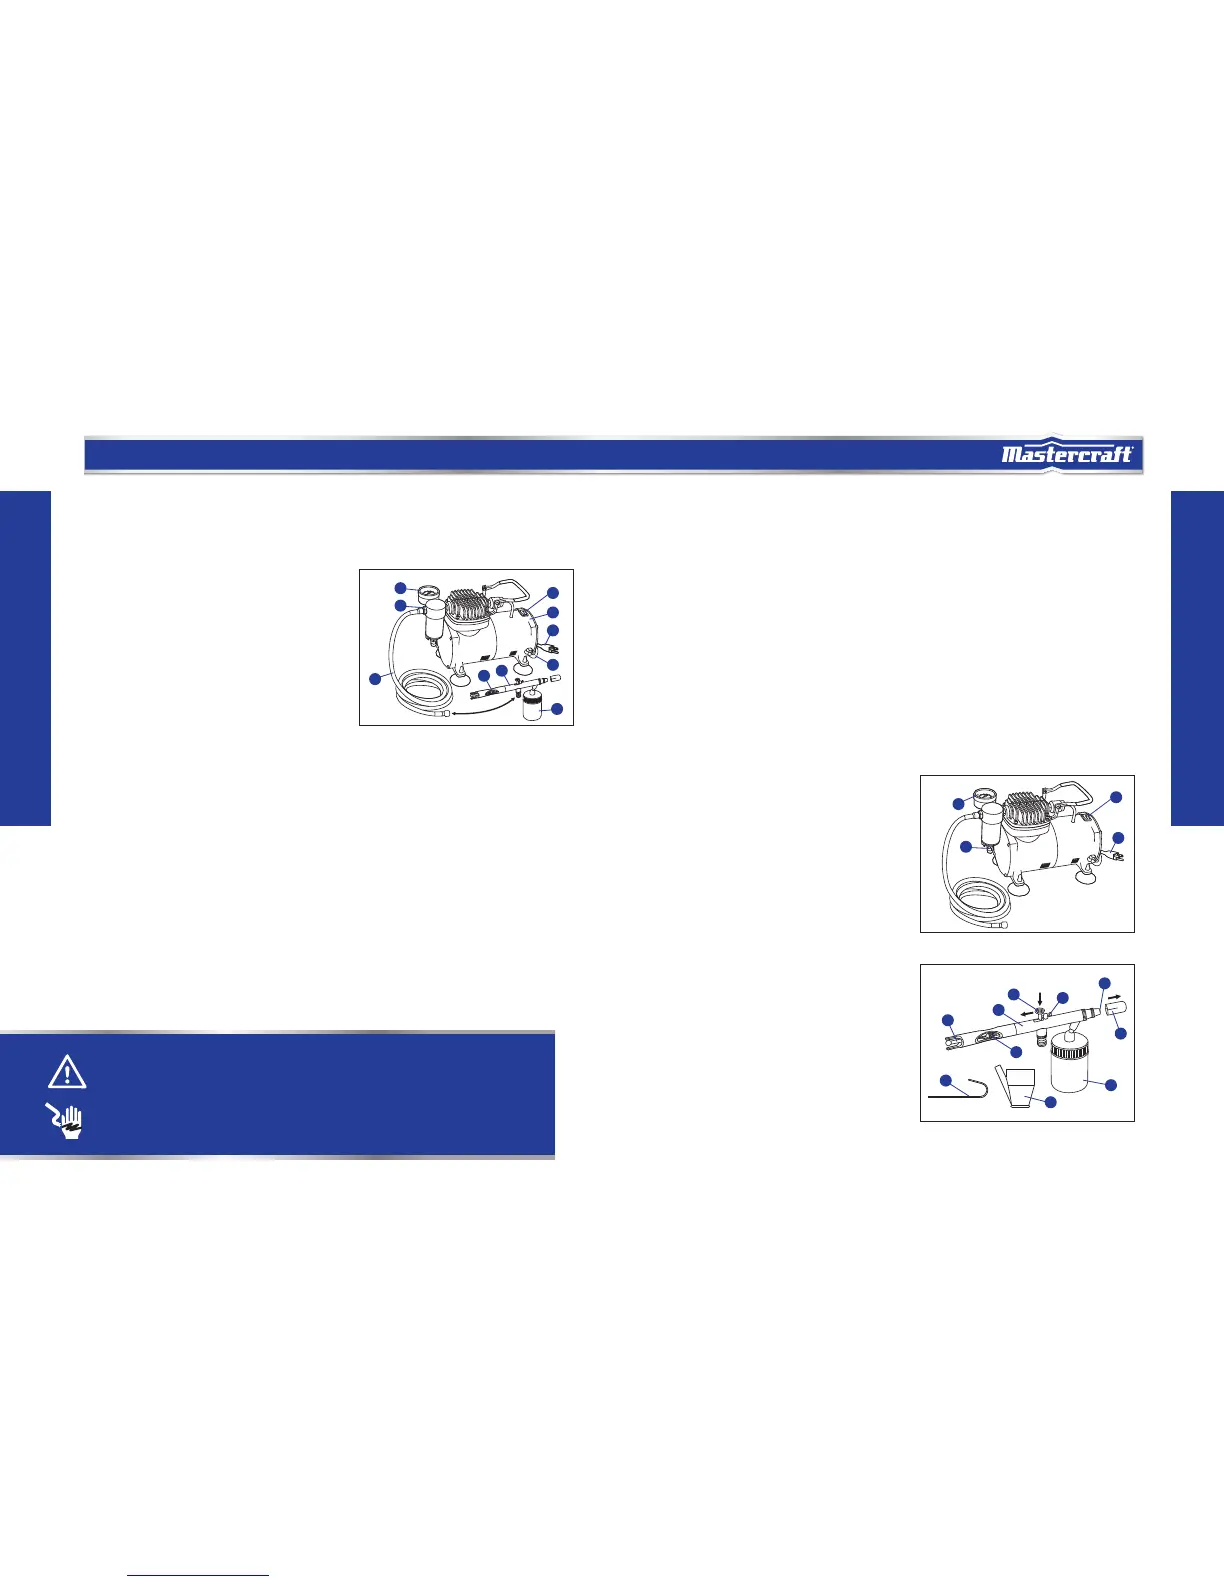
SETUP OF AIR BRUSH COMPRESSOR AND AIR BRUSH (Fig. 1)
1. Connect one end of the air hose (8) to the air outlet (1).
2. Connect the other end of the air hose to the air brush (2).
3. Connect the empty glass jar (3) to the air brush.
4. Insert the power cord plug (4) into the nearest 120-volt,
grounded, electrical outlet.
5. The compressor is set to the desired air pressure
maximum 58 PSI when it leaves the factory.
6. Turn on the power switch (6) and inspect the air
connections for leaks.
7. Turn off and unplug the air brush compressor (7) then
repair any leaks found.
IMPORTANT: Make sure the air brush needle chucking nut
(15) is screwed tight before use.
SETUP OF COMPRESSOR AREA
1. Designate a work area that is clean and well-lighted. The work area must not allow access by children or
pets to prevent injury.
2. Locate the air brush compressor (7) on a flat level surface to ensure proper pump lubrication and to
prevent damage to the unit. Keep at least 12 inch of space around the unit to allow air circulation.
3. Route the power cord (9) from the compressor to the grounded wall outlet, along a safe path without
creating a tripping hazard or exposing the power cord to possible damage.
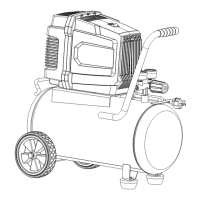
OPERATING INSTRUCTIONS (Fig. 2 to 3)
1. Insert the compressor power cord plug (4) into the nearest 120-volt, grounded, electrical outlet.
2. The compressor is set to the desired air pressure maximum 58 PSI when it leaves the factory. The
working pressure of air brush can be read on the pressure gauge (5) during operation.
3. Fill the 22cc glass jar (3) after thinning and straining your paint properly.
IMPORTANT: Most jar paints are too thick to spray and need thinning. Proportions of thinner needed may
vary with different manufacturers. Use the following chart only as a guide for thinning spray materials:
1 part water to 1 part watercolor/ink
7 parts water to 1 part acrylic
2 parts lacquer thinner to 1 part lacquer
4. Hold the air brush housing (10) lightly in your hand and push the tapered fitting on the lid of the 22cc
glass jar assembly into the base of the air brush housing. It is held in place with friction and is not
threaded.
IMPORTANT: It is suggested that you first fully insert the fluid connector on the glass jar lid to the fluid
intake of the air brush and then turn approximately 1/5 of a full rotation. This will secure a tight connection
between the glass jar and the air brush.
5. Turn on the power switch (6).
6. Pull off the protective cover (11). Press the finger lever
(13) downward to begin air flow. Draw back slowly/
gently on the finger lever until you achieve the air
volume you need for your spray technique.
7. Continue to adjust the spray volume by using the finger
lever, moving it front to back. When you have the
correct spray volume, you may fix the position using the
adjustment screw (12).
8. The spray pattern size is based on the distance between
the work surface and the air brush nozzle (14). For
extra-fine spray, hold the air brush nearer the work
surface.
9. When you have finished painting, gently release pressure
on finger lever (first loosening the adjustment screw, if
needed).
IMPORTANT: If fluid blocks the nozzle while working, try
loosening the needle chucking nut (15) then move the fluid
needle (16) back and forth, allowing the blocked fluid to
escape and clearing the nozzle.
WARNING!
•Readtheentireimportantsafetyinformationattheabovesectionof“SAFETYGUIDELINES”beforesetuporuseofthisproduct.
•Topreventseriousinjuryfromaccidentaloperation,turnthepowerswitch(B)“Off”andunplugtheairbrushcompressor(A)from
its electrical outlet before assembling or making any adjustments to the compressor.
•Beforeoperating,makesuretheairbrushcompressorissetupinawell-ventilatedarea,onaflat,level,solidsurfacewellaway
from any flammable objects, such as drapes. Never paint in an area without proper ventilation, or near possible ignition sources.
4
6
8
2
15
7
9
3
5
1
Fig. 1
4
6
5
19
Fig. 2
3
Fig. 3
15
17
10
13
18
12
14
16
11
 Loading...