Do you have a question about the MasterCraft 062-3415-8 and is the answer not in the manual?
Details pump performance at different head levels, listing flow rates in GPH and L/h.
Provides vital warnings about priming, dual voltage, pressure switch, thermal protector, and freezing.
Lists essential safety guidelines for pump installation, operation, and electrical connections.
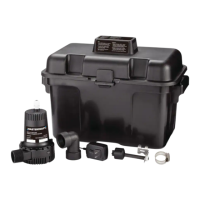
Lists required tools and accessories for assembling the pump and connecting plumbing.
Explains how to measure well depth and water level for proper pump installation.
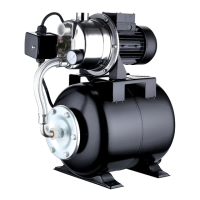
Guides on selecting pump location and preparing the pre-charged storage tank.
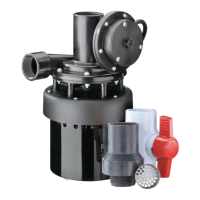
Details steps for assembling the suction pipe, foot valve, and well seal.
Covers connecting the pump to the well piping using elbows, adaptors, and PVC cement.
Explains the process of priming the pump and selecting the correct voltage for operation.
Provides instructions for wiring the pressure switch to the power source and pump.
Lists common issues like pump not starting, not priming, or low water output, with solutions.
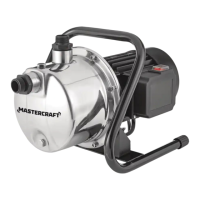
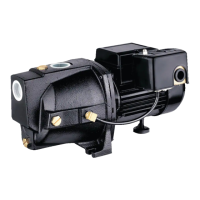
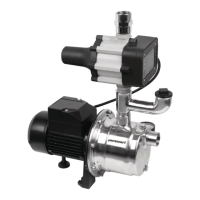
Illustrates and lists the main components of the shallow well jet pump.
The Mastercraft Shallow Well Jet Pump with a 6 U.S. Gallon (22 L) Tank, model no. 062-3415-8, is designed for residential water supply from shallow wells. This pump is intended for use where the vertical lift of water is less than 25 feet (7.6 meters). If your well is deeper than this, a deep well convertible jet pump would be required. The pump is not suitable for pumping flammable or explosive liquids such as oil, gasoline, kerosene, or ethanol, nor should it be used in the presence of flammable or explosive vapors, as this could lead to an explosion or fire, causing property damage, serious personal injury, or death.
For optimal performance, it is recommended to use a diaphragm pressure tank (not included) with this pump. A pre-charged storage tank, which features a flexible bladder or diaphragm, separates compressed air from water, preventing air absorption into the water and allowing for higher initial pressures. This design provides more usable water compared to conventional tanks, meaning a smaller pre-charged tank (e.g., 20 gallons) can offer the same usable water capacity as a larger conventional tank (e.g., 40 gallons). Before starting the pump, the pressure tank must be drained of all water and set to the proper pressure level. If using the supplied 30/50 PSI pressure switch, the tank's air pressure should be set to 28 PSI before startup, which may require an air compressor.
The pump features a dual voltage motor that can be wired for either 230 V or 115 V (pre-set to 115 V). If your power source is 230 V, you will need to remove the electrical housing cover, flip the switch to 230 V, and then replace the cover. All electrical work should be performed by a licensed electrician to ensure safety and proper operation. The pump is equipped with a 30/50 PSI pressure switch, which allows for automatic operation, starting the pump when pressure drops to the "cut-in" setting of 30 PSI. To wire the pressure switch, first remove its cover to expose the wiring terminals. Connect the green ground wire from the power supply to the switch ground terminal, and then connect the power supply wires to the two outside terminals marked "LINE." After wiring, replace the switch cover. It is crucial to turn off the power source before wiring the pressure switch to avoid electric shock.
Installation involves several key steps to ensure airtight connections and proper priming. When preparing the suction pipe, wrap thread tape clockwise around all threaded connections. For non-threaded connections, use PVC purple primer and PVC cement to create airtight seals. Measure all pipe lengths before attaching them. The suction pipe should be a minimum of 1 1/4" (3.2 cm) diameter PVC piping for best performance. A 1" (2.5 cm) MNPT x 1 1/4" (3.2 cm) SLIP adaptor will be needed to connect to the pump.
To determine the depth of the well, use a weighted string to find the water level. The pump's normal pumping level must be at least 10 feet (3 meters) below the measured water level. Subtract 5 feet (1.5 meters) from this measured water level, and this number must be less than 25 feet (7.6 meters). The pump should be mounted on a solid base as close to the well as possible. If installed outside, it must be protected by a pump house with auxiliary heat to prevent freezing.
Priming the pump is a critical step before starting the motor. The motor MUST NOT be started before the pump is primed. To prime, remove the plug from the top of the discharge tee and the priming plug in front of the discharge tee (this allows air to vent out). Fill the discharge tee with water until it overflows, ensuring the water level is stable and there are no air bubbles. This process may take several minutes to completely fill the pipes and the pump. If the pump is lower than the suction pipe, air may get trapped, preventing proper operation. Ensure the pipe slopes away from the pump. After filling, wrap the discharge tee plug and priming plug threads with thread tape and re-attach them to the pump, tightening with a wrench.
The pump motor includes a resetting thermal protector that automatically shuts off the pump if it becomes too hot. Overuse of this feature can damage the pump and void the warranty. Once the motor cools to a safe temperature, the pump will restart unexpectedly if plugged in. Therefore, always disconnect the pump from its power source before inspection or servicing. Do not touch the pump housing while it is operating, as it can become hot and cause skin burns. The motor housing should not be disassembled, as it contains no repairable internal parts, and disassembly can lead to leakage or dangerous electrical wiring issues.
Regular maintenance includes checking for leaks in all pipe connections and ensuring they are tight. The pump should not be exposed to freezing temperatures, as this can crack the cast iron and void the warranty. Always wear safety glasses when working with pumps. Disconnect power before servicing, and release all pressure within the system by draining all water. Secure the discharge line before starting the pump to prevent it from whipping and causing injury or damage. The electrical circuit should be protected by a dedicated 15 A or larger fuse or circuit breaker. Never use extension cords with this pump. Avoid handling the pump or motor with wet hands or while standing on wet surfaces. Protect the electrical cord from sharp objects, hot surfaces, oil, and chemicals, and avoid kinking or using damaged cords.
Troubleshooting common issues includes checking for power supply, blown fuses, tripped breakers, and faulty pressure switches if the pump does not start. If the pump operates but pumps little or no water, check the water level in the well, ensure the discharge is vented during priming, inspect for leaks in the piping, and clean any clogged well screens or inlet strainers. If the pump starts and stops too often, verify the tank's pre-charge, check for ruptured diaphragms, leaks in house piping, or a stuck foot valve. If the pump does not shut off, look for leaks in house piping, check the water level, and ensure the pressure switch is set correctly. For any missing parts or questions, contact the toll-free helpline at 1-800-689-9928. This product carries a three (3) year LIMITED warranty against defects in workmanship and materials, but it is not guaranteed against wear or breakage due to misuse or abuse. Opening or repairing the pump yourself will void the warranty and may cause damage or personal injury.
| Model | 062-3415-8 |
|---|---|
| Category | Water Pump |
| Power Source | Electric |
| Voltage | 120 V |
| Discharge Size | 1-1/4 in |
| Thermal Protection | Yes |
| Construction | Thermoplastic |
| Hose Diameter | 1-1/4 in |
| Max Head | 25 ft |