6
CAUTION HOT STEAM: USE TONGS TO TURN THE VALVE,
KEEP HANDS AND FACE AWAY FROM PRESSURE VALVE
WHILE IN THE CEILING VENTING POSITION. DO NOT RELEASE
PRESSURE UNDER HANGING CABINETS WHICH CAN BE
DAMAGED BY STEAM.
Always use an oven mitt to reduce risk of injury. To avoid liquid
splatter, do not use ‘Quick Release” method for foods with a
high volume of liquid (stews, soups, porridge, etc.). Steam will
immediately begin releasing from the Pressure Valve. When
pressure is fully released, the Floating Valve will sink, and the
lid will unlock to open. As a safety feature, the lid will not open
unless all pressure is released.
Do not force the lid open. If the lid feels tight, please allow
additional time for pressure to fully release before attempting
to open. If there is any resistance in opening the lid, it indicates
that your appliance is still under pressure and can cause injury
if forced open. When the Floating Valve is completely down, turn
lid clockwise and lift to remove. Always open the lid away from
you to avoid skin contact with any remaining heat or steam.
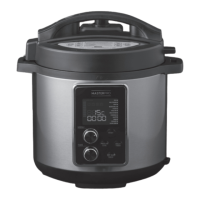
PREPARING WHITE RICE
When measuring rice, ONLY USE THE RICE MEASURE CUP
PROVIDED; DO NOT USE A STANDARD MEASURING CUP. Use
the Rice Measure Cup, along with the pot markings to make
perfect rice every time. For example, when making 4 cups
of rice, use 4 rice cup measures of rice and fill with water
to the “4” mark. As a general rule, when cooking 2 cups (or
less) of uncooked rice, use 1 tablespoon of butter or oil. For
measurements greater than 2 cups, use 2 tablespoons of butter
or oil. This will prevent foaming during the cooking process.
NOTE: When cooking rice, the maximum amount of rice
allowed for this 6 litre appliance is 6 cups of uncooked rice.
Normally one cup of rice requires one cup of water. This may
vary according to taste. For best results, rinse measured rice
until the water becomes relatively clear.
HOW TO SAUTE
This setting allows cooking over high heat, without the lid,
before pressure cooking. Before pressure cooking, most
recipes will benefit from the golden colour, richer flavours and
moist results gained from browning/sautéing.
To Sauté your meats or vegetables prior to pressure cooking:
1. Remove Lid from appliance. Sauté function will not work
unless Lid is removed.
2. Select the SAUTE function. The timer will default to 30
minutes.
3. Press the START button to begin the cooking cycle.
4. Add oil or butter as directed in your recipe and then place
food into the Inner Pot.
5. Stir or turn food as needed until desired colour and
consistency is reached.
6. Press the KEEP WARM/CANCEL button if you want to cancel
the SAUTE function before the timer finishes counting down.
Note: Allow the appliance to rest 2-3 minutes after
cancelling the SAUTE function before beginning to pressure
cook. If the appliance will not begin pressure cooking, allow
it to cool for a longer period after SAUTING before selecting
another function.
HOW TO USE THE SLOW COOK FUNCTION
1. Prepare desired food and place into Inner Pot.
2. Use the MENU dial to select the SLOW COOK function and
the display will show the default SLOW COOK time of 06:00.
Increase or decrease the SLOW COOK time in 30 minute
increments using the TIMER Dial.
NOTE: The longest SLOW COOK time allowed is 9.5 hours.
3. Press the START button to begin the cooking cycle.
4. The appliance may take between 5-20 minutes to reach
temperature before beginning countdown.
5. When cooking is complete, the appliance will beep and
automatically go to KEEP WARM.
6. The KEEP WARM icon will illuminate. Press CANCEL to
end the operation.
CAUTION: Never put your face or hands directly over the
appliance when removing Lid as escaping steam can cause
serious burn injury.
HOW TO USE THE DELAY TIMER
If you wish to program your appliance to automatically cook
prepared food at a later time, you can program the appliance to
delay cooking by up to 24 hours.
CAUTION: It is not recommended to use the Delay Timer
function to cook foods that may spoil. Leaving raw foods inside
the appliance for long periods of time prior to cooking may
result in the food spoiling. Cooked foods that can be left out
such as rice, beans, grains or other foods will not spoil.
This setting is used in combination with the MENU functions
and the PRESSURE COOK TIME function.
1. Prepare desired food and place into Inner Pot.
2. Secure the Lid onto the appliance, turn it counter-clockwise
to lock it in place.
3. Make sure the Pressure Limiting Valve is set to the “Airtight”
position.
4. Plug the power cord into power outlet.
5. The screen will display 00 00.
6. Press the DELAY TIMER button. The Delay Timer icon will
illuminate. The screen will show 0:30 which is equal to 30
minutes of delay time. Press the DELAY TIMER button again
to increase delay time in 30 min increments up to 24 hours -
hold for rapid increase. (The time that displays on the screen
shows how long the user wants the appliance to wait before
the cooking process begins.)
EX: If you wish to program the appliance to automatically
turn on in 3 hours, turn the TIMER dial until the screen
displays 3:00.
7. After programming your Delay time, select the desired
function.
8. Once the appliance completes its countdown, the appliance
will begin operation of the cooking sequence for the chosen
selection.
9. Follow instructions under “REMOVING LID AFTER
PRESSURE COOKING”.
MENU DIAL:
• Select one of the 11 MENU FUNCTIONS. (The sauté function
does not work with the Delay Timer.)
• Follow the instructions under “SELECTING A MENU
FUNCTION.”
PRESSURE COOK TIME:
Follow the instructions under “SETTING CUSTOM PRESSURE
COOK TIME.
There are nine safety devices installed in the appliance to
assure its reliability.
1. Open-and-Close Lid Safety Device
2. Pressure Control Device.
The correct pressure level is automatically maintained
during cooking cycle.
3. Pressure Limiting Valve
The Pressure Limiting Valve will release air automatically
 Loading...