Rev. Descrizione Redatto/Gestito Approvato Cod.Ident. Pagine Data Em.
03 Manuale Istruzioni Ufficio Tecnico Resp.Tecnico C314.M01.EN.03
8/18
03/2009
8
ATTENTION
The configuration of the programmed parameters is made in the factory using and introducing values
that allow obtaining a proper working of the system.
The manufacturer recommends entering the configuration menus of these parameters only after
having carefully studied and learned all the indications given in the enclosed instruction manual.
The manufacturer assumes no liability about the working of the appliance in case the original
configuration has been changed accidentally or by will.
Setting of the values To set the values proceed as follows:
• Turn on the appliance by the main switch “A”
• Act on UP or DOWN buttons to set the desired value (set-point) that will be shown on the lower display.
• Activate the “ SEL / ENT “ button to confirm.
• In these conditions the upper display gives the actual temperature (or the humidity) inside the chamber while the
lower display gives the programmed value.
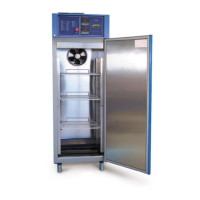
6.3 STANDARD STARTING
Turn on the “Ventilation” push-button in order to turn on its signal lamp.
With this operation the working of the main control of the chamber is on.
Turn on the “Temperature” push-button in order to turn on its signal lamp.
With this operation the working of the temperature control of the chamber is on.
NOTE: The control will work only after the main control is on by the “Ventilation” push-button.
Turn on the “Climax” push-button in order to turn on its signal lamp.
With this operation the working of the humidity control of the chamber is on.
NOTE: The control will work only after the main control is on by the “Ventilation” push-button.
6.4 STANDARD STOP
To stop only the temperature control, act on the “Temperature” push-button (signal lamp will be off).
To stop only the humidity control act, on the “Climax” push-button (signal lamp will be off).
To stop the whole control of the working process, act on the “Ventilation” push-button (signal lamp will be off).
6.5 EMERGENCY STOP
Act on the device A (Main switch – Emergency push-button) pushing it
6.6 SWITCHING OFF
Act on the device A (Main switch – Emergency push-button) pushing it
6.7 TRIAL STARTING
Before starting the normal and usual utilisation of the appliance, check its right working, making at least one completely
empty cycle following the given procedures.
If problems occur during the use, check the Chapter “ DIAGNOSIS “.
If the instructions given in this manual do not give the solution to the problem occurred, get in touch with the nearest
Service Centre.
6.8 EXAMPLE OF OPERATING
RANGER
The procedure described in this example must be carried out only after having carefully read and
perfectly understood all the indications contained in this manual.
The machine can be used in many different ways depending from the kind of test that has to be made.
We give here an "example procedure" which allows to an inexperienced operator to complete a whole test.
The experience in the time will allow optimising the use of the machine following one's own needs.
In the example below we suppose to set a climatic condition at 35° C with 50% humidity:
• Turn on the instrument acting on the switch A
 Loading...