Do you have a question about the Maytag MFR Series and is the answer not in the manual?
Provides an overview of the manual's scope and lists the goals for service professionals.
Details critical safety precautions and warnings for operating and servicing the washer.
Explains how to interpret model and serial number labels for identification.
Provides a table to convert older model numbers to the current MFR series.
Outlines the terms and conditions of the Maytag commercial washer warranty.
Describes general user information, model number breakdown, and washer capacities.
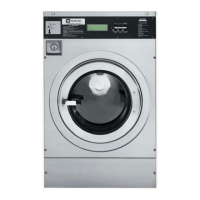
Illustrates the physical layout and identifies key components of the washer.
Details technical specifications for various washer capacities (18-40 lbs).
Lists specific tools required for servicing rigid Maytag washer models.
Details service kits available to convert coin-operated washers to simple OPL.
Documents changes and updates made to the EPROM chip versions over time.
Provides instructions for uncrating, inspecting, and starting the washer for the first time.
Explains how to identify the end of a wash cycle and open the door.
Details the procedure for manually unlocking the washer door if it fails to open.
Outlines essential daily cleaning and inspection tasks for proper washer operation.
Step-by-step guide to convert a coin-operated washer to a simple On-Premise Laundry setup.
Instructions on how to invert the water inlet valve screen for cleaning.
Procedure for converting the washer's operation from 60Hz to 50Hz frequency.
Addresses common issues and solutions for water inlet hose leaks.
Describes the function of control boards, user interfaces, and EPROM chips.
Details the removal and access provided by the cabinet front panels.
Explains the construction and basic parts of the washer door assembly.
Describes the electro-mechanical operation of the door lock assembly.
Explains the operation of the motor-driven drain valve and its components.
Details the function and operation of the water inlet valves.
Explains the purpose and operation of the brake resistor in specific models.
Describes the role of the inverter in motor speed control and power conversion.
Explains the 3-phase drive motors and the step-up transformer for control boards.
Guides on using the PD model's user interface for programming and configuration.
Instructions for navigating and using the PN model's control panel for settings.
Details the chemical injection control system, wiring, and connections.
Explains the operation of the contactor as an electromagnetic relay for the inverter.
Describes the mechanical coin drop assembly and its sensor operation.
Step-by-step guide to remove and clean the softener compartment funnel and siphon.
Instructions for safely lifting and securing the washer's top panel.
Procedure for removing the front panel (facia) on PD model washers.
Procedure for removing the front panel (facia) on PN model washers.
Details on how to remove the emergency stop button from PN model washers.
Instructions for removing the main control board from PD model washers.
Procedure for removing the control board and membrane switch assembly from PN models.
Steps for removing the key pad assembly from PD model washers.
Guide on how to safely remove and replace the EPROM chip on the control board.
Instructions for locating and removing the fuse from the control board.
Steps for removing the main control panel assembly from the washer.
Detailed procedure for removing the coin drop mechanism.
Instructions for removing the optic sensor from the coin drop mechanism.
Steps for removing the coin vault assembly from the washer.
Procedure for safely removing the top panel of the washer.
Instructions for removing the lower service panel for access.
Steps for removing the main washer door assembly.
Procedure for removing the hinge blocks from the door assembly.
Detailed steps for removing the door handle and latch mechanism.
Guide for removing and replacing the door glass and gasket on MFR18-50 models.
Procedure for removing and installing the door gasket on MFR60-80 models.
Steps for removing the front panel on MFR18 and MFR25 models.
Procedure for removing the front panel on MFR30-80 models using rotation.
Instructions on how to remove and handle the removable hinge pin.
Alternative procedure for front panel removal where 90° rotation is not possible.
Steps for removing the door hinge assembly from the washer.
Procedure to remove the door lock assembly when no access panel is present.
Steps for removing the door lock assembly when an access panel is available.
Instructions for removing the door lock mounting block.
Detailed steps for removing the water inlet valve assembly.
Procedure for removing the chemical dispenser assembly.
Steps for removing the contactor from the washer's electrical system.
Instructions for removing the transformer on MFR18 and MFR25 models.
Procedure for removing the terminal block from the washer.
Steps for removing the back panel of the washer.
Guide for removing and reinstalling drive belts on MFR25 models.
Procedure for removing the drive belt on MFR18, 30, and 80 models.
Steps to remove the idler assembly, pulley, and bearing on MFR25 models.
Instructions for removing the motor on MFR18 and MFR25 models.
Procedure for removing the motor on MFR30 through MFR80 models.
Steps for removing the motor mounting plate on MFR30-80 models.
Instructions for removing the AKO inverter on MFR18 and MFR25 models.
Procedure for removing the Mitsubishi E500 inverter.
Steps for removing the Mitsubishi D700 inverter.
Instructions for removing the brake resistor on MFR60 and MFR80 models.
Detailed procedure for removing the drain valve assembly.
Steps for removing the temperature sensor from the washer.
Procedure for removing the main cabinet assembly from MFR30-80 models.
Steps for removing the main cabinet assembly from MFR18 & 25 models.
Section covering the removal and replacement of tubs, baskets, bearings, and seals.
Guide for removing and reinstalling the basket pulley on MFR18 & 25 models.
Steps to remove the trunnion and basket assembly from MFR18 & 25 models.
Procedure for removing and replacing bearings in the trunnion for MFR18 & 25.
Guide for removing and replacing the axial seal on MFR18 & 25 models.
Steps for removing and replacing the counter-face ring on multiple MFR models.
Instructions for reinstalling the trunnion assembly on MFR18 & 25 models.
Procedure for removing the trunnion assembly on MFR30 models.
Guide for removing and replacing bearings on MFR30 models.
Steps for removing and replacing axial seal and counter-face ring on MFR30.
Instructions for reinstalling the trunnion assembly on MFR30 models.
Guide for removing and reinstalling the spin basket on MFR30 models.
Steps for removing the basket assembly on MFR40 and MFR50 models.
Procedure for removing and installing bearings on MFR40 and MFR50 models.
Guide for removing and replacing the bearing assembly on MFR60 models.
Steps for removing the spin basket from MFR80 models.
Procedure for removing and replacing the bearing assembly on MFR80 models.
Details how to test and repair water inlet valves, including coil resistance checks.
Identifies parts of the inlet valve stem assembly and their function.
Describes testing door lock solenoid, bi-metal, and switches via the wire harness plug.
Details testing door lock components by probing the control board connectors.
Provides steps for testing the contactor's coil and contacts for proper operation.
Guides on testing Mitsubishi and AKO inverters, including voltage checks.
Procedure for checking the DC Buss voltage on E500 and D700 inverters.
Tests for AKO inverters and motors, including fuse checks and visual inspection.
Procedure for testing motor phase windings and identifying functionality.
Details on performing ohm tests on motor windings and to ground.
Instructions for testing the brake resistor's continuity and isolation.
Provides resistance values for motors and other components, plus inverter specifications.
Guidance on testing the washer control board for power, display, and EPROM issues.
Procedure for testing the PD model's 6-button user interface membrane switch.
Instructions for testing the PN model's key pad by checking ribbon connector points.
Steps for testing the transformer's primary and secondary windings.
Describes testing the temperature sensor's resistance and quick diagnostic checks.
Details power supply requirements and proper grounding for 120V outlets.
Guidance on troubleshooting Mitsubishi inverters, including parameter settings and common issues.
Steps for troubleshooting AKO inverters, focusing on motor circuits and cooling fans.
Procedure for removing and replacing the inverter cooling fan.
Important warnings and prohibitions regarding inverter installation and operation.
General guidance for troubleshooting issues related to MC4 and MC5 control boards.
Steps for diagnosing control board issues, including checking LEDs, chips, and connections.
Steps to diagnose and resolve issues with the washer's display screen.
Detailed pinouts for various connectors like DL1, TTL Y1, A1, L1, RS485, K1, Q1, M1, P1, GA.
Guidance on diagnosing motor issues, including over-current, windings, and mechanical checks.
Addresses issues with insufficient belt tension and provides a spring replacement procedure.
Covers common drain valve problems like leaks, sticking, and overfilling causes.
Diagnoses issues with the door lock mechanism, including switch and solenoid checks.
Steps for removing the door locked switch from the door lock assembly.
Procedure for removing the latch bar from the door lock mechanism.
Instructions for removing the bimetal component from the door lock assembly.
Steps for removing the blocking bar from the door lock mechanism.
Procedure for removing the door closed switch from the door lock assembly.
Instructions for removing the door lock solenoid.
Steps for removing the door unlock solenoid.
Checks for proper door closure and gasket pressure, including hinge adjustments.
Diagnoses common door leaks, focusing on seal, glass, and alignment issues.
Identifies causes of overfilling, including inlet valves, air hoses, and pressure switches.
Procedure to verify and adjust hinge position for proper door alignment on MFR30-50.
Illustrates the wiring diagram for Mitsubishi inverter systems.
Provides the power circuit schematic for MC4 control boards.
Shows the power circuit schematic for MC5 control boards.
Detailed schematic diagram for MFR18-25 models with MC4 control boards.
Detailed schematic diagram for MFR18-25 models with MC5 control boards.
Detailed schematic diagram for MFR30-80 models with MC4 control boards.
Detailed schematic diagram for MFR30-80 models with MC5 control boards.