Do you have a question about the Medeli DD-306 and is the answer not in the manual?
Avoid deformation, discoloration, or damage by controlling exposure to sunlight, heat, humidity, dust, and vibration.
Turn off when not in use, unplug during storms, and avoid shared outlets to prevent damage and ensure stable operation.
Always turn off all connected devices before making or breaking connections to prevent damage.
Avoid excessive force on controls or connectors. Grip plugs firmly when unplugging. Disconnect all cables before moving.
Use a dry soft cloth. A damp cloth can be used for stubborn grime. Avoid alcohol/thinner and vinyl objects.
Digital circuitry may cause interference. Move the unit away from receivers if issues occur.
Your Digital Drum runs on batteries or power adaptor. Follow instructions for AC adaptor or battery usage.
Connect the power adaptor to the DC IN jack and plug into an AC outlet. Use specified adaptor only.
Open compartment, insert six "C" size batteries following polarity. Replace worn batteries promptly.
Connect stereo headphones to PHONE/OUTPUT jack for private practice. Internal speakers switch off automatically.
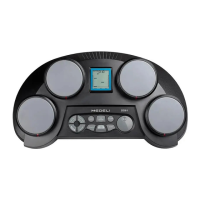
Lists and describes all controls on the front of the unit, including power, volume, tempo, and various function buttons.
Lists and describes connection ports on the rear of the unit, such as MIDI, PHONES/OUTPUT, and DC IN.
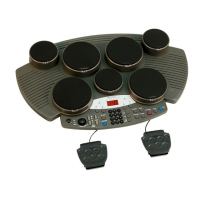
Explains how to connect the supplied foot pedals to the unit for playing hi-hat or bass drum voices.
Lists the items included with the Digital Drum, such as foot pedals and drum sticks.
Turn the [POWER] switch ON. The LED Display lights up.
Press the [DEMO] button. The demo song starts, and the LEARNING indicator lights up.
Controls the overall volume of the instrument. Turn clockwise to increase, anti-clockwise to decrease.
Controls the song's volume level via two buttons. Adjusts balance between accompaniment and performance.
To stop playback, press either the [DEMO] or [START/STOP] button.
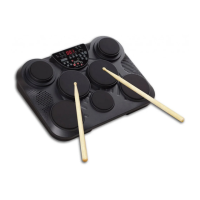
Illustrates the 7 drum pads and their assigned voices (e.g., Crash Cymbal, High Tom, Ride Cymbal) and assign numbers.
Example layout showing drum kit 001 assignments for pads and pedals, illustrating hi-hat and bass drum control.
Pedal 1 controls the Hi-Hat, while Pedal 2 controls the bass drum voice.
Select from 20 preset Drum Kits or one custom kit, which set voice combinations for pads and pedals.
Assign any of 76 percussion sounds to individual pads and pedals for the Custom Drum Kit.
Select a pad/pedal, then choose a percussion voice by striking, pressing pedal, or using number keys.
Adjust the instrument's overall sound with different reverb depths from [r-0] (off) to [r-3] (max).
Use the [METRONOME] button to enable vocal/click sound or turn off. Adjust tempo and volume as needed.
Press [SONG] button, use +/- keys or number keys to select a song from the list (00-99).
Turn the Super Bass option ON or OFF using the [SUPER BASS] button to deepen and empower the bass voices.
Set the song tempo from 40 to 240 bpm using [TEMPO +] and [TEMPO -] buttons. Return to default by pressing both.
Mute individual tracks (DRUM 1, DRUM 2, BASS, CHORD) by pressing their respective buttons.
Set song tempo and start accompaniment by striking pads/pedals four times. TAP START indicator turns off.
Press [LEARNING] button in SONG mode to activate learning. Pads/pedals flash to guide playing.
Press [START/STOP] to begin. Strike pads/pedals with flashing lights. Learning mode can be toggled.
Records pad/pedal data, song data, track settings, tempo, song volume, and reverb settings. MIDI data not saved.
Select desired song, drum kit, tempo, track on/off, and reverb settings before recording.
Press [RECORD] (flashing), then [START/STOP] (stops flashing) to begin. Recording starts upon striking a pad.
Press [START/STOP] or [RECORD] to stop. Recording halts automatically when memory is full ('FL' displayed).
Press [PLAY/STOP] to play back the recorded song. Press again to stop. New recordings overwrite old ones.
MIDI (Musical Instrument Digital Interface) enables electronic instruments to communicate, allowing tone generation and control.
The unit has MIDI IN (receives data) and MIDI OUT (transmits data) terminals for communication with other devices.
Connect to MIDI keyboards or sequencers to control other instruments or record drum data.
Details pad type, drum voices, kits, songs, demo song, panel controls, connectors, power source, dimensions, and weight.
A comprehensive list of 76 percussion sounds with their respective Pad Assign Numbers.
Lists 20 preset and 1 custom Drum Kits, showing voice assignments for each pad and pedal in various kits.
Catalog of 100 songs (00-99), categorized by style (e.g., 8 Beat, 16 Beat, Dance, Rap, Latin, Swing).
Details transmitted and recognized MIDI functions, including Note Number, Velocity, Control Changes, and System Exclusive messages.
Explains the four MIDI modes (OMNI ON/OFF, POLY/MONO) that define how the unit responds to MIDI data.
| Display | LCD |
|---|---|
| MIDI In/Out | Yes |
| USB Connectivity | Yes |
| Metronome | Yes |
| Type | Electronic Drum Kit |
| Number of Drum Kits | 10 |
| Songs | 10 |
| Connectors | Headphone, Aux In, MIDI, USB |
| Power Supply | AC Adapter |
| Pads | 7 |