ENGLISH
44
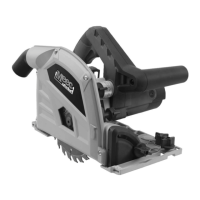
Guide rails and clamps (optional)
1. Guide rails are used for precise straight sawing. The guides also protect the surface of the
workpiece.
2. The guides are fastened to the workpiece with clamps.
3. Release the clamps by pressing the lock buttons. Adjust the clamps to the thickness of the
workpiece.
4. Place the guide rail on the workpiece and secure with the clamps. Place the arm in the slot in the
guide and tension the clamp with the lever. NOTE: Place the guide rail with the black foam-rubber
guard against the workpiece.
5. Place the tool on the guide rail. There is a slot (14) in the base, which fits over the top of the guide
rail.
Fine adjustment of play between base and guide rail
1. The play between the base and guide rail can be minimised by using the screws (6) for fine
adjustment.
2. Undo the fine adjustment screws anticlockwise.
3. If necessary, turn both fine adjustment screws (6) clockwise to minimise the play between the base
and the guide rail.
4. Tighten the fine adjustment screws clockwise.
Connectors for guide rails (optional)
1. To connect two guide rails together, insert the connector in one of the slots in the guide rail.
2. Insert the other connector in the other slot.
3. Tighten the grub screw with a 3 mm hex key to connect the guide rails together.
Sawing line
When using a guide rail, align the marking (0) on the front edge of the base with the marked sawing line
for straight sawing and mitre sawing at 45°.
Splinter guard for guide rail
The guide rail has a black protective strip made of rubber,
which must be cut to the right size before using it for the first
time. It counteracts splintering on the top of the workpiece.
When the guard has been cut it also shows exactly where the
sawing line will come.
Cutting the splinter guard to the correct width
1. Mark out a sawing line on the workpiece and align the guide rail accurately to the line.
2. Fix the guide rail on the workpiece with clamps.
3. Turn the selector (18) to the position for sawing along the sawing line. Set the speed to position 6.
4. Place the tool at the back end of the guide rail.
5. Start the tool and press down the blade. Cut the splinter guard along its entire length. This allows
the edge of the splinter guard to align accurately to the edge of the saw.
Plunge sawing with guide rail
1. Hold the tool firmly in the handles (3) and (13) with both hands.
2. Start the tool and wait until the motor has reached full speed.
3. Press down the tool slowly to the plunge sawing position.
NOTE: The sawing width indicators (16) on the side of the protective cover show the front and back
sawing points for the blade (Ø 165 mm) at maximum sawing depth when using the guide rail.