21
90-10183R30
GB
oh
MAINTENANCE
oti6
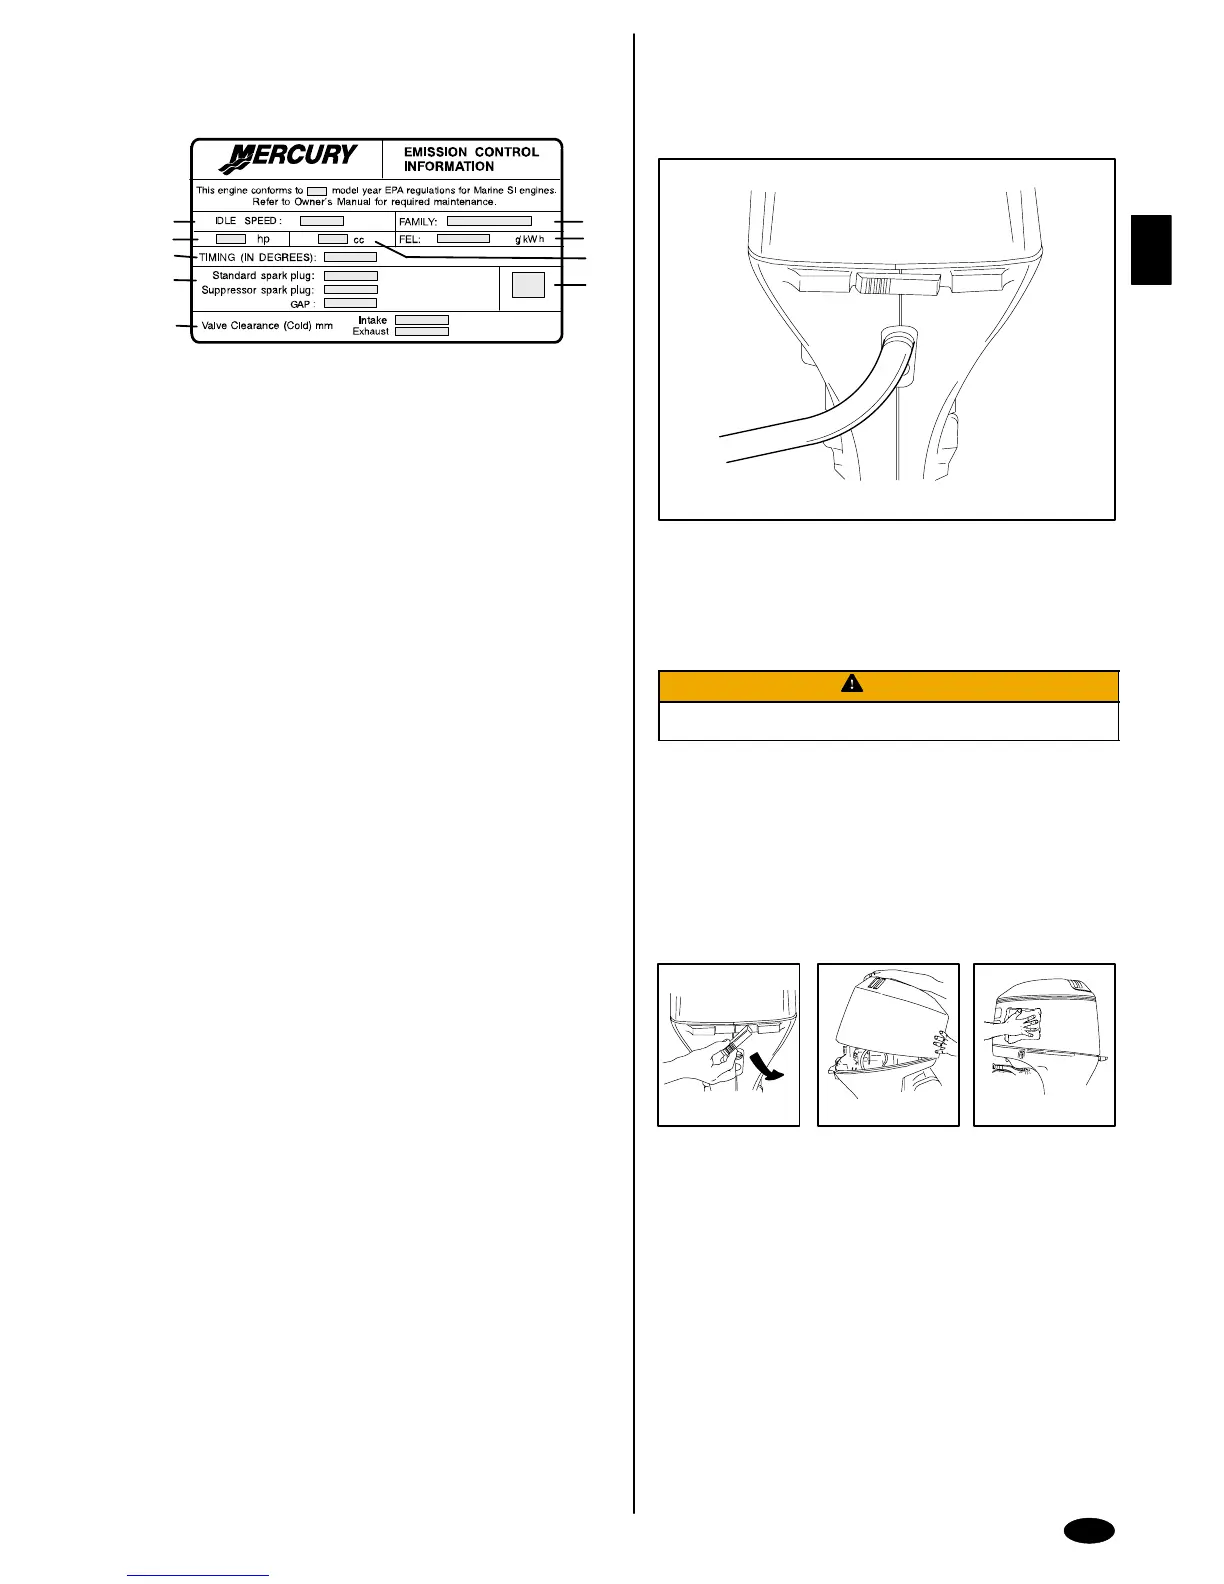
EMISSION CERTIFICATION LABEL
An emission certification label, showing emission levels and engine specifications
directly related to emissions, is placed on the engine at time of manufacture.
a
c
d
b
e
f
h
i
g
a.Idle Speed
b.Engine Horsepower
c.Timing Specification
d.Recommended Spark Plug & Gap
e.Valve Clearance (if Applicable)
f. Family Number
g.Maximum Emission Output for
the Engine Family
h.Piston Displacement
i. Date of Manufacture
oti7
OWNER RESPONSIBILITY
The owner/operator is required to have engine maintenance performed to maintain
emission levels within prescribed certification standards.
The owner/operator is not to modify the engine in any manner that would alter the
horsepower or allow emissions levels to exceed their predetermined factory
specifications.
ohd51
INSPECTION AND MAINTENANCE SCHEDULE
Before Each Use
1. Check engine oil level. (page 13)
2. Check that lanyard stop switch stops the engine.
3. Visually inspect the fuel system for deterioration or leaks.
4. Check outboard for tightness on transom.
5. Check steering system for binding or loose components.
6. Visually check steering link rod fasteners for proper tightness. (page 22)
7. Check propeller blades for damage.
After Each Use
1. Flush out the outboard cooling system if operating in salt or polluted water.
(page 21)
2. Wash off all salt deposits and flush out the exhaust outlet of the propeller and
gear case with fresh water if operating in salt water.
Every 100 Hours of Use or Once yearly, Whichever occurs first
1. Lubricate all lubrication points. Lubricate more frequently when used in salt
water. (page 24)
2. Change engine oil and replace the oil filter. The oil should be changed more
often when the engine is operated under adverse conditions such as extended
trolling. (page 24)
3. Replace spark plugs at first 100 hours or first year. After that, inspect spark plugs
every 100 hours or once yearly. Replace spark plugs as needed. (page 23)
4. Inspect thermostat visually for corrosion and broken spring. Make sure
thermostat closes completely at room temperature.*
5. Check engine fuel filter for contaminants. (page 22)
6. Check engine timing setup.*
7. Check corrosion control anodes. Check more frequently when used in salt
water. (page 22)
8. Drain and replace gear case lubricant. (page 25)
9. Lubricate splines on the drive shaft.*
10.Check and adjust valve clearance, if necessary. *
11. Check power trim fluid. (page 24)
12.Inspect battery. (page 22)
13.Check control cable adjustments. ∗
14.Inspect timing belt. (page 23)
15.Check tightness of bolts, nuts, and other fasteners.
Every 300 Hours of Use or Three Years
1. Replace water pump impeller (more often if overheating occurs or reduced
water pressure is noted).*
Before Periods of Storage
1. Refer to Storage procedure. (page 25)
∗ These items should be serviced by a authorized dealer.
goh88
1-5
ohe5
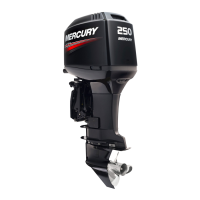
FLUSHING THE COOLING SYSTEM
Flush the internal water passages of the outboard with fresh water after each use
in salt, polluted or muddy water. This will help prevent a buildup of deposits from
clogging the internal water passages.
IMPORTANT: The engine must be run during flushing in order to open the
thermostat and circulate water through the water passages.
Note: You can have the outboard tilted or in the vertical operating position during
flushing.
WARNING
To avoid possible injury when flushing, remove the propeller. Refer to
Propeller Replacement.
1 Place the outboard in either the operating position (vertical) or in a tilted
position.
2 Remove propeller (refer to Propeller Replacement).
3 Thread a water hose into the rear fitting. Partially open the water tap (1/2
maximum). Do not open the water tap all the way, as this allows a high pressure
flow of water.
IMPORTANT: Do not run engine above idle when flushing.
4 Shift outboard into neutral. Start the engine and flush the cooling system for at
least 5 minutes. Keep engine speed at idle.
5 Stop the engine. Turn off the water and remove hose. Reinstall the propeller.
goh89
1
2
3
ohf2
TOP COWL REMOVAL AND INSTALLATION
Removal
1 Unlock the rear latch by pushing lever down.
2 Lift rear of cowl and disengage front hook.
Installation
Engage the front hook and push cowl back over the cowl seal.
Push cowl down and move the rear latch lever up to lock.
omi1
EXTERIOR CARE
3
Your outboard is protected with a durable baked enamel finish. Clean and wax
often using marine cleaners and waxes.