13
90-10183R30
GB
goe2
+20
+40
+60
+80
F° C°
0
+100
-7
+4
+16
+27
-18
+38
SAE
10W-30
SAE
25W-40
oe
FUEL & OIL
oej3
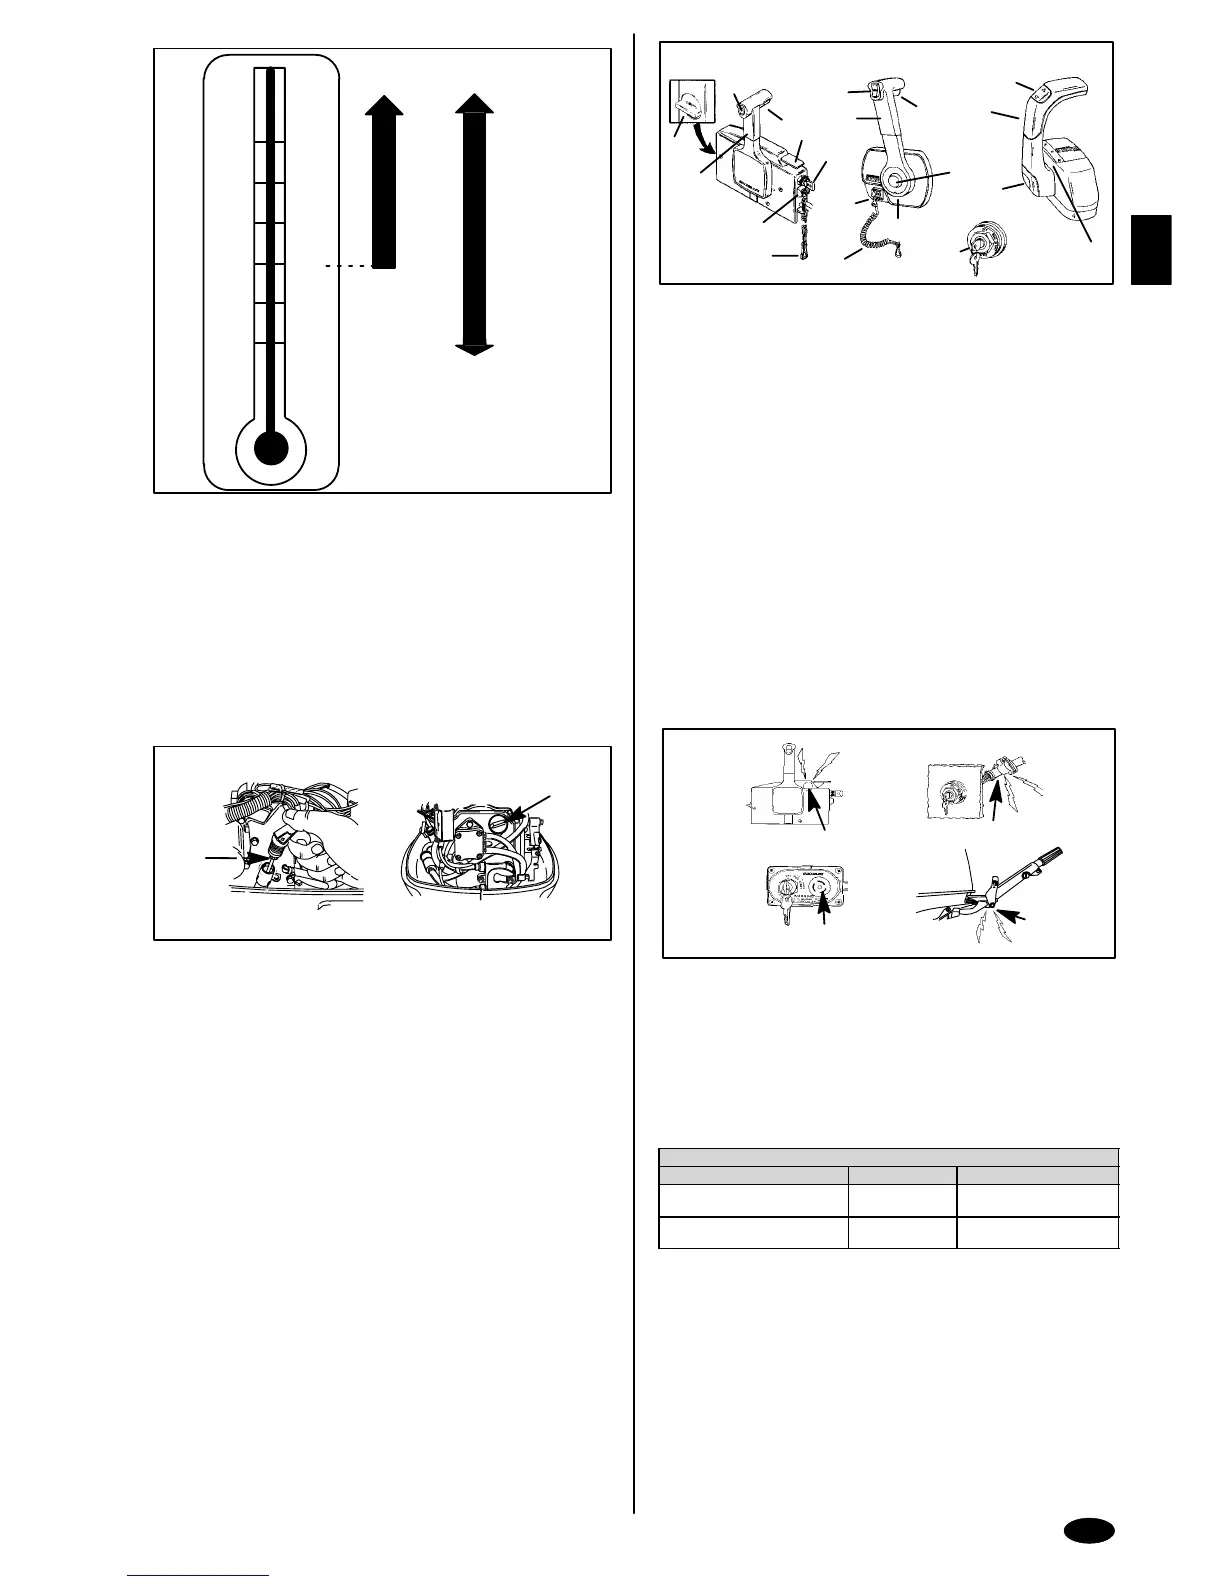
ENGINE OIL RECOMMENDATIONS
We recommend the use of Mercury or Quicksilver SAE 10W–30 multi–viscosity
4–stroke outboard oil for general, all–temperature use. If SAE 25W–40
multi–viscosity oil is preferred, (see chart above) use Mercury MerCruiser 4–cycle
engine oil or Quicksilver sterndrive & inboard 4–cycle engine oil. Never use
4–cycle engine oil that is not certified to meet or exceed any one or combination
of the following American Petroleum Institute (API) Service Classification SH, SG,
SF, CF–4, CE, CD, CDII. Severe engine damage may result from use of an inferior
oil.
RECOMMENDED SAE VISCOSITY FOR ENGINE OIL
• SAE 10W-30 viscosity oil is recommended for use in all temperatures.
• SAE 25W-40 viscosity oil may be used at temperatures above 40° F (4° C).
goe6
1-4
a
b
oen1
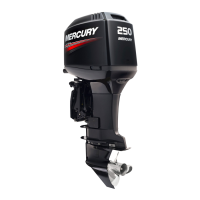
CHECKING AND ADDING ENGINE OIL
IMPORTANT: Do not overfill. Be sure that the outboard is upright (not tilted)
when checking oil.
1 Turn the engine off. Have the outboard in a level operating position. Remove
the top cowl.
2 Flip the handle up and pull out the dipstick (a). Wipe it with a clean rag or towel
and push it back in all-the-way.
3 Pull the dipstick back out again and observe the oil level. If the oil level is low,
remove the oil filler cap (b) and fill to (but not over) the upper oil level with the
recommended oil.
IMPORTANT: Inspect oil for signs of contamination. Oil contaminated with
water will have a milky color to it; oil contaminated with fuel will smell
strongly of fuel. If contaminated oil is noticed, have the engine checked by
your dealer.
4 Push the dipstick back in all the way, then flip the handle down to lock the
dipstick in place. Reinstall the oil filler cap and hand tighten securely.
gog142
1
2
3
4
5
6
7
8
9
1
1
2
3
3
4
5
7
9
6
6
og
FEATURES & CONTROLS
oge12
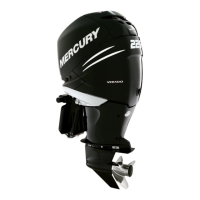
REMOTE CONTROL FEATURES
Your boat may be equipped with one of the Mercury Precision or Quicksilver
remote controls shown. If not, consult your dealer for a description of the functions
and operations of the remote control.
1 Control Handle – Forward, Neutral, Reverse.
2 Neutral Release Lever
3 Trim/Tilt Switch (if Equipped) – Refer to Power Trim Operation.
4 Lanyard Stop Switch – Read the Lanyard Stop Switch safety explanation and
Warning in the General Information Section.
5 Lanyard – Read the lanyard stop switch safety explanation and warning in the
General Information Section.
6 Throttle Friction Adjustment – Console Controls require cover removal for
adjustment.
7 Ignition Key Switch – Off, On, Start, Choke
8 Fast Idle Lever – Raising lever will increase engine idle speed in neutral. Refer
to Starting the Engine in the Operation Section.
9 Throttle Only Button – Pushing in the button will enable you to advance the
control handle for increasing engine idle speed without shifting outboard into
gear. Refer to Starting the Engine in the Operation Section.
1
a
b
d
c
ogb94
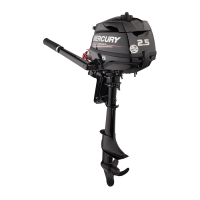
WARNING SYSTEM
1
The outboard warning system incorporates a warning horn inside the boat.
Remote control models will have the warning horn located inside the remote
control (a) or connected to the ignition key switch (b). Tiller handle models will
have the warning horn located in the ignition key panel (c) for electric start
models or below the tiller handle (d) for manual start models.
Warning System Operation
The warning horn will emit either a continuous beep or intermittent short beeps and
engine speed will be limited to 2000 RPM. This will alert the operator and help
identify the following listed situations.
Warning System
Function Sound Description
Engine Over Temperature Continuous Engine Over Heat. See
Explanation next page.
Low Oil Pressure Intermittent
Short Beeps
Low Oil Pressure. See
explanation next page.