22
90-10185R30
GB
goh93
1
3
5
2
4
oh
MAINTENANCE
oho55
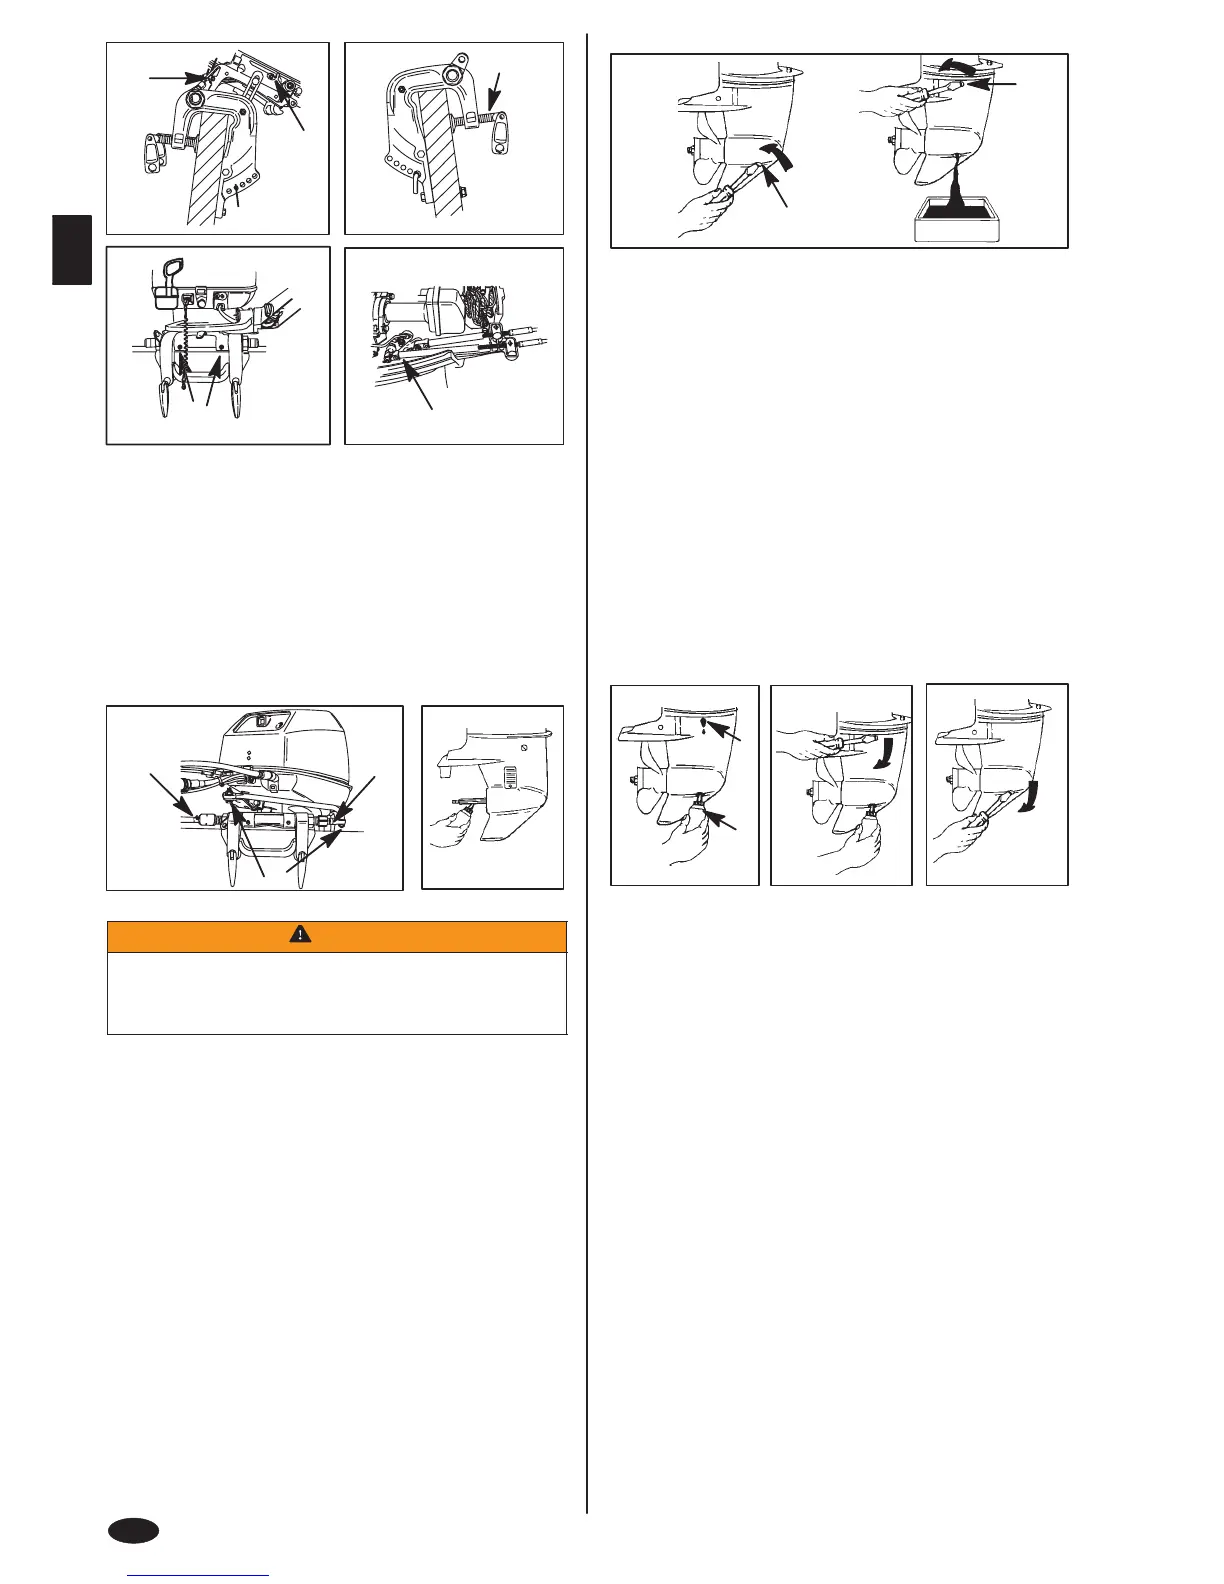
LUBRICATION POINTS
Lubricate Points 1 thru 6 with Quicksilver or Mercury Precision Lubricants
2-4-C Marine Lubricant with Teflon or Special Lubricant 101.
1 Steering Friction Adjustment Shaft (Tiller Handle Models) - Lubricate fitting.
2 Swivel Bracket - Lubricate fitting.
3 Transom Clamp Screws - Lubricate threads.
4 Tilt Tube - Lubricate fittings.
5 Lubricate the throttle and shaft cables, moving components and pivot
locations.
goh62
8
6-a
7
6-b
oho56
LUBRICATION POINTS (CONTINUED)
WARNING
The end of the steering cable must be fully retracted into the outboard tilt
tube before adding lubricant. Adding lubricant to steering cable when ful-
ly extended could cause steering cable to become hydraulically locked.
An hydraulically locked steering cable will cause loss of steering control,
possibly resulting in serious injury or death.
6 Steering Cable Grease Fitting (If Equipped) - Rotate steering wheel to fully
retract the steering cable end (a) into the outboard tilt tube. Lubricate through
fitting (b).
Lubricate points 7 With Light Weight Oil
7 Steering Link Rod Pivot Points - Lubricate points.
Lubricate Point 8 with Quicksilver Quicksilver or Mercury Precision
Lubricants Anti-Corrosion Grease or 2-4-C Marine Lubricant with Teflon.
8 Propeller Shaft - Refer to Propeller Replacement for removal and installation
of the propeller. Coat the entire propeller shaft with lubricant to prevent the
propeller hub from corroding to the shaft.
goh208
1-3
a
b
ohq2
GEAR CASE LUBRICATION
When adding or changing gear case lubricant, visually check for the presence of
water in the lubricant. If water is present, it may have settled to the bottom and will
drain out prior to the lubricant, or it may be mixed with the lubricant, giving it a milky
colored appearance. If water is noticed, have the gear case checked by your
dealer. Water in the lubricant may result in premature bearing failure or, in freezing
temperatures, will turn to ice and damage the gear case.
Whenever you remove the fill/drain plug, examine the magnetic end for metal
particles. A small amount of metal filings or fine metal particles indicates normal
gear wear. An excessive amount of metal filings or larger particles (chips) may
indicate abnormal gear wear and should be checked by an authorized dealer.
Draining Gear Case
1 Place outboard in a vertical operating position.
2 Place drain pan below outboard.
3 Remove fill/drain plug (a) and vent plug (b) and drain lubricant.
ohv10
Gear Case Lubricant Capacity
Standard model gear case: Approximately 6.8 fl. oz. (200 ml).
Bigfoot model gear case: Approximately 8.8 fl. oz. (260ml).
goh83
4
1-3
5
a
b
ohv3
GEAR CASE LUBRICATION (CONTINUED)
Checking Lubricant Level and Refilling Gear case
1 Place outboard in a vertical operating position.
2 Remove vent plug from vent hole (a).
3 Place lubricant tube (b) into the fill hole and add lubricant until it appears at the
vent hole (a).
4 Stop adding lubricant. Install the vent plug and sealing washer before removing
the lubricant tube.
5 Remove lubricant tube and reinstall cleaned fill/drain plug and sealing washer.
ohr1
SUBMERGED OUTBOARD
A submerged outboard will require service within a few hours by an authorized
dealer once the outboard is recovered from the water. This immediate attention by
a servicing dealer is necessary once the engine is exposed to the atmosphere to
minimize internal corrosion damage to the engine.

 Loading...