8
THE
FUEL
SYSTEM-----.---------
of
the
float-chamber lid.
The
prongs of
the
lever
should
just
rest
on
the
bar
(see Fig.
B.17)
when
the
needle is on its seating. If this is
not
so,
the
lever
should be
reset
at
the
point
where
the
prongs
meet
the
shank.
Care
must be
taken
not
to
bend
the
shank, which must be perfectly flat and at
right
angles
to
the
needle when it is on its seating.
Section
B.ll
CENTRING THE JET
First remove
the
clevis pin at base of
the
jet,
which
attaches
the
jet
head
to
the
Jet operating
lever;
with-
draw
the
jet
completely, and remove
the
adjusting
nut
and
the
ad] ustlng
nut
spring. Replace
the
adjust-
ing
nut
without
its spring and screw it up
to
the
highest
position. Slide
the
jet
into
position until
the
jet
head
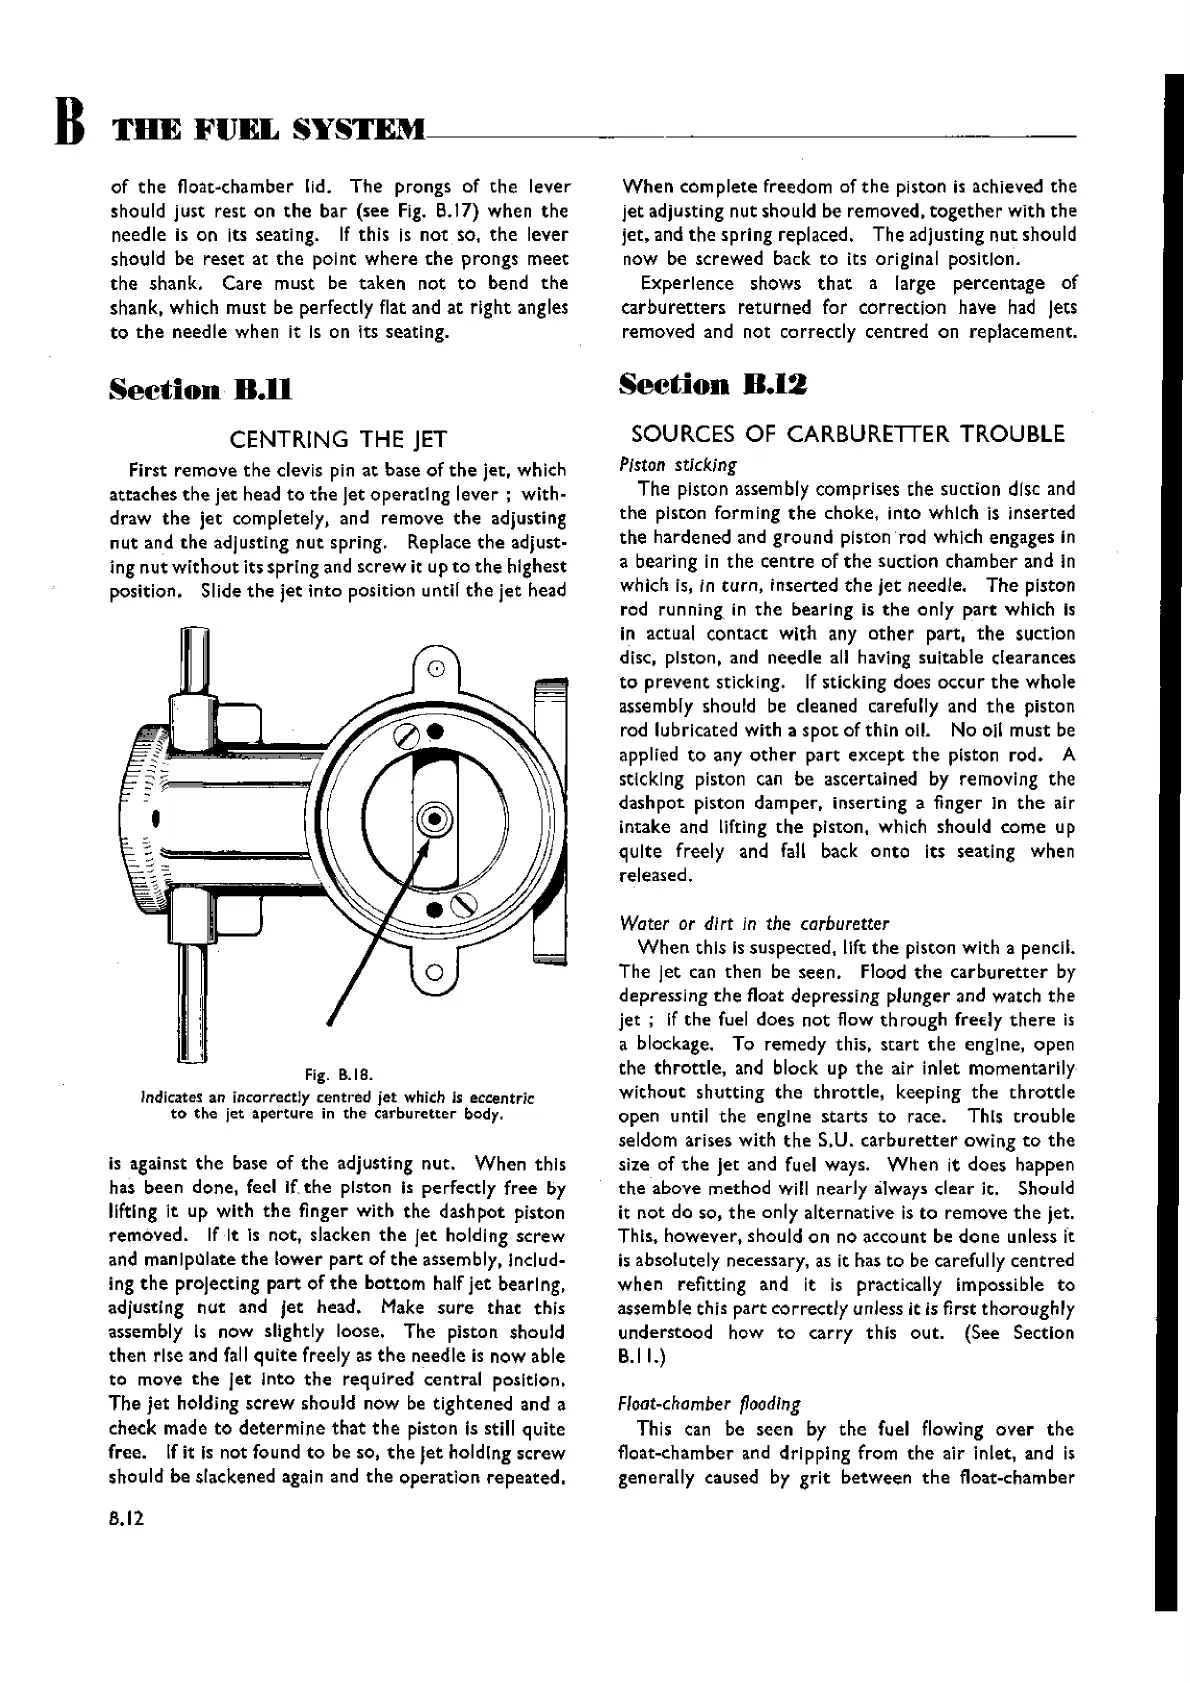
Fig. B.18.
Indicates an incorrectly centred
jet
which Is eccentric
to
the
jet
aperture
in
the
carburetter
body.
is against
the
base of
the
adjusting nut.
When
this
has been done, feel
If
the
piston is perfectly free by
lifting it up with
the
finger with
the
dash
pot
piston
removed. If It Is not, slacken
the
jet
holding screw
and manipulate
the
lower
part
of
the
assembly, lnclud-
ing th e proJecti ng
part
of
the
bottom
half
jet
bearl ng,
adjusting
nut
and let head. Make
sure
that
this
assembly Is now slightly loose. The piston should
then
rise and fall
quite
freely as
the
needle is now able
to move
the
jet Into
the
required central position.
The
jet
holding
screw
should now be tightened and a
check made
to
determine
that
the
piston is still
quite
free. Ifit is not found
to
be so,
the
jet
holding screw
should be slackened again and
the
operation
repeated.
B.12
When
complete freedom
ofthe
piston is achieved
the
jet
adjusting nut should be removed,
together
with
the
jet.
and
the
spring replaced. The adjusting
nut
should
now be screwed back
to
its original position.
Experience shows
that
a large percentage of
carburetters
returned
for correction have had Jets
removed and not correctly
centred
on replacement.
Section
B.12
SOURCES
OF CARBURETIER TROUBLE
Piston
sticking
The piston assembly comprises
the
suction disc and
the
piston forming
the
choke, into which is inserted
the
hardened and
ground
piston rod which engages in
a bearing in
the
centre
of
the
suction chamber and In
which is, In
turn,
inserted
the
jet
needle.
The
piston
rod running in
the
bearing is
the
only
part
which is
in actual contact
with
any
other
part,
the
suction
disc, piston, and needle all havlng suitable clearances
to
prevent
sticking. If sticking does
occur
the
whole
assembly should be cleaned carefully and
the
piston
rod lubricated with a
spot
of thin
011.
No
011
must be
applied
to
any
other
part
except
the
piston rod. A
sticking piston can be ascertained by removing
the
dashpot piston damper, inserting a finger In
the
air
intake and lifting
the
piston. which should
come
up
quite
freely and fall back
onto
its seating when
released.
Water or dirt in the carburener
When
this is suspected,
11ft
the
piston with a pencil.
The Jet can then be seen. Flood
the
carburetter
by
depressing
the
float depressing plunger and watch
the
jet;
If
the
fuel does
not
flow th rough freEly th
ere
is
a blockage. To remedy this,
start
the
engine, open
the
throttle,
and block up
the
air inlet momentarily
without
shutting
the
throttle,
keeping
the
throttle
open until
the
engine
starts
to
race. This
trouble
seldom arises with
the
S.U.
carburetter
owing
to
the
size of
the
jet
and fuel ways.
When
It does happen
the
above method will nearly always clear it. Should
it
not
do so,
the
only alternative is
to
remove
the
jet.
This, however, should on no account be
done
unless it
is absolutely necessary, as it has
to
be carefully
centred
when refitting and it is practically impossible to
assemble this
part
correctly
unless it is first thoroughly
understood how
to
carry
this
out.
(See Section
B.II.)
Float-chamber
~oodlng
This tan be seen by
the
fuel flowing
over
the
float-chamber and drl pplng from
the
air inlet, and is
generally caused by
grit
between
the
float-chamber
Wishvilles Classic
Automobile Library
 Loading...