C
THE
IGNITION"
EQUIPMENT~~~~~~~~~~-
4
J
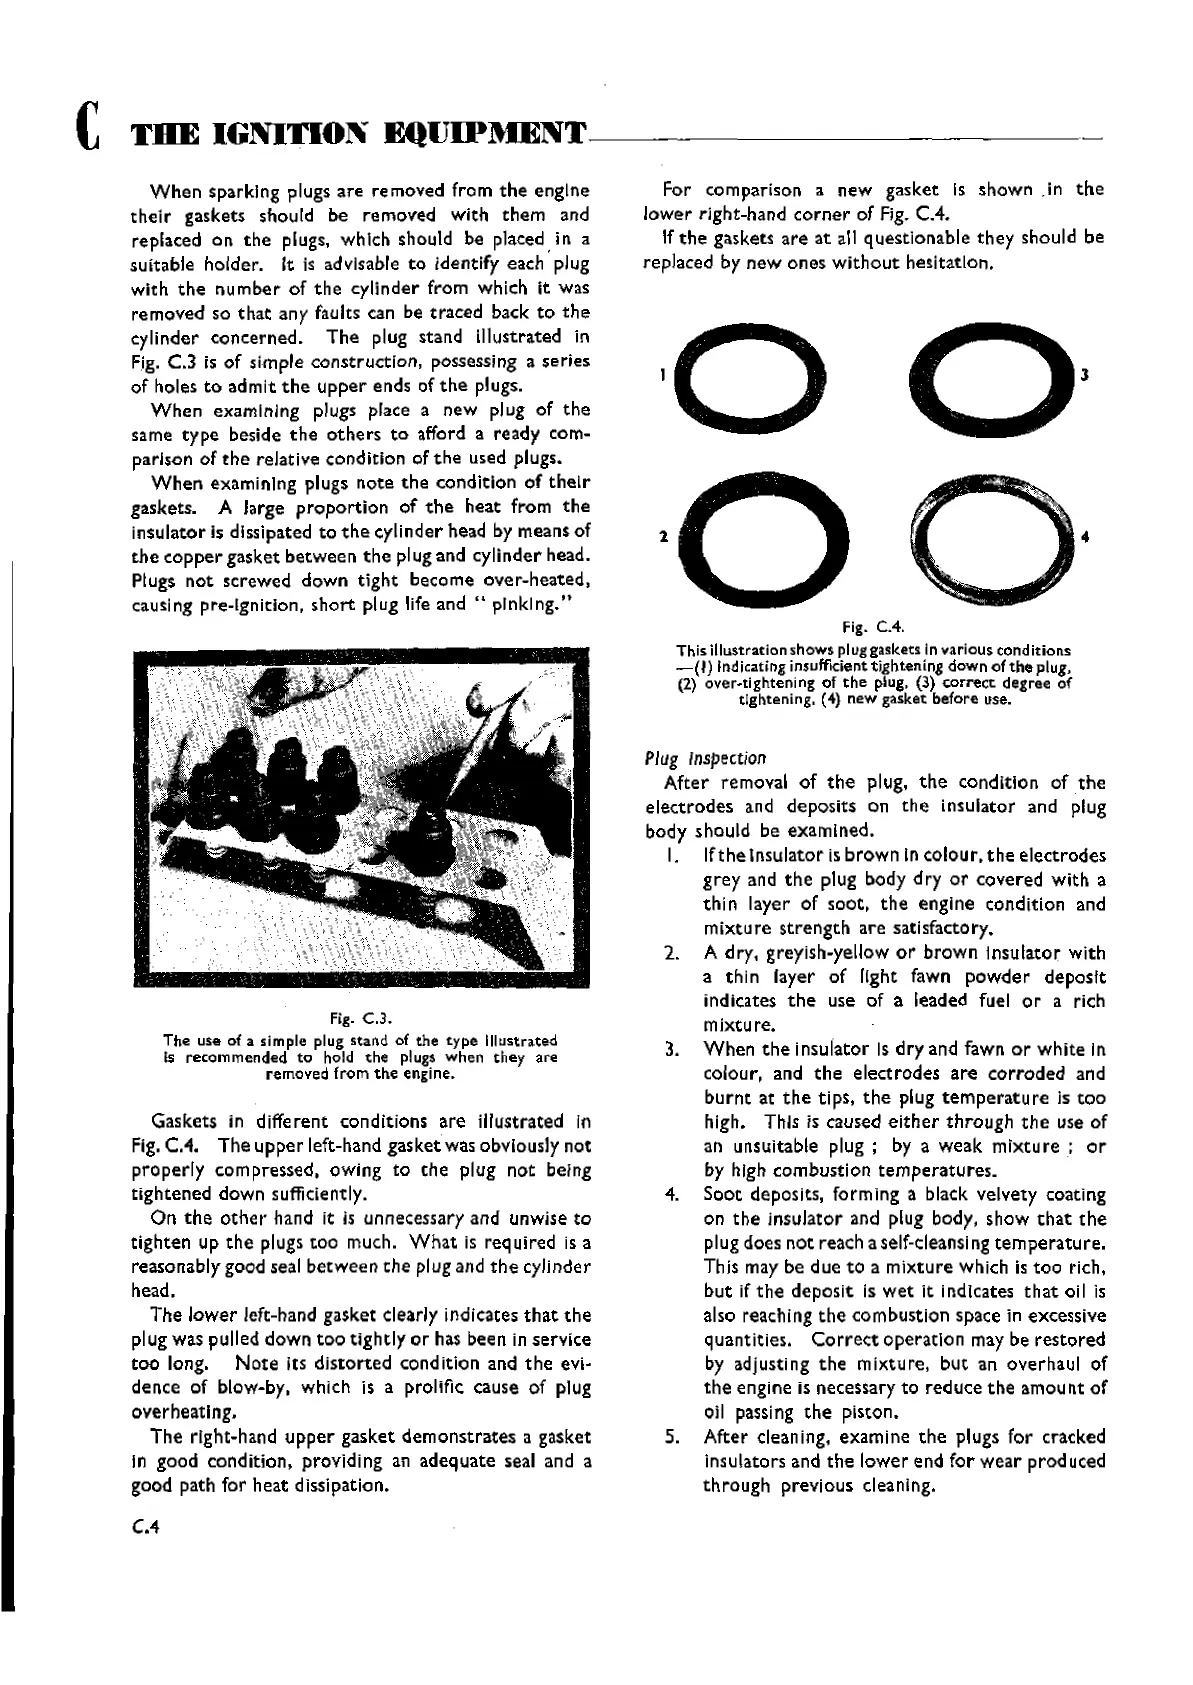
Fig.
CA.
This illustration
shows
piuggaskets in various eond itions
-(
I) Indieating insufficient tightening
down
of
the
plug,
(2) over-tlghtening of
the
plug. (3)
correct
degree
of
tightening. (4)
new
gasket
before
use.
1
Plug
Inspection
After
removal
of
the
plug,
the
condition
of
the
electrodes
and
deposits
on
the
insulator
and plug
body
should
be
examined.
I. If
the
Insulator
is
brown
In
colour.
the
electrodes
grey
and
the
plug
body
dry
or
covered
with
a
thin
layer of
soot,
the
engine
condition
and
mixture
strength
are
satisfactory.
2. A
dry,
greyish-yellow
or
brown
Insulator
with
a
thin
layer
of
light fawn
powder
deposit
indicates
the
use of a leaded fuel or a rich
mixture.
3.
When
the
insulator
Is
dry
and fawn
or
white
in
colour, and
the
electrodes
are
corroded
and
burnt
at
the
tips,
the
plug
temperature
is
too
high. This is caused
either
through
the
use of
an unsuitable
plug;
by a
weak
mixture;
or
by high
combustion
temperatures.
4.
Soot
deposits, forming a black velvety coating
on
the
insulator
and plug body,
show
that
the
plug does
not
reach a self-cleansing tern pe ratureo
This may be
due
to
a
mixture
which is
too
rich,
but
if t he
deposit
is
wet
it indlcates
that
oi I is
also reaching
the
combustion
space in excessive
quantities.
Correct
operation
may be
restored
by adjusting
the
mixture,
but
an
overhaul
of
the
engine is necessary
to
reduce
the
amount
of
oil passing
the
piston.
5.
After
cleaning,
examine
the
plugs for cracked
insulators and
the
lower
end
for
wear
produced
through
previous
cleaning.
For comparison a
new
gasket
Is
shown
.ln
the
lower
right-hand
corner
of Fig. CA.
If
the
gaskets
are
at
all
questionable
they
should be
replaced by
new
ones
without
hesitation.
Gaskets
in dlffe
rent
conditions
are
illustrated
In
Fig.
CA.
The
upper
left-hand
gasket
was obviously
not
properly
compressed,
owing
to
the
plug
not
being
tightened
down
sufficient Iy.
On
the
other
hand It is unnecessary
and
unwise
to
tighten
up
the
plugs
too
much.
What
is
required
is a
reasonably good seal
between
the
plug and
the
cylinder
head.
The
lower
left-hand gasket clearly indicates
that
the
plug was pulled
down
too
tightly
or
has been in
service
too
long.
Note
Its
distorted
condition
and
the
evi-
dence
of
blow-by, which is a prolific cause
of
plug
overheating.
The
right-hand
upper
gasket
demonstrates
a gasket
In
good
condition.
providing
an
adequate
seal and a
good
path for
heat
dissipation.
Fig.
C.3.
The use of a simpie piug stand of
the
type
Illustrated
Is
recommended
to
hold
the
plugs
when
they
are
removed
from
the
engine.
When
sparking plugs
are
removed
from
the
engine
their
gaskets should be
removed
with
them
and
replaced on
the
plugs, wh1ch should be placed, in a
suitable holder. It is advisable
to
identify each plug
with
the
number
of
the
cylinder
from
which it was
removed
so
that
any faults can be
traced
back
to
the
cylinder
concerned.
The
plug stand
illustrated
in
Fig. C.3 is
of
simple construction, possessing a
series
of
holes
to
admit
the
upper
ends of
the
plugs.
When
examining plugs place a
new
plug of
the
same
type
beside
the
others
to
afford a
ready
com-
parison of
the
relative
condition
of
the
used plugs.
When
examining plugs
note
the
condition
of
their
gaskets. A large
proportion
of
the
heat
from
the
Insulator Is dissipated to
the
cylinder
head by means of
the
copper
gas
ket
betwee
n
the
piug
and
cyli
nder
head.
Plugs
not
screwed
down
tight
become
over-heated,
causing pre-Ignition.
short
plug life
and"
pinking."
C.4
Wishvilles Classic
Automobile Library
 Loading...